Monday, January 31, 2011

String Heart Block with a Bonus

Sophie's Heart #8
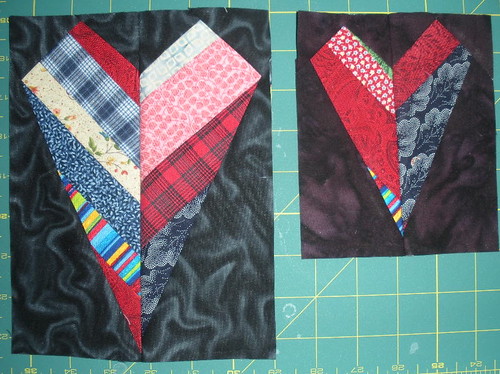
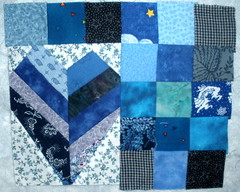
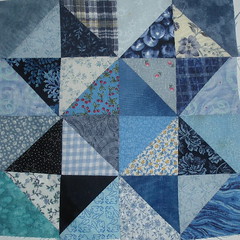
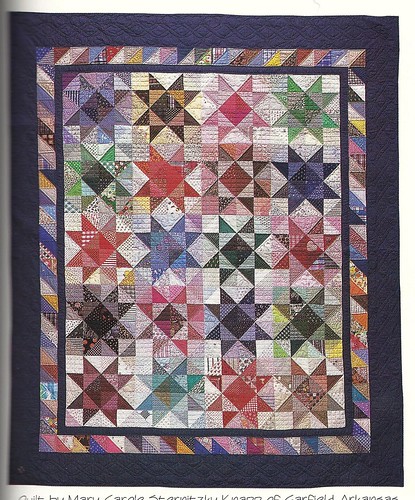
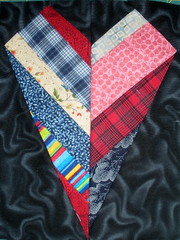
This 6 inch by 8 inch (finished size) heart block is made in two steps: First you make the string pieced rectangles and then you use it to piece the heart block.

Many quilters have posted good directions online for how-to make string blocks. Kate published the basics on the Block Lotto blog when we made string pairs, here:

January Block Lotto String Square Pairs

Bonnie Hunter has a String piecing primer on her Quiltville site here:

String Quilting Primer


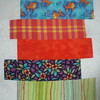
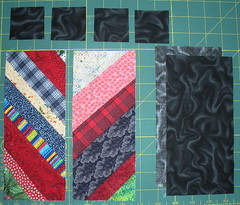
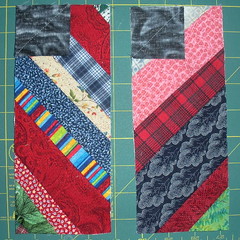
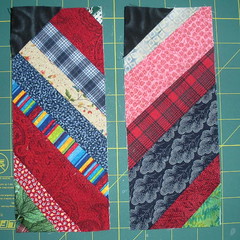
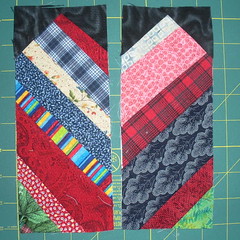
You’ll need two 3-1/2 by 8-1/2 inch rectangles of string fabric for each heart block —the strings should be at an angle and you’ll need a pair: one right leaning and one left leaning, arranged so that they form a V shape. You could piece each rectangle individually on a 4 x 9 inch foundation, or you might string piece something larger (maybe an 8 x 9 rectangle or 9 inch square, and then cut it to size.
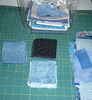
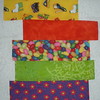
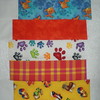
FABRIC REQUIREMENTS

Fabric CuttingFor each block, you’ll need:
• Two string rectangles 3.5 x 8.5 (1 Left-leaning and 1 Right-leaning
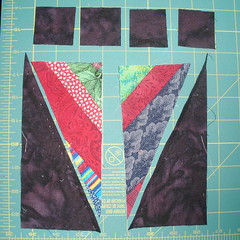
• Four 2-inch squares of background
• One or Two background rectangles 4 x 8 inches

NOTE: Cut ONE back ground rectangle if your fabric is solid or dyed and looks the same on both sides (no right side). Cut TWO if your fabric is printed and/or has a right side and a wrong side.

Slice rectangle diagonally
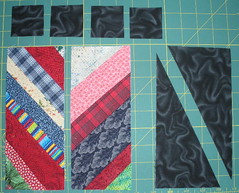
Slice the rectangle diagonally from corner to corner. If you are cutting TWO (print) Rectangles, you MUST stack and align them with WRONG SIDES TOGETHER before cutting the diagonal. You will end up with two mirror image triangle pairs (and can use the second pair for another block.

If your fabric is solid or dyed and is the same on both sides, you will cut ONE rectangle and flip over one of the rectangles to make a pair of mirror image shapes.

SEWING THE BLOCK

1. Align a square, face down, with the top left corner of each of the string rectangles.
2. Sew across the square, diagonally from corner-to-corner. You can draw the line before you sew if that makes it easier—remember you are going to sew ON the line.
3. Trim the excess fabric (in the corner) away, 1/4 inch from your seam.
4. Press.

DSCN5973 DSCN5974 DSCN5975

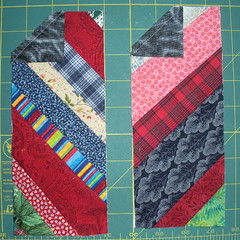
5. Repeat with the other two squares in the top right corners of the string rectangles.

DSCN5976 DSCN5977 DSCN5978

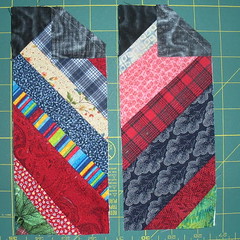
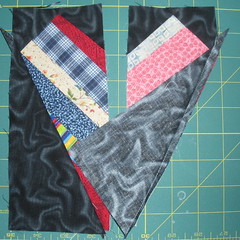
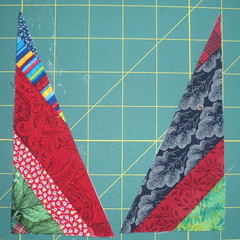
6. Lay out your block, placing the triangles on top for reference.

DSCN5979

DSCN5980 
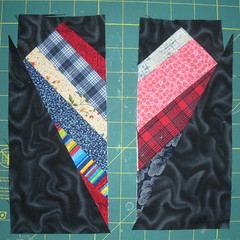
7. Flip one over and align the long edge of the triangle so that:
• it is even with the intersection of the seam at the outside edge of the rectangle
• it crosses the bottom edge of the string rectangle 1/4 inch away from the point (so your seam will go through the point.
8. Sewn the triangle in place,
9. Fold back the triangle after it’s sewn and MAKE SURE that the triangle covers the rectangle underneath. DO NOT trim or press anything until you have checked.

The placement of the triangles does NOT have to be exact. Remember this is supposed to be fun. If you are having problems, try sliding the triangle up or down on the rectangle … or cut a larger rectangle to start.

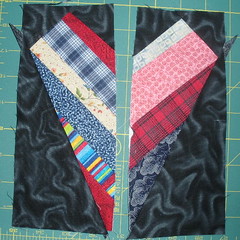
10. Repeat on the other side.
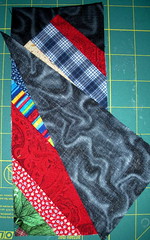
11. Fold back the triangle and trim the excess string fabric away … but DON”T toss it.

Check before trimming Cut away extra string fabric

12. Press.
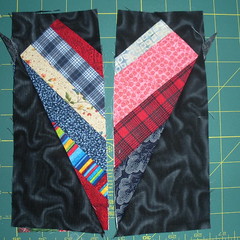
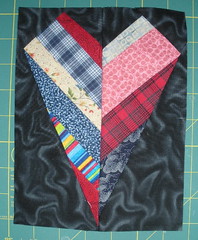
13. Sew the two halves of your heart block together.

Pressed and ready to join Finished block

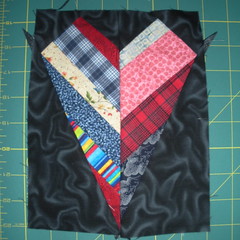
14. Press and square up and trim to 6-12/ inches wide and 8-1/2 inches tall.

Squared up and Trimmed to size

BONUS BLOCK

I couldn’t toss the large triangles of string fabric that I cut away in step 11 … and noticed when I flipped them over, I saw the beginnings of a smaller heart block. I used 1-3/4 inch squares and a 3.5 x 7 rectangle. The sewing order is a little different for this one: you’ll need to sew the triangles together first, then add the squares at the top.

Removed Triangles Flip them and imagine a smaller heart block Making a heart from bonus triangles

As you can see, the bonus block is a bit smaller with slightly different, but similar proportions to the “parent block”.

Finished block with bonus block

Monday, January 24, 2011

Blue Monday

First, scrappy blue stars on the design wall:

Blue star blocks

After correcting my bad math and ideas about color, I'm now aiming at averaging 17 blocks each in red, orange, yellow, green, blue, violet and tan/brown. Today I made more of the blue blocks, but stopped at 13 when I ran out of "light" blues in the scrap bin.

In other blue news, I quilted and bound the blue scrap mug rug . . .  and took it for a trial run this afternoon.

Blue Scraps mug rug

It's all set to go into the office and add a little color and whimsy to my very boring beige office.

I had a couple more blue projects (new and WIPs) in mind for the rainbow scraps challenge--with a week to go until the end of the month, I'm not sure how many will be completed before we move onto a new color for February.

Click over to Judy's Design Wall Monday blog post to see what other quilters have on their design walls. 

Saturday, January 22, 2011

Friday Night ... Saturday Morning

One blockHere's one of my first blocks made from the feedsacks: It is perfectly imperfect and so quick to make.

I cut into two of the feedsacks last night in class and woke up this morning anxious to add some of the other sacks, so I could begin to see whether or not they're going to play nicely together, so I made blocks from two more.  Here's my first dozen.

The first dozen

It's unlikely the blocks will end up in anything like this straight set, but it's kind of interesting to see them side by side like this. 

Nanci sharing someone's first blocksIn a class like this, where everyone is starting with fabrics from their stash, it's always fun to see what everyone else is using.  It turns out that quite a few of us are working out of our comfort zone--across the table from me, Karen is using pretty, soft water-color-like fabrics and Mary is using some fabrics from a baby print line--including a panel that may end up on the front or as some kind of back art.

Nanci is showing off someone's blocks made from CW repros--I loved the shirting fabrics she was using.

Here are some of the other colorways from the group:

Brights with Black and White This is one of a set of brights with black & white prints, which would probably have been my usual choice ;-)

There were two or three students at each table, making blocks from dramatically different colorways.

Pink with Black/White/Pink prints CW repros and soft pastells

Friday, January 21, 2011

Feedsacks

FeedsacksWhen Terri commented on my previous post about my choice of "repros" to make Nancie's Road Trip quilt, I realized I wasn't clear. When I said feed sacks, I was talking about real, vintage, from the 1930's and 40's feed sacks.

Here's my meager collection, after I finished pressing them last night.  I didn't realize until I pulled them our of my stash that half of them have paisley designs (and some of the leaves on the other half have paisley-like qualities.)

It's interesting to compare these textiles to modern quilting cottons.  The fabric is narrower--from selvage to selvage it's 36 inches--and more loosely woven.

I don't know how many of the 7 sacks will end up in my quilt--there are one or two that definitely have a "not like the others" quality . . . though I'm not sure if that's a reason to take them out or keep them in.   Plus, I keep thinking that the one with the big bold red scrolls and blue flowers could become the most adorable apron . . .

Wednesday, January 19, 2011

Friday Night Synchronicity

The first Friday Night Sew In (FNSI) of the year is taking place this Friday ... will you be joining the 100 or so quilters that have already signed up? You can read the details and see the impressive list on Heidi's blog, Handmade by Heidi.

I will be beginning a BYOS (Bring Your Own Stash) class, taught by Nancie V--one of the friendliest and most welcoming local quilters.  When I saw her sample quilt top, I thought the block was interesting ... maybe because it wasn't immediately obvious how it was made.


I thought the block looked very traditional and was probably made with templates or some specialty ruler, but based on what I know of Nancie, that didn't seem like a Nancie choice.  This kind of "we're all making the same quilt" class is not my usual thing, nor are templates or specialty rulers, but this quilt was calling my name . . . then when I was chatting with Nancie at the quilt shop's open house, she quietly told me it was made using LIBERATED quilting techniques and I knew I wanted to make it

I've decided to run with the traditional impression it made on me and plan to use some feed sacks that have been in my stash for a while ... along with a couple I recently won on eBay after I decided that I needed just a little more variety.   I'm really looking forward to seeing what everyone else in class will be choosing from their stash.

Tuesday, January 11, 2011

Lost & Found - a Doll Quilt

I hear yesterday that my last quilt project of 2010 has safely arrived at it's destination, so it can go public.

Lost & Found - A Doll Quilt

It's constructed of 3 inch house blocks - a smaller version of 6 inch paper foundation pattern I designed for the Block Lotto in 2008 (also the year I nearly finished this little quilt for Kate ... before I packed it up to move with me and lost it).  I found it last month when I turned my apartment upside down looking for my walking foot ... which I was afraid I had lost in my most recent move.

Lost & Found - Quilting DetailTo make each of the house blocks, I only needed a charm square of fabric, these are from a set of Moda's most popular "marbles."  The background really is a dark navy batik--maybe a bit darker than the photo).

I had a lot of fun making the quilt ... and was a little brokenhearted when I thought it had been lost in the move from Michigan to Texas. The quilting is far from perfect (and in this photo, I can see a quilting thread that wasn't yet snipped--I sure hope I caught that before it went into the mail.) I remember tormenting myself over the choice of binding fabric. Along with my fear of the free motion quilting in the borders, that was probably what kept me from getting to done BEFORE the big move. It all seems pretty silly in retrospect.

I do hope you enjoy your Lost and Found quilt, Kate.

If you like this block, check out the wonderful quilt Julie made from the blocks she won in the lotto here.

Sunday, January 09, 2011

I'm ready ...

Today I made veggie stock and am ready for all the soups I know I'm going to want to make this week and I finished these.  (Coincidentally, when I blogged about my veggie stock it was almost exactly a year ago.)

Finished mitts for me

They are actually predicting snow for Dallas ... here it will "just" be hard freezes at night and not very highs during the days. (It's kind of amazing how quickly one can adapt to warm weather ;-)

And now that I have made the PERFECT variation of the Braided Mitts pattern for me and the weather is going to be frosty, I am ready to knit something a little more substantial.

Saturday, January 08, 2011

A scrappy blue update report

I wanted to make a clever connection between blue scraps to Elvis' Blue Suede shoes in honor of his birthday today, but I'm just not that clever ...

Almost a Mug RugI pieced this 7-1/2 by 9 inch quilt-let  from my blue scraps in the evenings after work this week. I hope to quilt and bind it this weekend and take it into the office and put it to good use as a mug rug next week. Coincidentally, on her blog this week, Angela blogged about using blue strings to make star blocks. As you might guess from the heart block I featured in my little mug rug project (and the string heart in the Block Lotto Blog Button quilt), I enjoy using strings as fabric, too.

I also kept putting my triangle squares together and have completed eight 8-inch blocks.

My scrappy blue stars

I am liking them and know I will like them more when I start adding blocks in other colors. I'm already looking forward to finding out what the color for February will be.  I confess I am also seriously considering spending some extra salary (from some OT this week) on a GO Baby to make cutting all those triangles from scraps a little faster.

To see what other Rainbow Scraps challengers made from their blue scraps this week, check out the Mr. Linky links on Angela's  Saturday Check-in on her blog, soscrappy.

Friday, January 07, 2011

Slimmer, Smaller, X-small and Just Right

Smaller Braided MittsA couple days before Christmas, the weather became a little bit frosty and I remembered some fingerless gloves that Julie had made and written about a couple months earlier.  At the time, she was asking if they would be worn by people in Wisconsin in winter . . . while they might not work so well for Winter in Wisconsin, as I was walking across the office park to get a warming latté in the cafe in another building, I was thinking they were PERFECT for cold winter days in Austin, Texas.

I contacted to Julie to find the pattern--I decided they were a great last minute Christmas idea for a friend.  Julie told me I could find Tera Johnson's Braided Mitts on Ravelry and suggested that I use a smaller needle because they were on the large side.  I pulled some nice wool out of my stash and started knitting ...

I never finished the first pair because, even before I had added the thumb and the ribbing at the top, it was clear they were going to be STILL way too big for me and I knew they'd never work for my petite friend whose hands had to be at least as small as mine. 

So when I saw my friend over the holiday, I showed her photos from the Ravelry site and looked at everyone's Braided Mitts projects and decided on a color and yarn.  Then we traced her hand, mitten style, so I'd have something to use to compare as I reworked the pattern.While I waited for the yarn I ordered for her (Debbie Bliss Cashmerino in Grape--a dark red-violet), I worked on making the pattern fit.

I felt a little like Goldilocks, first making a slimmer pair from a tweedy brown wool ... that felt too long, then making a smaller pair (in the photo above), which was OK for me, but still too large for Charisse, then making the extra small pair from the grape yarn.

Braided Mitts in three sizes

It's hard to see the pattern in the dark yarns, but they are all the same, with the single braided cable on the top.

Tonight I am meeting Charisse and another friend after work ... fingers crossed that the "slimmer" brown tweedy pair and the X-small grape pair fit. The timing, at least, is good. Temps are predicted to drop dramatically over the weekend and stay there for a couple weeks. I have a feeling that I'll have an opportunity to wear sweaters and coats that have been too heavy for Texas.

Braided Mitts - one more pairI couldn't resist ordering a ball of the luscious Cashmerino yarn for me, too ... so I'll knit one more pair for me, tweak the pattern slightly and have a pair that will be "just right."  I'll be tucking this into my bag and working them up quickly.  I figure once the cold weather hits, I'll REALLY be in the mood to knit.

Monday, January 03, 2011

Quilting Tools & Gadgets

As I was cutting the 144 individual blue squares from my scraps yesterday (72 light, 36 medium and 36 dark), I started to think that maybe I could justify the purchase of a GO or other fabric cutter ... at least in the fantasy in my head, it would make all that cutting easier and more accurate.  As I repeat this exercise each month and work my way through my scraps for the larger project I have in mind for the Rainbow scrap challenge, it'll be interesting to see if I decide it IS worth it ;-)

A few of my favorite toolsIn the meantime, after dinner tonight, I was quilting "old school,"using some of my tried and true quilting tools to square up and trim the 144 triangle squares. For me, I still like the design of Quilt-in-a-Day's half-square triangle specialty ruler. Since you are trimming the units BEFORE you open and press them, you only have to trim the squares on 2 sides. I don't know if they are still making Brooklyn Revolvers, but mine is still going strong and perfect for trimming smallish blocks. I still love my ergonomic rotary cutter, too. I was thinking tonight that I don't think I could ever go back.

Do you have a tried and tool quilting tool that has stood the test of time? I'd love to know about it--these days I really have to be convinced that the latest-greatest gadget, ruler or other product is really going to work for me before I buy . . .

The first of many After all 144 of the triangle squares were trimmed and pressed, I had to stay up a little be later (on a school night!). so I could make the first block. I may decide I cannot live with that one really badly matched seam, but otherwise, I like it. Over the weekend I envisioned a quilt made of 100 of these 8 inch blocks and was thinking I could make 9 of the 9 designated "colors" of the challenge ... except tonight I realized that nine times nine is not 99 which was the basis for yesterday's plan, so . . .  I'm working on a new plan, probably for a smaller quilt ;-)

FYI, here's one example of the scrap quilt design that inspired me.

Scrappy Inspiration

This quilt, Charm Stars Quilt is from Leisure Art's book Quilt an Easy Scrap Quilts. It was made by Mary Carol Sternitzky of Garfield, Arkansas. 

This is a smaller quilt than I have planned (even with my new corrected math) made from larger (12") star blocks than my 8 -nchers.  My quilt won't be a charm quilt--I will use the same fabric more than once  if there's enough in my scrap bags to cut more than one 3-inch square. My borders will almost certainly be different ... but I hope all my scrappy triangles will tinkle like these ;-)

Sunday, January 02, 2011

I'll press and trim them ... tomorrow

144 triangle squaresHere are 144 triangle squares, ready to be pressed and trimmed to 2 inches. I thought I'd have a design wall full of half-square triangles at the end of the night, but I decided to stop here.

They will be used for one of my projects for Soscrappy's Rainbow Scrap Challenge this month. Like Andra, I plan to make some monochromatic blocks each month in the designated color and put them all together for a colorful, scrappy quilt at the end of the year. Along the way, I hope to reduce my scraps ... a LOT.  Each month I will be taking my scraps out of the jumbo zip lock bags where they live now and pressing and folding them into new storage–I have been hanging onto those large lightweight plastic tubs that hold a pound of spinach or salad and thinking they might be repurposed into stackable storage for scraps and projects.
My old scrap storage system my new scrap storage idea ironing, folding and cutting 144 squares

My lotto blocks for January are in a much more finished state--I finished them before earlier this afternoon ... before diving into my scraps:

Sophie's Stack #7 Sophie's Stack #8 Sophie's Stack #9  

The block pattern is my variation on the traditional Chinese Coins quilt pattern.  You can find the pattern here - Stacking (Quilt) Blocks.  I think these 10" blocks would make a fun (and quick) kid's quilt and I plan to make one for the Austin Guild's "baby bundle" charity effort.

The seem to be a hit with the sneak peekers (who earned an advance look a week ago). By the first of January, there were already 85 blocks made.  Here's a look at a "virtual quilt" made from 60 of them.


I think these blocks are a great way to use jelly rolls or noodles (or whatever you call 2-1/2 inch wide strips) or scraps and use big enough strips so you can SEE the fabrics. I like the whimsical look of imperfectly stacked "coins," too.
Related Posts Plugin for WordPress, Blogger...