Showing posts with label Quilt Block Patterns. Show all posts

Saturday, February 04, 2017

More Playing with (Small) Scraps


Purple and Teal ScrapsI have been making more made fabric squares ... mostly because I don't have a lot of scraps large enough to do something useful for the Rainbow Scraps Challenge.

These two squares are approximately 7 1/2 inches square: purple to finish up the January color for the Rainbow Scraps Challenge and Teal for the new month.


I used the 4-at-once no-waste method to make flying geese from each square and made a 12-inch version of this month's block for the Block Lotto, Dutchman's Puzzle.

Purple and Teal Scraps
My Dutchman's Puzzle quilt block pattern includes my tips for making flying geese units three ways, including my favorite (used here).

I also included measurements for making the block in sizes from 4 inches (finished size) to 16 inches.

There's also a coloring sheet to trying your own color combinations.


On the Block Lotto this month we are playing with combinations with Pantone's Color of the Year, Greenery.

This choice made me happy, but then again, I've never met a green I didn't like ...


You can find my pattern on Payhip–clicking the pattern cover image will take you there.

Sunday, January 15, 2017

No Scrap Too Small

You've probably heard the saying,

When life gives you scraps, make quilts.

Today, I was thinking ... when the scraps are too small, make fabric ... to use to make quilts. Or in my case a quilt block.


Purple HeartAfter a couple years of making blocks for the Rainbow Scraps Challenge, I find that the fabrics in my scrap bins have become quite small.

So this weekend, I pulled out a bunch of too-small scraps and made the fabric in this 8-inch heart block.

The pinwheel block is made from the bonus triangles created by the snowball corners on in the stars. It is 2 1/4 inches (finished size)

I created the heart block pattern for the January Block Lotto.  We're making the lotto blocks from fabric made from (mostly) red scraps.  So far, 23 quilters have made 120 heart blocks. If you're interesting to take a look, follow the link for some red hot eye candy.


SaveSave
Heart Block Cover ImageWhether you call it crumb-piecing, string-piecing, improv quilting or making fabric, if you're in the mood to make some crumby, scrappy heart blocks of your own, you can find my pattern by clicking the image on the right.

That's Grace Hopper photo-bombing my attempts to photograph my blocks.

Sometimes when life give you too-small scraps (or a cat that insists those quilt blocks are hers), you just have to go with the flow.

Monday, February 01, 2016

Chocolate Snails (Trails) on my Wall


5 Snail's Trails BlocksCombine the designated color for this month's  Rainbow Scraps Challenge and the February Block Lotto choice and, in my mind, I keep thinking Chocolate covered Snails (Trails). Ugh.

They look better than they sound ...

For the Block Lotto this month, we've expanded the second color beyond the RSC accent color of pink to include pastels and low volume prints in any color.

After I went outside and took a blocks in the wild photo of my blocks for the block pattern, they went back on the wall, in an on-point orientation (I was curious).


Here are my blocks as cover girls ... and a link to the block pattern.

Snails Trail - Quilt Block Pattern

I realized when I was outside taking photos ... I don't think I've seen a snail since moving to New Mexico. Maybe they don't like the dry climate?

In addition to directions for rotary cutting and traditionally piecing the 6 inch block, the pattern includes an introduction to paper foundation piecing, a foundation pattern and step-by-step directions for using that technique for making the block.

My First Quilt It's probably because this is the first block I paper pieced, that I think it's a good place to start. This little wall hanging is my fist quilt. It was made from four 4-inch blocks, made from two cotton prints re-claimed from shirts and a bit of white-on-white suggested by another student in class. I hadn't YET committed to quilting or started a stash.

(I am sure I must have a better photo of this little quilt ... but this sad little photo is the one I found).

The quilt teacher that day also pointed out that the same foundation can be used to make a completely different block by replacing the 4-patch with a square and using a different fabric placement.

I think the "new block" variation would be a great pattern to use for scraps. Square-in-a-square-in-a-square-in-a-square?

Completed block A completely different block

I am joining the lists for Monday Making on Live Laugh Quilt and for Design Wall Monday on Patchwork Times.

Thursday, May 01, 2014

A New Month, a New Block Pattern for the Block Lotto

The block I picked for May is another 7 inch square. I called it Diagonal Bars ... though, when you put the blocks on point, the bars are no longer diagonal are they? These are the 7 blocks I've made for the Block Lotto so far.

7 Diagonal Bars Blocks

Here are some of these blocks, made for my Mod-Mod Sampler quilt.

4 Diagonal Bars for my Mod-Mod Sampler

You can find a link to the pattern on my Free Quilt Block Patterns page and details for this month's block lotto here: May's Block is Diagonal Bars.

It was inspired by one of the quilts in the Infinite Variety exhibit of red and white quilts a few years ago.


I changed the proportions to make it easy to rotary cut and sew as a 7 inch block.  I changed the color because, unfortunately, we've had problems in the past with red and white lotto blocks bleeding after being sewn into quilts.

The Linky topic this month on the Block Lotto is to blog about sources of inspiration. This month's block, as well as the Feather Bed quilt I'm making are definitely examples of how I am sometimes inspired by the quilts that cross my path.

Tuesday, April 01, 2014

Sewing the April Lotto Block - Three Ways

This morning, I'm asking myself why, when there are multiple ways to make a block, I try to include those choices in the block patterns I create for the Block Lotto. It would be so much easier to create a simple pattern with one path to the finished block and leave it to everyone to figure out possible alternatives on their own.  It's probably because I love that there's rarely one right answer when it comes to accomplishing a quilt design and, in my way, I hope to spark that interest in learning new ways to see a quilt block in others. You can find the Triangles in a square block pattern here:

Triangles-in-a-Square Block Pattern

Whatever the reason, this month's block pattern for the Block Lotto includes three approaches to making the block, along with cutting directions for making multiple blocks that follow the guideline of making each block with a unique 3-color combination (combined with white), with no waste. To test my directions, I made blocks following all three methods, 4 from Method #1,  8 from Method #2 and a single paper-foundation pieced block, Method #3.


I couldn't share my design wall yesterday for Design Wall Monday, but I'm joining the party today.

Method #1 Notes


In Method 1, the 7-inch square (finished size) block is constructed from one flying geese unit plus two half square triangles.

I used the no-waste method for making flying geese, 4 at once.  When you choose fabrics for 4 blocks, it helps to keep in mind that the one used for making the FG units will become the large triangle in all four blocks and will be combined with all other fabrics.  The other four fabrics are sewn into half-square triangle (HST) units with white and then combined in pairs with unique combinations.  It was quick and easy to chain sew all the units needed for four blocks, arrange them and finish the blocks.


Method #2 Notes


In Method 2, you first construct the 5-inch (finished size) center–which is half quarter-square triangle (QST) and half half-square triangle (HST), then add white triangles to put it on point to create the 7-inch block.  To make unique 3-fabric combinations with no waste, you make these blocks 8-at-a-time.

Besides the white background, you'll choose eight fabrics–four will be used in the HST half and four on the QST half of the center squares. I didn't do well choosing fabrics for this set of blocks because it wasn't obvious to me (until it was too late) that each of the small triangle (QST) fabrics (the larger squares) will be combined with each of the large triangle fabrics (HST).


As I assembled the centers, I saw how the two blue fabrics and two red fabrics, though different, were just TOO similar.  I decided to remake them by replacing the large triangles (the HST halves).  Here are the before and after versions.


After I was happy with all the centers, I added the white triangles to put the centers on point and finish the eight unique 7-inch (finished size) blocks.

I was feeling a bit wasteful about those fabrics I'd replaced until I realized I could use them for Method #3, the paper-foundation pieced block.    Alls well that ends well :-)

Method #3 Notes


A couple sneak peelers had problems printing the foundation (on page three of the block pattern) and we figured out that if the shrink to fit option is selected, the foundation will shrink slightly and while not enough to be significant in the 1-inch block printed on the page ... the block will be too small.   Be sure to also double-check the measurement of the outside box–it should measure 7 1/2-inches square. Here's my single paper-pieced block.


The inspiration for this block came from a scrap quilt made by me a long time ago. The 7-inch block is inside the 10-inch block in this quilt: 


You can make these 10 inch blocks from the Triangles-in-a-Square by putting it on point, adding triangles (from squares cut 5 7/8-inch, halved diagonally). 

The color-way for the April Block Lotto was suggested by Kim–it's the one used by the Vancouver Modern Quilt Guild last year for the To Boston with Love project.  Since I had often thought about remaking this quilt in those bright, clear colors, it seemed like a perfect match to me. 

For more information about this month's Block Lotto and a peak at the virtual quilt (made from photos of 55 of the blocks already made), here's the link: 

Saturday, March 01, 2014

Sewing the Star Chain Block

When I select fabrics to make my blocks for the Block Lotto, I do the opposite of what you might do when making blocks for a quilt–I try to take the fabric guidelines in as many different ways as I can to see if they will still play together nicely and so you will often find me using very old fabrics–like in this blocks which contains two of the oldest fabrics from my stash, new fabrics, solids, batiks, hand dyes in a range of colors.  Usually you'll see examples of low contrast alongside high contrast blocks.

This month, we are making big 14-inch finished size blocks and so the maximum to enter into the drawing for lotto blocks is four.  Here are my very diverse four.

Even though I probably wouldn't have put these fabrics together in a quilt, once they were on my wall, I fell in love with the idea of using this block for the green scrappy quilt I have always wanted to make. I was secretly hoping that the designated color for the Rainbow Scraps Challenge (RSC) would be a more generic green as a reason to make that scrappy quilt now ... but it may happen anyway with no reason other than I want to.

I have made a pair of these blocks in Aquas and Teals for the RSC–they will be part of my Mod-Mod throw.  Here they are with the Blue and Pink blocks made in January and February.


Choosing fabrics may be the most challenging part of making this block–whether you are making it for the Block Lotto and following those guidelines or making it for your own projects.  I strongly suggest making the star center first so you can see all three fabrics together and decide if there's enough contrast for your liking.  One of my four lotto blocks started out looking like this ...  although I loved the fabrics together, I didn't love this, so I used a dark red-violet solid for the star.

For the background, Fat Quarters work well–the 4-patch corners are quickly made from 2 strips that are 20-inches long, approximately the width of a FQ or half a width of fabric (WOF) if you're using yardage.

Once the fabrics are chosen and cut, the block goes together quickly.

The star center is a variation of the Ohio Star block with the chain fabric in the corners.

I started with the large squares cut the exact size needed to make the quarter-square-triangle (QST) units, but a lot of quilters like to cut larger and trim to size.  I think this is a pretty good step-by-step tutorial for making them:

Quarter Square Triangle Tutorial

The author is making larger units–for our block, you’ll be starting with the 3 1/4-inch squares (3 1/2 if you like to cut larger and square-up and trim) for 2 1/2-inch quarter square units (to finish at 2 inches in the sewn block.

The star center is constructed 9-patch fashion, using the 5 small squares and the 4 QST units.

I made the 4-patch corners using the long strips, sewing them together, cutting them into 8 units which became my four 4-patch corners.


If you are working with smaller than half a WOF, you could make a pair of strip sets using 10" long strips or make the 4-patches individually from 2 1/2-inch squares.

The large block is constructed, again, like a 9-patch, adding the large rectangles.  In my mind, as I make the block, I think of the process in two steps: make the small 9-patch (star center), then make the big one (and complete the block.)


You can read more about the inspiration for this block pattern and details for this month's Block Lotto here: 


You can download a copy of my block pattern here: 


It will also be available to download from my Free Block Patterns page soon. 

While I cannot explain why I find it so appealing, I definitely see more of these blocks in my future. 

Saturday, February 01, 2014

Sew Along with Me - Bead on a String

The Bead-on-a-String block is the February block for the Block Lotto. It's seven inches square (finished size). You can find the block directions here:

Bead-on-a-String Quilt Block Pattern

Here's how I approached making my blocks.

The color way for this month was suggested by Debbie: yellow, orange, maroon, black and white.  I started by looking in my stash for some yellow, orange and maroon fabrics that I thought would work for the beads.

SampleFabrics

I printed the circle template on the second page of the block directions (on purple paper), glued it to some lightweight cardboard and cut out the circle shape to create the template I used to prepare the circle appliqué.

Using my template, I traced the circle on the wrong side of one of the bead fabrics, then cut the fabric, adding a generous 1/4-inch seam allowance.  Once I cut the first circle, I used the cut fabric as a guide for cutting more.

Using a needle and thread, make a running stitch around the edge of the cut circles.  Place the fabric right side down, lay the template inside the circle and pull the thread tight to create a perfect circle appliqué with a turned under edge.

Take the circle appliqué with the template inside to the ironing board and press the edges so they will stay in place when, after it's cooled, you remove the template and have a perfect circle ready to stitch in place.


To make each block a unique combination of yellow, orange and maroon fabrics, I made them three at a time.

Once the circles are prepared, I found matching thread to use for the machine appliqué.

The white background squares are cut slightly oversized because sometimes appliqué can pull the block in slightly making it smaller.

I folded the circles evenly in quarters and finger pressed the creases.  I did the same with the background squares.  Using these creases, it was easy to line them up and center the circle on the background square.

I used a buttonhole stitch to appliqué the circles to the background. As you sew and pivot around the circle, it's important to remember to stop and pivot when the needle is "outside" the circle and in the background.

After the appliqué is finished, the block is squared up and trimmed to 7 1/2 inches.  I could still see the crossed creases in my circle, which made it easy to keep the circle centered in the block–the center will be 3 3/4 inches from the edge in the trimmed block.


To assemble the block, cut them in half, rearrange the halves and insert the long black rectangle to form the string.  I found it easiest to cut away the background behind the bead after the block was cut in half. 


1. Slice circle appliqué in half, 2. Cut away background, 3. Laying out the Bead block

My three finished blocks are at the top of the post.  To see more examples, check out virtual quilt in this post on the Block Lotto. 

Wednesday, January 15, 2014

The Mod-Mod Quilt-Along Begins Today

Do quilters in the blogiverse NEED another Quilt-a-Long?  Probably not.  
But because I know some quilters like to follow-along with the Block Lotto, but don't necessarily want to make blocks in colors of my choosing or participate in the lotto drawing, I designed a series of quilts made from this year's lotto blocks–in 6 sizes, from a 42 inch square to a 105 inch square king size bed quilt. Anyone can sample the block patterns for the Block Lotto this year and a make a quilt, as small or large as they like.
FYI for the block lotto community, this is a repost of information I have already shared there–intended for my followers here who might like to join along.  
After a self-indulgent year of mostly figurative blocks for the Block Lotto in 2013,  this year we’ll be making blocks with a strong geometric feel in three (finished) sizes:
7 inch square
7 by 14 inch rectangle
14 inch square
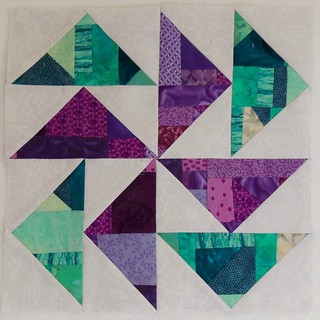
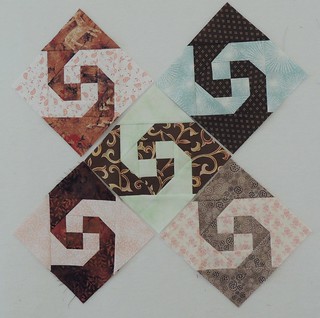
I promised a change for the lotto blocks this year and guaranteed no basket blocks, nor houses, nor dogs,  nor cats, nor hearts.  One thing will remain the same, though.  As always, the lotto block patterns will be made using a variety of techniques, perhaps presenting an opportunity to try something new or perfect a technique that you haven’t used much.
BlockSizes
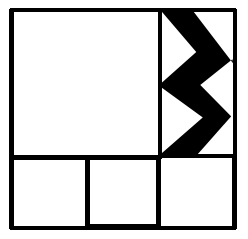
These black boxes show the relative sizes of the blocks we’ll be making, they look something like this.

Looking at these shapes, you might start thinking, as I did, how they could easily be combined into 21-inch square units in a number of ways.  All three sizes could combine in a layout like this (including January’s Double Chevron):
ModuleExample
If you start thinking about multiples of 21-inch square modules, like I have, you can see how you could build sampler quilts in a range of sizes:
  • Small (42-inch square) – 4 modules arranged 2-by-2
  • Crib (42 by 63-inch rectangle)  - 6 modules arranged 2 (wide) by 3 (high)
  • Throw (63 inch square) – 9 modules arranged 3-by-3
  • Twin (63 by 84-inch rectangle) – 12 modules arranged 3 (wide) by 4 (high)
  • Full/Queen (84-inch square) – 16 modules arranged 4 by 4
  • King (105 inch square) – 25 modules arranged  5 by 5

With these ideas in mind, I have created a random-ish layout using this year’s blocks in a straight setting with no sashing or borders, using the lotto blocks to build 21-inch square modules.
Because of the MODular approach and the MODern look of our geometric blocks this year, I’m calling this effort the Mod-Mod Quilt-along.
Each month, mid-month, I’ll tell you how many of the current month’s block you’ll need to make each of the above quilt sizes and show you where they will appear in your quilt.
I plan to make two quilts and sharing my progress:
  • A rainbow-colored throw using the color of the month from the rainbow scrap challenge (a sort of mystery quilt for me)
  • A full/queen using a more controlled color palette with a common white-on-white (WOW) background

Fabric Estimates


If you are using a common background fabric, here’s my generous suggestion for how much you’ll need (keep in mind that I haven’t written all the block patterns yet):
  • Small (42-inch square) – 1 1/2 yards
  • Crib (42 by 63-inch rectangle)  - 2 1/4 yards
  • Throw (63 inch square) –3 1/4 yards
  • Twin (63 by 84-inch rectangle) – 4 1/2 yards
  • Full/Queen (84-inch square) – 6 yards
  • King (105 inch square) – 9 1/4 yards

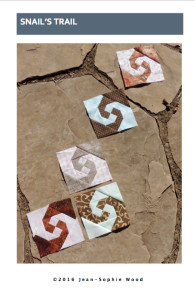
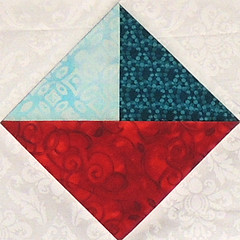
January’s Double Chevron Blocks


You can download the Double Chevron Block Pattern from my Free Block Patterns page.

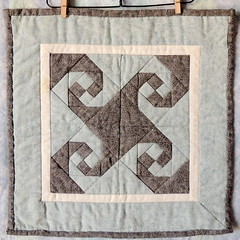
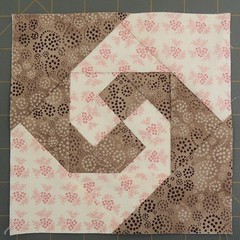
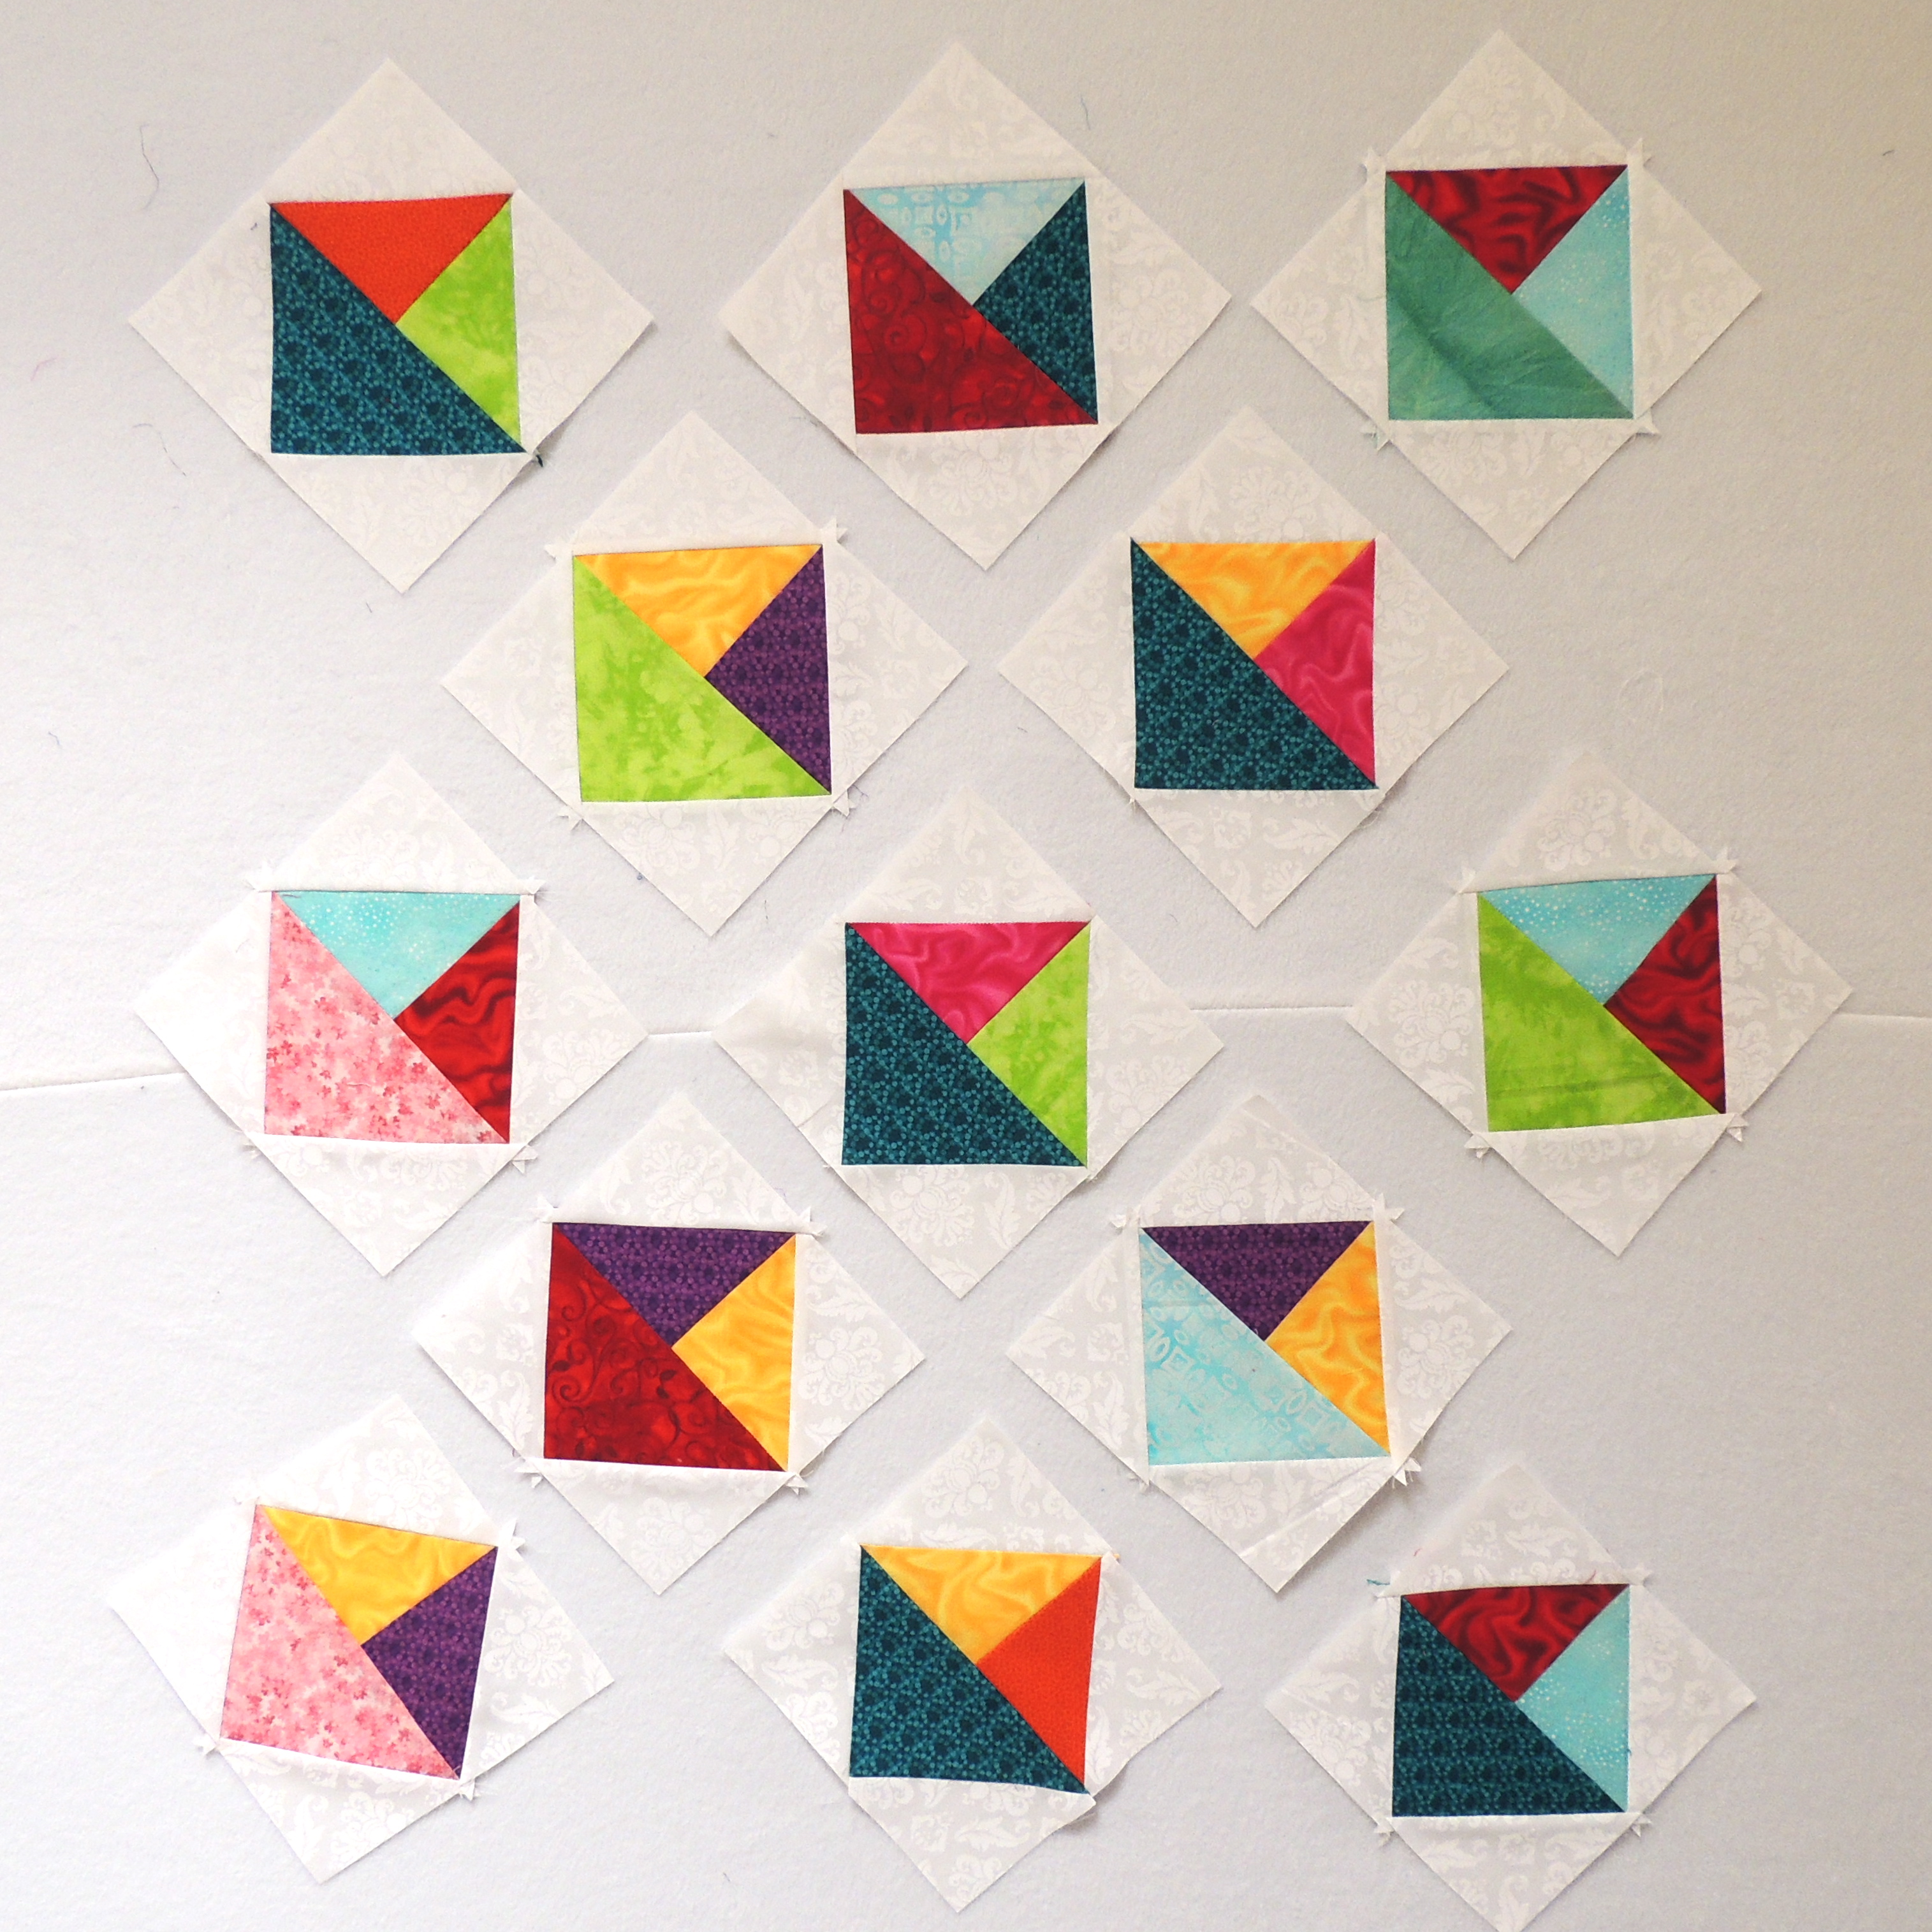
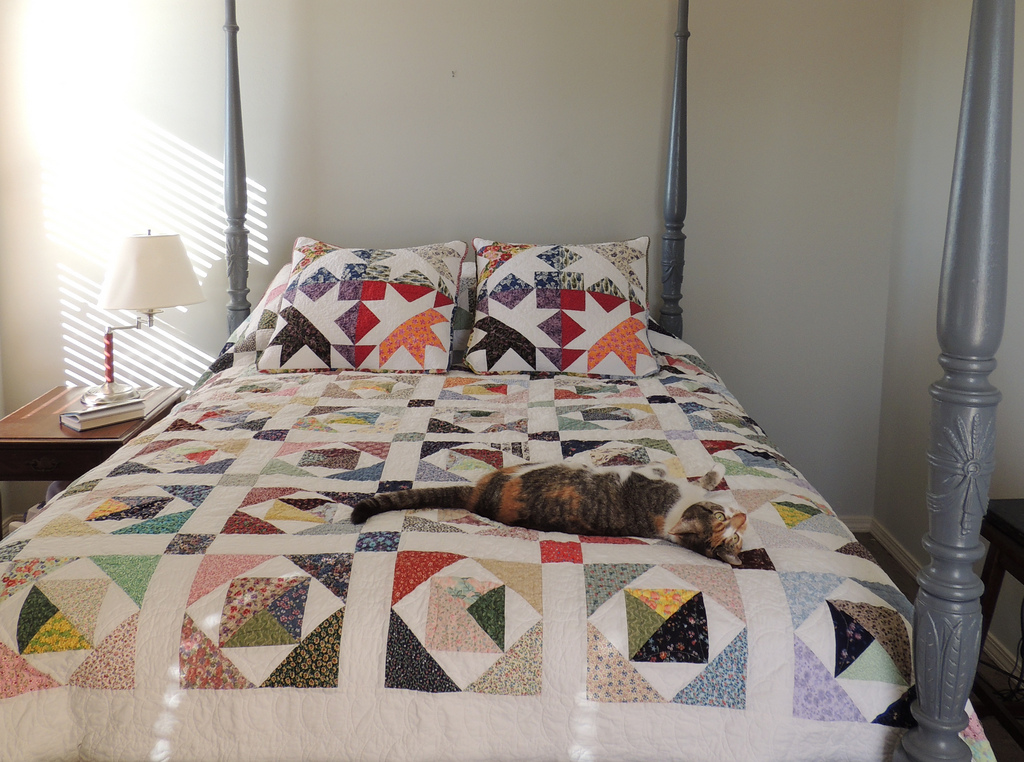
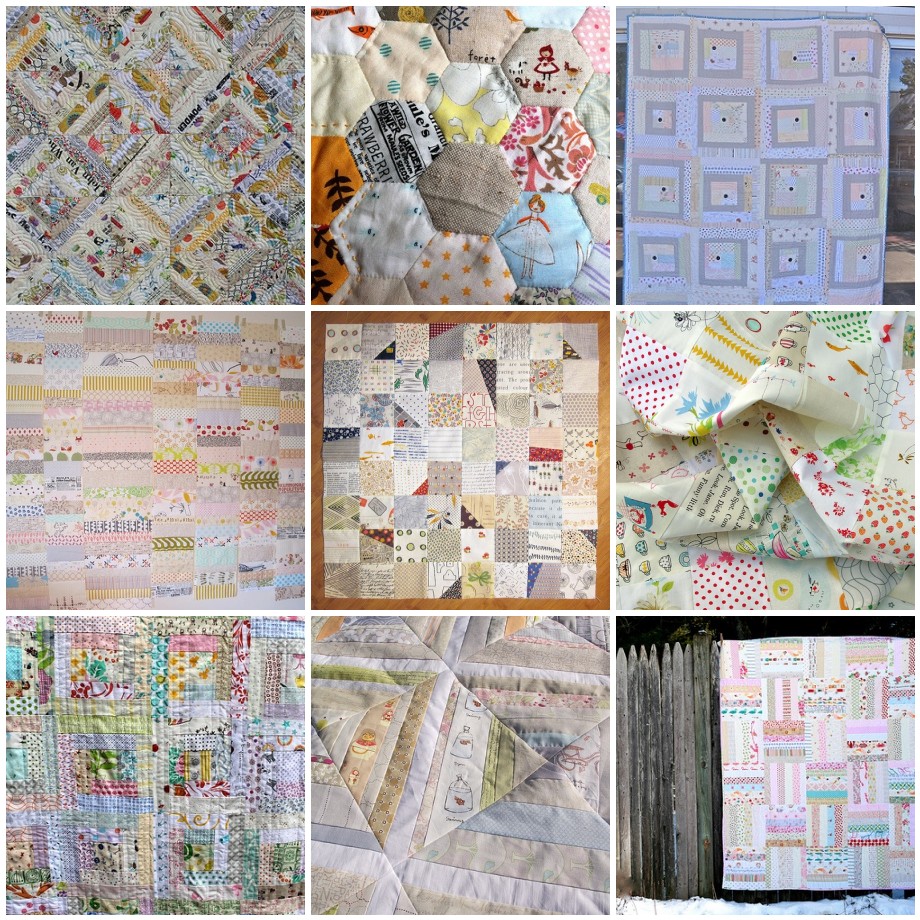
Here are the blocks I've made for my Throw (made as part of the rainbow scrap challenge).


Here’s how many of these blocks you’ll need this month, for each of the 6 quilts:

SmallCribThrowTwinF/QKing
Double Chevron Blocks123468

Small Sampler

SmallestLayout-January

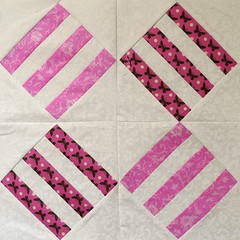
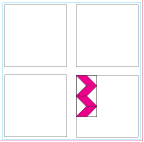
If you are making the small sampler quilt, you’ll make one Double chevron block for it. Your quilt layout looks like this (so far–these will get more interesting in future months)


Crib


ModModFull-King

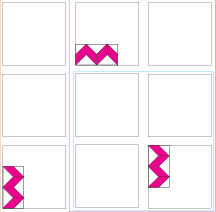
The Crib size quilt include 2 Double Chevron blocks, in the 6-module layout on the left.


Throw

ModModFull-King
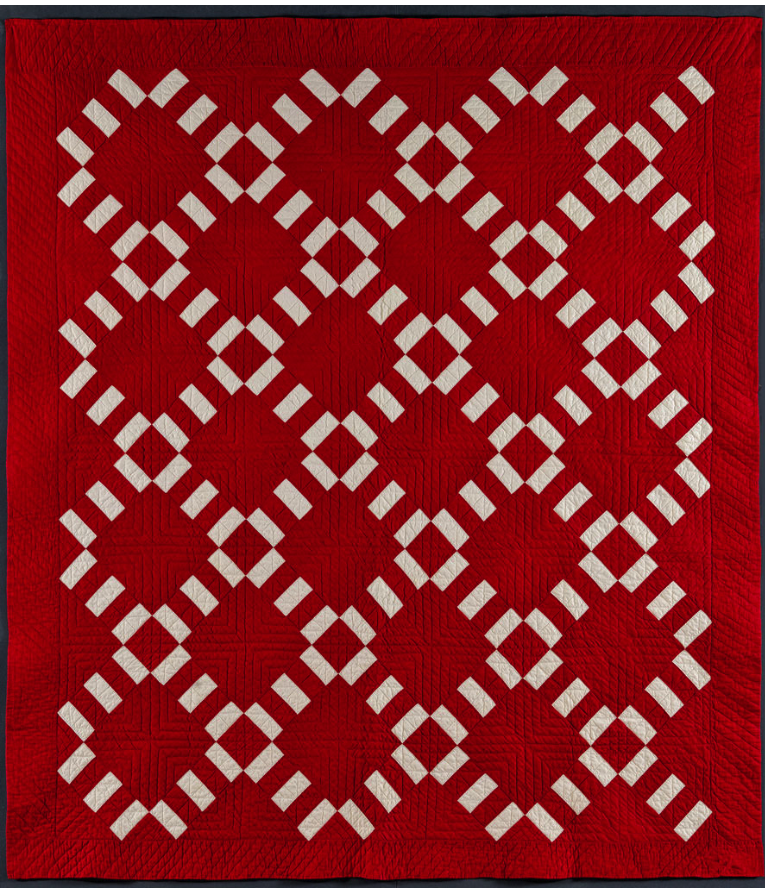
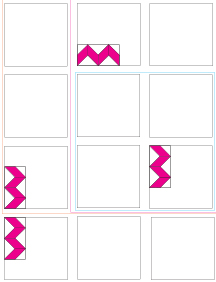
In the square Throw, three modules are added to the layout and one more Double Chevron block for a total of 3 needed for this quilt.
As you can probably begin to see, these modules (and quilt layouts) are nested.  The smallest size becomes part of the crib size, which is part of the throw, which is part of the twin size, which is part of the full/queen size, which is nested within the king size.  This means you can start small and decide to make a bigger quilt or … start out super ambitious and decide to make a smaller one.

Twin


ModModFull-King

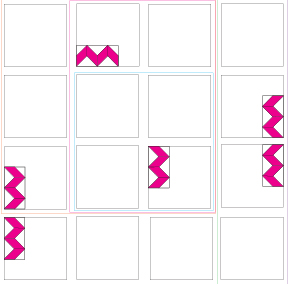
For the Twin size, you’ll need 4 Double Chevron blocks.
Here’s where they will be in that quilt, constructed from 12 modules.
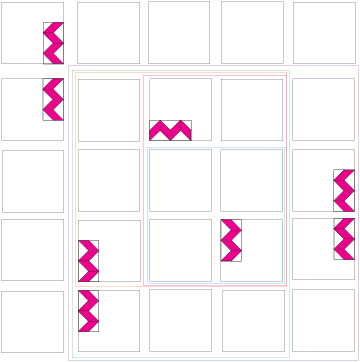


 Full/Queen


You’ll need 2 more Double Chevrons–a total of 6–for the Full/Queen quilt.  Here are the 16 modules for that quilt.
ModModFull-King

King

And for the super-ambitious, make 8 Double Chevron blocks.  Here’s the 25 modules for that 105-inch square quilt.
KIngLayout-January

The Badge

If you would like to add the badge at the top of this post to your blog, here's the HTML code you need:


This help post on the Block Lotto will step you through how you add a badge to your blog, if you need a reminder.

If there is interest in playing along with me and make a sampler of some size of your own, I'll set up ways for us to share: Flickr group, link parties, etc.  Let me know.
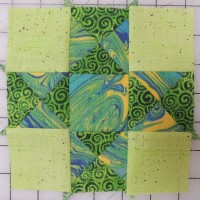
Saturday, June 01, 2013

A New Month, A New Block Pattern, Choosing A New Goal

Tall Ship Block Directions--Cover ImageThe month of May seemed to pass in the blink of an eye, didn't it?

For me, the start of each month comes with two quilt-y tasks, make sure the lotto block guidelines and directions are posted and decide on a project goal for the month for A Lovely Year of Finishes.

For our continuing year of 6-by-9 inch rectangle lotto blocks, we're making this variation of a traditional ship block in blue and white.

You can download the print-friendly directions from my Freebies Page on this blog.  The Tall Ship Block Pattern includes directions for making 8-at-once half square triangle units beginning with two large squares.

Everyone is always welcome to join us on the Block Lotto.  If you like this block and want to play along, the guidelines for this month are here:

Tall Ships Sail into the Block Lotto in June

Here's the virtual quilt, constructed from photos of blocks from Block Lotto sneak peekers, Angie, Debbie, Helen, Kathleen, Margaret, Nan and me.

Tall Ships Virtual Quilt

I seem to have inadvertently messed up the table formatting on that page when I added the image and link for the Tall Ship pattern ... probably a sign that it's time to re-organize it. I noticed recently that I have more than 50 sets of photos on Flickr that have been blogged as tutorials, tips, projects or block patterns. Who would have thunk it, when I volunteered to re-start the block lotto as a beginner-friendly activity and practice for making blocks for Bees and exchanges?

I may well spend part of the day playing with web pages ... as I continue to waffle between several projects I'd love to finish in June. I know myself (and my speed or lack there of) well enough to know that, practically, I will only be able to finish one and so I need to stop waffling and decide in time to post my goal for A Lovely Finish. The contenders are:

  1. The red-blue-cream-tan star quilt with the anything but flat lone star in the center.  I have been working on this one and have some momentum, plus it would be a nice finish in time for the Fourth of July. I posted about some of the challenges with this old, old project here.
  2. Another oldie-but-goodie UFO that just needs to be quilted–a string star small bed-size quilt. I keep feeling the urge to make a string quilt, but tell myself I need to quilt and finish at least one of the three string quilt tops here before starting another.  In my mind, it's sort of like my approach to buying books–no new books unless I create space on my bookshelves by giving some of the books I own away.  I have stencils for a quilting design I plan to use. I think the additional preparation step of marking the quilt has been holding me up, despite last month's goal to learn to love the preparation steps.  I couldn't find a photo of this one, but if it's chosen–and maybe even if it isn't–you'll be seeing a lot of it. 
  3. The architecture challenge for the 15 minutes blog.  I signed up and chose and posted a photo as inspiration, here.  The deadline is early July.  Making this my June Goal would ensure I'd get it finished. 
  4. Another oldie–a quilt for which I planned to directions in 12 steps.  I'd been thinking I would finish in time to blog the directions over the 12 weeks of summer.  The quilt top is nearly finished (and has been nearly finished for ... years). Summer begins in June ... so it would be another good choice.  Plus I think it would be a lovely quilt to have around the house in Summer. Here's a peek at it in-progress.

    Coming together
I don't know why that I have lately felt inclined to pull out these old WIPs and work on them.  I suppose it's a good thing and because I do seem to be finishing some of them, I'm not asking too many questions about my motivation and just going with the flow.  Now I just need to narrow my focus, choose one (or work on the new project for the challenge) and GET IT DONE.

I'm going to allow myself wallow in indecision a couple days longer over the weekend and see which of these projects insists it must be my Lovely Finish for June. 

Tuesday, March 05, 2013

March Lotto Blocks

10 Steps Block for March Block LottoContinuing our year of 6 by 9 inch rectangle blocks, we're making this log cabin variation for the March Block Lotto.

The color guidelines are to use white + gray + your choice of color.

The construction is like the Court House steps style log cabin, with "logs" added in pairs, on opposite sides.  The fabric placement makes is similar to a square traditional block called White House Steps.

I always say it, but I do think this has lots of quilt design/setting possibilities.  If you'd like to play with some of those possibilities, my directions are here:
Steps Block Pattern Cover
Steps Block Pattern

The pattern includes directions for making the block, a coloring sheet, a foundation for paper foundation piecing, and the virtual quilt made from block photos from the Block Lotto.

Friday, February 01, 2013

Low-Volume Love for the Block Lotto

Low Volume String HeartsI often use the Block Lotto as a place to try ideas in a small way–making a few blocks, with no commitment to do anything with them (unless, of course, one happen to win a set in the drawing at the end of the month.)

This month, we're making string-pieced fabric and creating low-volume string heart blocks (6 by 9-inches, finished size).

Defining guidelines for the block lotto is the most challenging when I'm trying to describe to the quilter something possibly new and how to make their own design decision for their blocks. I never worked harder than during our year of liberated quilting ... and so it was this month with the concept of "low volume quilts."

I did a little research (with the help of google image search and flickr) and went looking for examples. I started a gallery on Flickr to capture them.

Follow the links underneath the mosaic for original photos and credits.

  photos of some Low Volume quilts found on Flicker

1. Low Volume Quilt, 2. Low volume quilting, 3. Low Volume quilt, 4. low volume quilt, 5. scrappy low volume start, 6. [workinprogress], 7. Low volume log cabin detail, 8. another close up, 9. low volume quilt- full front

Looking for examples, choosing fabrics and creating low-volume blocks was useful practice for me.  I may never make a quilt entirely from low-volume fabrics, but I definitely see some low-volume scrappy backgrounds in combination with other design elements in my quilting future.  As always, I hope others make the blocks and have an interesting experience, too, but I know that only time will tell.

String Heart Block Pattern Cover Image
You can download print-friendly directions for choosing the fabrics and making the String Heart block by clicking the pattern cover image.  It's also available from the Freebies page on this blog.

You can find complete guidelines for the February 2013 Block Lotto here:

Low Volume Love in February

If you are feeling some low-volume love, come play with us.


Join me on the Block Lotto Blog
blocklotto.com

Joining the party on Confessions of a Fabric Addict to celebrate getting it all done in time for the block lotto.

Related Posts Plugin for WordPress, Blogger...