The latest round of Julie's Cotton Robin has concluded and
all has been revealed. I had so much fun this year working on–and being challenged by–this round of little quilts and was delighted by the quilt that came back to me.
For those unfamiliar with the Cotton Robin, here are the basics:
- Make a center that is no larger than 9 inches square (or a comparable-sized shape) and mail it to Julie. Optionally you may include additional fabrics (totally up to a quarter yard) and/or instructions. This year, Julie asked us to challenge ourselves in some way. Once the package goes to Julie, things become pretty much anonymous.
- Receive a package from Julie which contains a center and mailing info for this and all future rounds. Add a border and send it on to the next person.
- Receive a package with a center with one border and add the second (last) border. The quilts should be no larger than 20 inches square (or something comparable if it isn't square). Send it to the next person.
- Receive a finished quilt top, add backing and batting, quilt and bind it. Mail the finished quilt home.
Here are some of my in-progress photos and notes of the four Cotton Robin quilts I contributed to this year, along with a photo of the finished quilts, one for each of the steps above. It's a longish and photo-heavy post, so if you want to just cut to the chase and see ALL the finished Cotton Robin quilts, scroll up and follow the link at the top of this post.
My Center
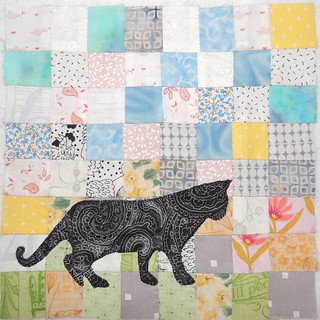
The challenge I set for myself was to create a soft, low-volume quilt. I pieced a scrappy center from 64 one inch (finished size) low-volume squares and added a machine appliqué cat silhouette. The cat is from a book by Carol Armstrong–if you have been around long enough, you might recognize that I've used it before in a doll quilt I made in for a swap–click over to see
Ela and her Doll Quilt ... and those in the
Block Lotto may see this cat again in a block for this month–it's a quilter's choice month with the theme of pets.
I didn't include a note with my Cotton Robin package, but hoped that the center and the fabrics included conveyed my intention.
I included two fabrics–one which was used (the green background in the second round) and one that was returned to me with my quilt.
Round One
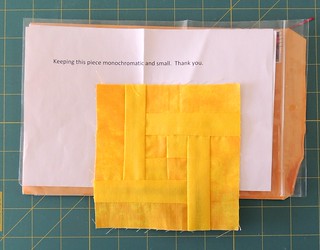
I confess that when I received this package, with the note,
Keeping this piece monochromatic and small, I wondered about the person who was really challenging themselves (and us) to make a monochromatic yellow quilt.
The center was 5 inches square (to finish at 4 1/2 inches).
My first inclination was to turn the square into a circle and make it the center of a sun (aka New York Beauty block). But then I realized that was exactly
what I did for the first round last year and left it alone.
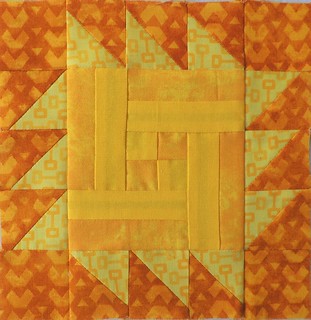
I looked in my stash for a pair of yellow/gold fabrics that matched the two in the center and had as much contrast as possible and made a round of 1 1/2 inch half-square triangles. The quilt was now 6 inches (finished size).
Maybe I pushed a little too far into golden brown territory. I don't know. Here's how
Mary Jane's finished quilt came out:
Round Two
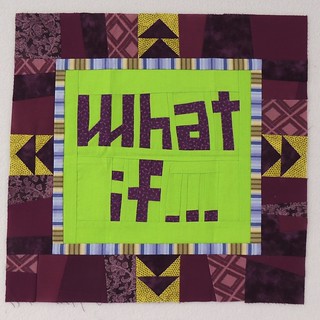
Sometimes, you receive a package and an idea immediately takes hold. You can't shake it even if you aren't sure you have the skill set necessary to achieve it ... but when a quilt is actually asking you, "what if ..." I think you have to go for it and so I did.
My vision was that the center was a thought bubble and someone was thinking and asking themselves that question. I googled for images of a "cartoon thinker" ... and Google returned many images of MEN! (bad, sexist Google). I tried again with "woman thinking" and found some candidates including a cartoon woman sitting in front of a computer. I saved her, cropped her, resized her (multiple times) and started playing with the idea on my design wall.
I found a fat quarter of hand-dyed fabric in my stash that was a good match for the fabrics used in the first round and used it to define the dimensions of my round.
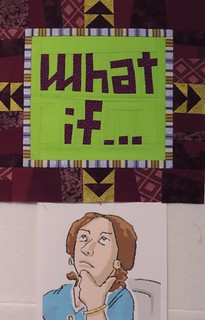
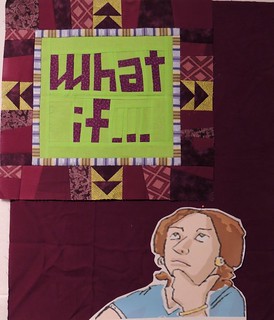
At the guild retreat last winter, someone had some bright green that I knew would be a match for the background of the center and I asked for a bit of it so I could continue it into the last round. I also continued the look of the improvisationally pieced second round, added a couple more arrow blocks, procrastinated a lot and then faced the cartoon lady thinker.
I didn't have a clue whose quilt this was, but at some point I thought it might be
Glen's–a woman with very red hair ... I sent her a cryptic email to confirm or eliminate the possibility that maybe my thinker should be a red head, found it wasn't her and continued on. I built the fused, raw-edge appliqué in layers–skin, eyes, hair, clothing, jewelry–then attached it to the pieced background.
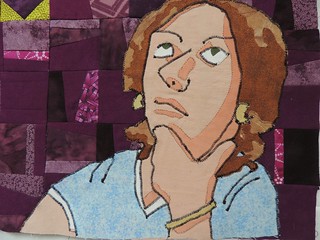
I decided that I would use an open zig-zag stitch for the black lines in the cartoon ... and hoped that whomever was the owner of this quilt would see it as in the cartoonish style I intended and wouldn't disapprove of the messy look.
The rest of the raw edges were stitched with matching thread.
Since a lot of this was new territory for me, I started stitching, knowing that it could all go terribly wrong and I'd be starting over.
I sent the finished top onto Helen, with my apologies. This was her first experience of the Cotton Robin; I knew she was a little worried about the quilting/finishing round and I was sending her this challenge to finish. She did a great job. Here is the finished quilt, being held by her son.
It's probably a good idea that I didn't know this quilt was
Cathy's until Helen posted that she had mailed it to her ... I would have been totally intimidated knowing I was was trying something foreign and new-to-me on a quilt for a quilter that is so accomplished and productive. I guess it's true, sometimes ignorance is bliss.
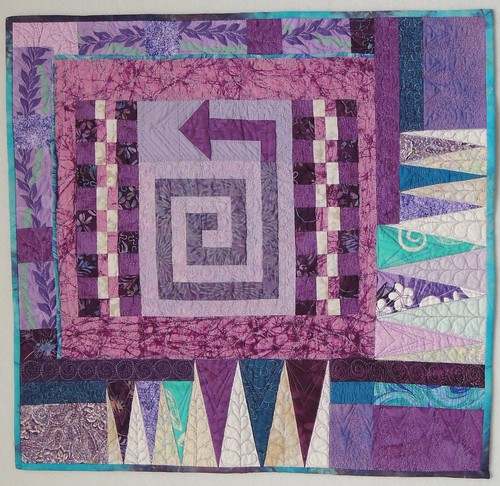
Finishing a Quilt
Speaking of intimidation ... the quilt I received to finish was going home to our fearless leader in the Cotton Robin,
Julie. Julie has done a such a great job of organizing us for four years–I wanted to finish a perfectly beautiful quilt for her. I loved everything about the quilt that Julie, Diane and Shannon had made except for one thing ... I was never quite sure which way was up. Since I couldn't decide on a logical "top," I didn't sew on the hanging sleeve and left it for Julie to decide.
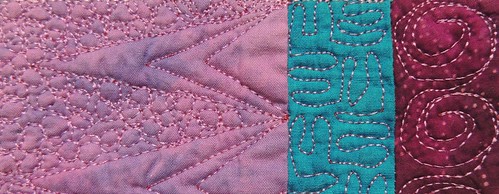
I quilted spirals in the spiral, a checkerboard in the checkerboard, triangle shapes in the triangles and a leafy vine outlining the leafy vine print in the borders. I repeated these shapes in some of the plain strips and rectangles and added some straight lines, pebbling and feathers. I used 2 purple threads, one lighter and one darker, but it's really hard to tell in the finished quilt.
I couldn't decide if the binding should be purple or turquoise, then found a hand-dyed fabric that had both colors.
It's not perfect, but it was so much fun. I hope Julie, Cathy and Mary Jane (and everyone else who participated in the Cotton Robin this year) love their quilts as much as I love mine. As soon as I get the bedroom that will become my home office unpacked and situated, I plan to hang the last two Cotton Robin quilts on the wall there so I can appreciate them every day.
For more of the in-progress photos of these four quilts,
this link will take you to my photos on Flickr.
If you've read this far and want to see the rest of the quilts from the Cotton Robin, here's the link to
The Big Reveal.
It wasn't until the big reveal that I found out my quilt was made by me,
Terri, Rachel and
Jay. Thank you all for making me an amazing little quilt.
I'm celebrating these finishes, finally revealed, at: Richard and Tanya's Link a Finish FridayCan I Get a Whoop Whoop? on Confessions of a Fabric AddictNina-Marie's Design Wall FridayFabric Frenzy FridayQuiltShopGal's Creative Goodness Linky Party

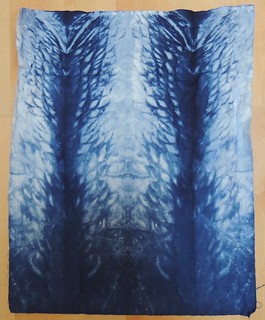 What do you see in this arashi shibori?


