Tuesday, June 21, 2011

On the first day of Summer

It's the first day of summer and what I felt like sewing was . . .

Icicles

Go figure.

Monday, June 20, 2011

Another Finish

Finished Super-Rectangle Table Topper
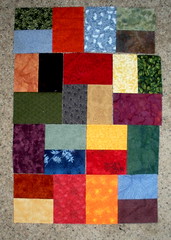
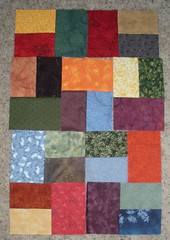
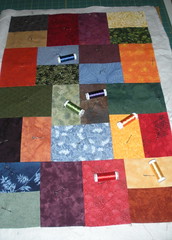
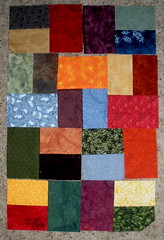
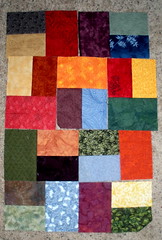
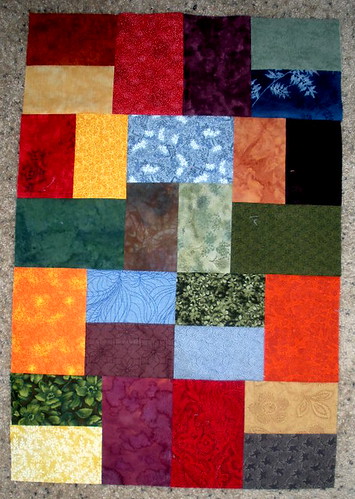
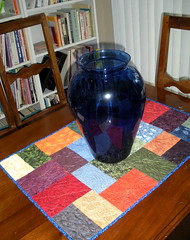
Over the weekend, I finished the binding on my FNSI project, the "super-rectangle" table topper--made from 9 of the 3-patch blocks that we are making for this month's Block Lotto. 

Now, all I need is some flowers for that vase . . .  and maybe the bookshelves could use a little straightening up, too ;-) 

When a Project wants to be something ELSE

Making Art from Art
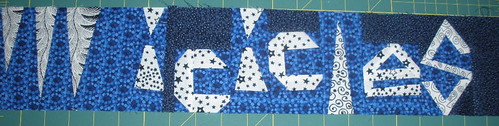
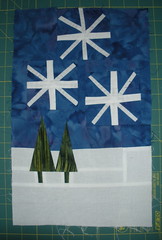
When I read that the AAQI quilt-a-month club challenge for June included Winter theme, I thought about a pair of old unfinished challenges pieces in my UFO/WIP collection. Originally begun as part of another challenge, I thought the 8 x 16 inch pieces of my winter diptych could be re-worked into the 9 x 12 format.  I removed some of the sky and could have chopped off the snow at the bottom of the piece, but I didn't think I'd like the proportions and the more I thought about it . . . another idea emerged.

I started to see a great place to start for a winter-themed round robin quilt.  Maybe it's the fact that it's been 100-plus degrees hot-hot-hot here and I'm starting to wonder if a little winter in my life would be such a bad thing.

If the ladies in charge will accept me at this late date, I'll be joining the in-progress Liberated Round Robin . . . if I'm too late, I'll likely play along with this nested round robin group on my own.

To see more design walls/tables and work-in-progress, check out the links in  Judy's Design Wall Monday post.

No longer on the work table at my house, is the pillow I made for the pink portion of the Rainbow Scrap Challenge last month.  I like those pale-ish baskets so much more with their yo-yo "blooms" planted in them.


Finished Pillow 

I sewed the quilted back and front sections together with the right sides on the outside and then bound the edges.

Saturday, June 18, 2011

Playing with Patterns

Here's how I spent my Friday Night Sew-In (FNSI)–playing with (quilting) patterns.

This is my table topper, a 18 by 27 inch "super" rectangle, made from 9 of the easy 3-patch rectangle blocks.  

I decided that I would quilt each of the 27 different rectangles (3 in each block) with a different design.  They are all based on quilting designs in Leah Day's Free Motion Quilting Project.   I chose a bunch of the more organic-looking shapes, a mix of edge-to-edge, center fill, echoing and pivoting designs ... as well as mix of designs I liked and felt confident I could accomplish and some that I didn't think I'd like and thought were a bit beyond my technical reach.

Thread choices
Someone suggested variegated thread, so I pulled out a rainbow of sulky rayon threads from my thread box.  The color changes didn't always work in a pleasing way . . . and I confess that I ripped out one design when it was almost completed because it didn't work at all ;-)

At the end of the night, the quilting was done. I plan to bind it, wash it, and put it on my table soon.


I enjoyed losing myself in this little project last night, even if, this morning, it doesn't necessarily feel like I accomplished a LOT.  I always start the FNSI with a list of things I plan to work on . . .

In other news, I made a big covered button, with a cover pieced from scraps.  The button and loop closure to the string pieced tote.  The loop is actually a stretchy poly tail holder ;-)

Tote with button

Thursday, June 16, 2011

Get ready, Get set, Sew

Handmade by Heidi
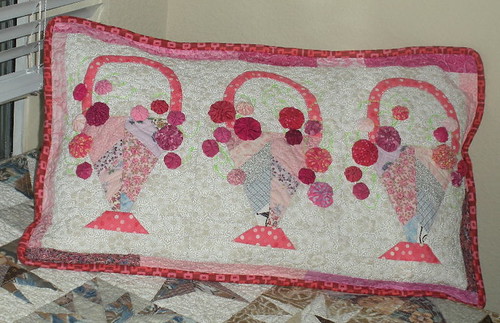
Tomorrow is the third friday of the month and time for June's Friday Night Sew-in.  Haven't decided on WHAT I'll be sewing, but I'm definitely planning to participate this month.

How about you? Participation is as easy as one-two-three:
  1. Commit.  Sign up and post your intention on your blog.
  2. Sew.  On Friday night, get your house and family settled, get comfortable and work on projects of your choice.
  3. Share. Sometime on Saturday, publish a post about what you worked on (and share photos in the FNSI Flickr group–something I usually forget about, so I'm reminding myself here ;-) 

    Wednesday, June 15, 2011

    The Zipper Experiment

    FMQ detail
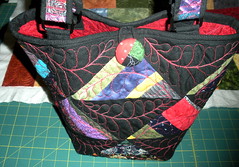
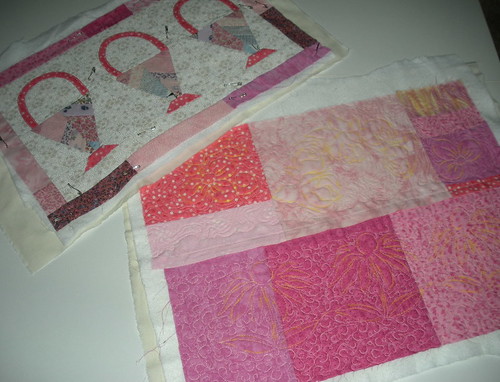
I finished the quilting on the front of the 3 Baskets pillow and ... found the courage to unzip the quilted back and slice through the batting and backing. I trimmed the batting, folded in the raw edge of the backing and stitched it to the zipper tape.

    In the detail photo, you can see 3 of Leah Day's designs from her free motion quilting project: loose weave (on the basket), sea oats (in green, masquerading as vines for the yet-to-be-added yo-yo "flowers," and bed of roses in the background.

    I probably could have finished the back of the zipper application more neatly/evenly, but it works . . . and I rationalized that no one except me (and now, you) will ever see the inside of the pillow and my wavy edge.

    The zipper test

    After this photo was taken, I added more filler-quilting to continue the quilting to the zipper.

    I had a little brainstorm today about a project that won't need too many yellow scraps for the Rainbow Challenge, so I'm anxious to finish up this pillow and move on.

    IF I still lived in Dallas

    The itty bitty loft that was my home in downtown Dallas would be a great place to be . . .  to celebrate the Mavericks NBA Championship win.


    No worries about traffic or parking, just a short walk to join the victory celebration. It's going to be quite a party.

    Monday, June 13, 2011

    What IF . . .

    When assembling and quilting those pink pieces, I asked myself that dangerous question, what if . . .

    What if I assembled the back of the pillow cover, sewing in the zipper BEFORE I quilted it?

    Pillow front and back

    I've quilted the back with some flower designs from stencils (the yellow chalked desisngs), filling with a couple of filler designs (inspired by Leah Day) and avoiding the zipper area.

    Detail of Pillow Back Quilting
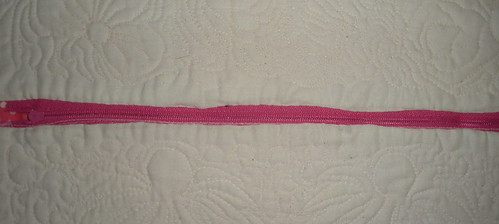
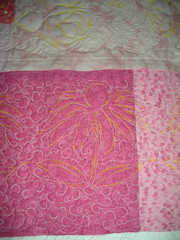
My plan is to unzip the zipper, slit the batting and backing and finish the cut edges with bias strips.

    Probably there's a better way to do this . . . and I'm sure someone will leave a comment so I'll know better the next time.  I probably could have done some research on the "right way" to insert a zipper into a quilted fabric, but I couldn't resist just running with the what if that was in my head. 

    Before I take the next steps and see if my crazy idea will work, I plan to quilt the front and add all those pink yo-yos.

    To see more work in progress (and maybe a few other crazy ideas), check out the Design Wall Monday links on Judy's blog, The Patchwork times. 

    Sunday, June 12, 2011

    The Color of the Weekend is YELLOW

    Daisy ChainYellow is the color for June in the rainbow scraps challenge. The most challenging thing for me about working with yellow scraps is that, like others, I just don't have many of them.

    I enjoyed making the small pink yo-yos last month (for a project that is not yet finished) so I thought I'd make some yellow flowers using the Clover tool–purchased at a quilt show a long, long time ago, but never used . . .  until now.

    Here are my first efforts. 

    DSCN6839


    Auditioning the Hat Band
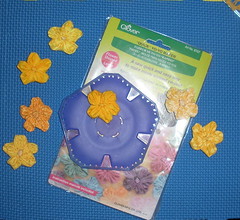
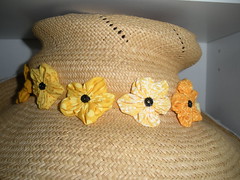
I was thinking of black-eyed Susans when I added big black beads to the centers . . . even though these flowers really look nothing like them.

    My idea was to chain them together and use them as a hatband for a wide brimmed straw hat that I'm cleaning up and re-working, but once they were in place, I didn't like it :-(

    I'll wait for some new inspiration.

    While I like the Clover tool, I don't think I'll be makng more flowers from quilting cotton.  I think it would be wonderful to use with a silk chiffon, a handkerchief linen or other lightweight fabric.   The flowers finish around 1 3/4 inch wide.  I also bought the smaller 1 1/4 flower tool.

    Grace Helped
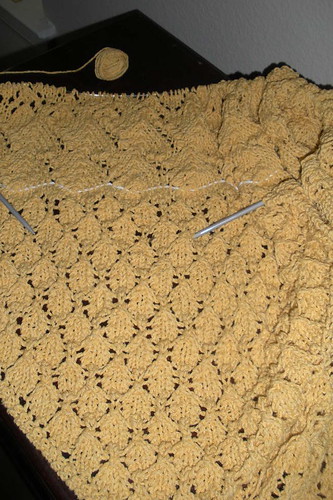
On a more successful note, I removed the blocking wires and T-pins from my shawl (Grace helped) and I am quite happy with the result.

    Finished Shawl on the Balcony rail

    World Wide Knit in Public Day is being celebrated this week–I haven't heard of any public knitting events near me, but I'll be casting on a new project soon and being on the lookout for kindred knitters.

    Friday, June 10, 2011

    Pay No Attention to the COLOR in these Photos

    Blocking the Swallowtail Shawl
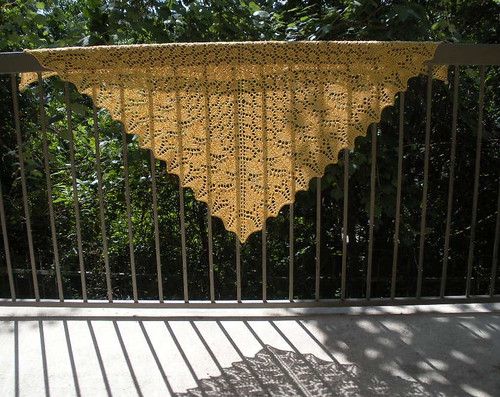
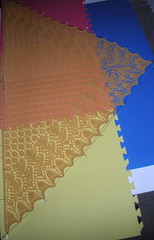
The real news is that the extra ball of yarn arrived a couple days ago and it seems to be a close enough match, despite coming from a different dye lot.

    I finished knitting last night and blocked the shawl this afternoon. The brightly colored modular interlocking rubber mats under the shawl really challenged my camera . . . but I still wanted to share my progress.

    The biggest challenge of knitting this pattern in the Aran weight yarn was the P5 together that makes the "nubs" in the Lilies of the Valley pattern. Once I developed a technique for that stitch, it went very smoothly.

    Here's a detail photo showing some of those lovely bobbly "nubs" and the final lace pattern.


    I'm not sure if the knitting police would consider this "done," but I'm counting it as a finish ... and maybe, since the shawl was knit from some leftover skeins and the color for this month's Rainbow Scrap Challenge is yellow, it can count as a challenge project, too ;-) 

    Wednesday, June 08, 2011

    A Rectangle for My Table

    I've been a little focused on rectangular proportions lately . . . as evidenced by my 3-patch rectangle block, created for the block lotto.  I realized when I was making my blocks that you could take 9 blocks, mix them up in a random-looking lay out that measures 18 x 27 inches, maintaining those same golden-inspired proportions as the block. I'm calling it a super-rectangle.


    MaryJane's 3-patch #19Kate's 3-patch #2
    LPB's 3-patch #1Sophie's 3-patch #16LPB's 3-patch #4
    Kate's 3-patch #8MaryJane's 3-patch #17
    I thought this size would be a nice size for a table topper for my small drop-leaf table.  Then I started thinking about multiples.  If you made FOUR super rectangles like this and sewed them together as a 4-patch, the result would be 36 x 54 inches or a crib size quilt.  If you made a NINE-patch of super rectangles, the result would be 54 x 81 inches or a twin size quilt.  I liked the idea of starting with rectangle block with nice proportions and making a quilt that shares those same proportions.

    After Michelle posted on the Block Lotto blog about making a 42 x 54 inch quilt top using 42 3-patch rectangle block, made from 4 fabrics in 3 hours and 15 minutes, from cutting to done . . . I decided to sew a completely scrappy version of the golden rectangle for my table and time myself along the way.

    27 Fabrics
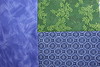
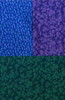
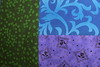
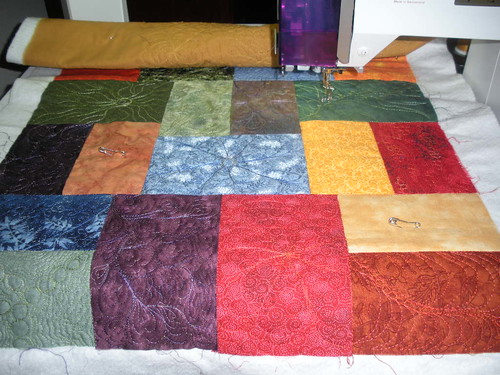
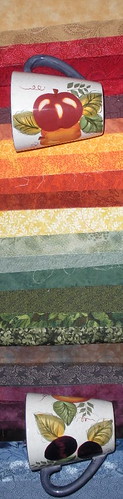
To make nine 3-patch blocks without using any fabric twice, I'd need 27 fabrics. I used my everyday dishes as my color inspiration choosing tone-on-tone fabrics from the fruits and the blue on the handles and rims.  (There are also pears on some of the pieces.  I really enjoyed the process of really looking at the mugs and seeing the many colors in each fruit (and leaf) and tried to represent them with fabrics from my scraps.

    Time to select 27 fabrics from scraps: 20 minutes

    Time to randomly cut the large and small rectangles from the fabrics: 25 minutes

    Ready to Sew

    One could lay out all the blocks before beginning to sew, but I didn't ;-)

    Time to sew randomly selected rectangles into nine 3 patch blocks: 25 minutes (including the time to rip out and re-sew one of the blocks–something that I thought was a batik actually wasn't ... and I sewed it wrong side up)

    Next came the biggest chunk of time . . .  where I arranged and re-arranged those blocks until I was happy enough with the arrangement to sew them together:  30 minutes.

    Arrangement 1 Arrangement 2
    Arrangement 3   Arrangement 4 
    (if you like one of these better than my actual super rectangle, don't tell me ;-)

    Another quilter might have worked out the color placement in advance with colored pencils or a computer program . . .  but, personally, I like moving around actual pieces of fabric. 

    Time to sew the 9 blocks into a rectangle for my table, press it and be ready to layer and quilt: 10 minutes


    Total elapsed time: just under 2 hours.

    As soon as I decide on thread color(s), my plan is to quilt it with 27 of Leah's FMQ filler designs, one in each rectangle.  It will be good practice for me and interesting texture on my table.

    Tuesday, June 07, 2011

    If It's Tuesday, It Must Be ...

    Flowering Trees in the Neighborhood. . . talk to recruiters day.  I'm not complaining–job hunting is much easier when the phone is ringing.  I suspect that, on Monday, staffing agencies start their week by looking at their new requirements and looking through resumes for a match; then on Tuesdays, the recruiters reach out and touch all the people behind those resumes.

    On the job front, I AM talking to lots of recruiters and interviewing with interesting companies–both on the phone and in person–but . . . am beginning to have that always a bridesmaid, never the bride feeling as the feedback continues to be that they liked me for the position and the decision was close, but . . . they went with another candidate.

    Bird nesting atop spikes
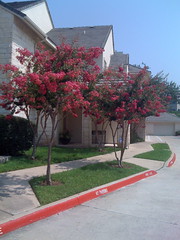
This morning, before it hotted up to what is expected to be another record-breaking high, I went for a walk to the post office and the grocery store. I dug out a straw hat with a wide brim and thought about how I will rework it a little for this summer.  The Lantana trees near my house are already in full bloom and looking gorgeous.

    Outside the post-office, under the eaves, on top of spikes clearly intended to discourage nest building, there were several nests like these–look close and you'll see mama sitting atop that mess, guarding her eggs.

    She made me wonder if all species have the ability to be stubborn?

    She also made me think of a friend who recently told me in an email that she hasn't yet turned on only air conditioner–a window air conditioner with a potted plant on top of it ... a Carolina wren made a nest in a potted plant.  She's hoping for cool weather because it's going to be a while before the eggs hatch and before the babies fledge.

    Seriously, doesn't it seem a little bit beyond instinctual and just plain stubborn, birds taking on man and building construction when they choose to build their own homes?

    I confess to spending most of my time in air-conditioned comfort . . . though it does seem to be a little bit crazy to be knitting when the weather is like this.  

    Actually, the knitting temporarily stopped on Friday because, even though I have been knitting with fingers crossed . . . on Thursday night, I ran out of yarn . . . with 10 long rows to go. Even unblocked, I think it's looking pretty wonderful.


    The pattern did say that I would need a bit more yarn than I had, but I was using a different weight yarn than any of the options listed on the pattern and someone on Ravelry who had made the same pattern using exactly the same yarn, said she used less–in fact exactly the same number of skeins as me . . . so while I thought it would be close, I believed I would make it. 

    Thursday night, when the yarn ran out, I looked online and only found a single skein, on clearance.  Miraculously, it was the same color, though undoubtedly a different dye lot.  The shipping was almost twice the cost of the sale-priced skein of yarn.  I decided to sleep on it. 

    Friday, I woke up with an idea of how I could shorten the last border, which is at the top in this photo,  and make it work. I unknit several rows and then re-knit them.  I knew I wasn't going to like the proportions, but I persevered.  But I didn't account for how much yarn the "elastic bind off" was going to take and when I had a little more than half of the three hundred and some stitches bound off . . . it once again became clear that I didn't have enough yarn.   And so, once again, I unraveled the bound off stitches and put everything back on the needles and then backed out my foreshortened last border, reknit the pattern as written as far as I could go and . . . called the yarn shop in Rhode Island that has the last skein of this rough silk yarn. 

    As a result of my experimentation, I know I want to knit the last border as written because it creates the swallow-tail that gives this shawl it's name.  So even if the new yarn, when it arrives, is a bad match, I will likely use it . . . and overdye the whole thing to conceal the mis-matched dye lots.

    I suppose I'm being a little stubborn, too, and really want to knit the shawl as written no matter what (even with yarn from mis-matched dye lots ;-)

    Until then, I am thinking about the next summer knit . . . I think I have some cotton yarn in my stash that might be perfect for the Boutique Sweater that Crazy Aunt Purl has been blogging about. It's another one of those knits that are right for the air conditioned summer environment.

    Monday, June 06, 2011

    The Easiest Lotto Block Ever!

    Lately, I have been noticing the pleasing proportions of rectangle blocks.  The quilts are usually made from rectangles cut from a single fabric, or improvised "made" fabric and set with wide, plain sashings.

    It prompted me to do some reading about the golden rectangle and think about quilts and quilt blocks with similar proportions.

    Out of all that thinking came the easiest Lotto Block ever.  I'm calling it a 3-patch rectangle (the link goes to the block directions page).  Because the block is so easy, the real challenge this month is paying close attention to color.  We're making violet-blue-green blocks, avoiding the warm red-violets and yellow-greens.  It has led some of us to question, how green is our green stash or how purple (and not red-violet) are our purples?

    This is what fifteen 3-patches look like–I got a little carried away this month and made 16 blocks so I could play with some setting ideas.

    You can see all the blocks that everyone has made so far, on the block lotto blog, here.

    These blocks would be a good choice for a quick quilt and would, I think,  also make an interesting background for appliqué.  I am planning to make a table topper from 9 blocks using tone-on-tone fabrics and practicing free motion quilting designs in each of the rectangles.

    For a look at what's on other quilters' design walls/floors/tables, check out Judy Laquidera's Design Wall Monday blog post today.
    Related Posts Plugin for WordPress, Blogger...