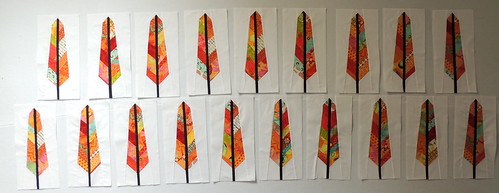
This afternoon, I'm squaring up the 52 feather blocks I made at the quilt retreat.
19 done, 33 to go ...
I'm joining the lists at Lee's WIP Wednesday and Esther's WOW.
Wednesday, April 30, 2014
Tuesday, April 29, 2014
Scrappy Purple Violet Blocks
The last purple gasp of projects for the Rainbow Scrap Challenge: Violets
When a friend mailed me a big box of fabrics culled from her stash, some of the purple strips seemed perfect for some violet blocks.
These are 5-inch blocks. Curiously it's not one of the six sizes included in the pattern I created for the Block Lotto a few years ago ... I see an updated pattern in my future.
I plan to use these for a sewing machine cover for my purple Bernina.
I'm playing a little catch-up after picking up a bug at the quilt retreat and will be late joining the parties for Scrap-Happy Weekend and Design Wall Monday.
You can find the pattern at the top of my Free Quilt Block Patterns page.
When a friend mailed me a big box of fabrics culled from her stash, some of the purple strips seemed perfect for some violet blocks.
These are 5-inch blocks. Curiously it's not one of the six sizes included in the pattern I created for the Block Lotto a few years ago ... I see an updated pattern in my future.
I plan to use these for a sewing machine cover for my purple Bernina.
I'm playing a little catch-up after picking up a bug at the quilt retreat and will be late joining the parties for Scrap-Happy Weekend and Design Wall Monday.
You can find the pattern at the top of my Free Quilt Block Patterns page.
Thursday, April 24, 2014
Retreat!
I think quilt retreats are universal in many ways.
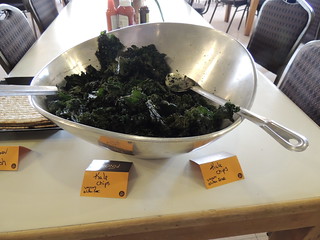
The kale chips were a nice change from the usual chocolate and sweet/salty snacks.
Finishes are shared and celebrated.
Quilters gather in a large room, with cutting tables and ironing stations. Sometimes you're one of the lucky few with a spot near the window and enjoy the natural light; sometimes you end up in a dark corner, glad you remembered to bring some lighting of your own.
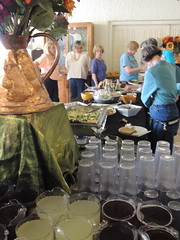
The food is always good. You may not have as many vegan and gluten-free options as I enjoyed today, but it's always tasty.
The kale chips were a nice change from the usual chocolate and sweet/salty snacks.
Finishes are shared and celebrated.
If you're organized and focused, you can get a lot done. My day today started like this.
Looked like this for much of the day.
And started to look like this around dinner time.
At the end of the day, I had 19 feathers completed ... and 33 more in progress. I couldn't resist bringing the finished ones home so I could put (some of) them on my wall.
(It was after dark when I got home so the light/color in this photo isn't great.)
Really, the biggest difference between the retreats I've attended, in California, Michigan, Texas and New Mexico is the architecture.
Tuesday, April 22, 2014
Making Fabric
These are width-of-fabric strips in various sizes, ready to be sewn into striped yardage.
The fabrics have been set aside for a while and today, it felt like the time was right to get started on this ... and so it is officially in-progress. At the end of the day I had made 3 1/2 yards of these citrus-y stripes.
I'm joining the lists for WIP Wednesday at Freshly Pieced and Esther's Blog.
The fabrics have been set aside for a while and today, it felt like the time was right to get started on this ... and so it is officially in-progress. At the end of the day I had made 3 1/2 yards of these citrus-y stripes.
I'm joining the lists for WIP Wednesday at Freshly Pieced and Esther's Blog.
Monday, April 21, 2014
April's Lovely Finish- a Spring Challenge Pillow
Here's what I made from those made fabrics that I shared a couple weeks ago. It's my Lovely Finish for April.
Because the line drawing was so similar to the Modern Clover block that Kate designed and I created the block pattern for the April 2011 Block Lotto, I initially thought to use that block because it would fulfill the requirement of changing one thing.
You can see the beautiful quilt Kate made from the lotto blocks she won that month in the Block Lotto Gallery on this page: Modern Clovers - A Finished Quilt.
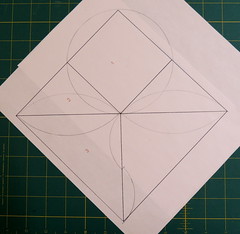
Then I started asking myself those what if? questions and pulled out a compass to turn all the straight lines in Victoria's drawing to curves: A circle instead of a square for the bloom, a curvy stem and symmetrical leaves with pointy ends. (You might have to squint or enlarge the image to see my penciled design).
I had become a fan of Dale Fleming's technique for sewing inset circles when I tried it for the first time a couple months ago to make the February Bead-on-a-String blocks for the block lotto, that I thought of it as a way to sew this block ... but I wondered if it would work when the fabrics involved were made fabrics and had lots of layers and seams in them. I also had never inset anything with points, like the leaf shapes.
If you google Dale Fleming 6-minute circle, you'll find links to Dale demonstrating her technique on Simply Quilts (on the HGTV website) and a longer version (with other shapes and examples on The Quilt Show (membership may be required). You'll also find others sharing their experience–clearly I am not the only one who has become a fan.
You can see in my sketch, and in the finished pillow, that the circle bloom overlaps the leaves. I decided that the bloom would be "in front" of the leaves and so, I would need to inset the leaves, then inset the circle into the piece. I created two templates (from freezer paper) and made them 14 1/2 inches square, the same size as large as the background, to help me keep the individual elements aligned.
Here are the in-progress photos I took of the process.
Since I wasn't entirely happy with the center of my string-pieced circle, I also added three circles by hand appliqué using a US dime as my template to cut and prepare the circles.
Since I knew it was going to become a pillow, I used a plain muslin fabric for the back ... which makes it easy to see the good, bad and the ugliness of my quickie free motion quilting.
I outlined the pieced and appliquéd shapes, quilted the background with a free motion fill design–similar to Leah Day's Bed of Roses, though mine actually feel more like fried egg flowers with spiral centers–and added veins to the leaf shapes. There's an extra layer of batting behind the circle bloom.
After it was quilted, I turned it into a pillow by added a plain fabric lapped back and binding the edges.
And then, after a weekend of gray rainy days, it was ready for it's day in the morning sun.
In my case, April Showers bring progress to quilting projects :-)
Sometimes a little play and a small challenge piece can spark a new idea ... and this experience was no different ... I can't wait to see if my new idea works.
I'll be linking to the Finishes party for A Lovely Finish when it's published later this month. This is also a NewFO finish for me in April. If only the rest of my life was going so well and ahead of schedule ...
This 14 inch pillow is also my response to the Spring Challenge for the 15 Minutes of Play blog. The requirements of the challenge were to begin with the sketch below and change one thing about it and to use some made fabric.
You can see the beautiful quilt Kate made from the lotto blocks she won that month in the Block Lotto Gallery on this page: Modern Clovers - A Finished Quilt.
Then I started asking myself those what if? questions and pulled out a compass to turn all the straight lines in Victoria's drawing to curves: A circle instead of a square for the bloom, a curvy stem and symmetrical leaves with pointy ends. (You might have to squint or enlarge the image to see my penciled design).
I had become a fan of Dale Fleming's technique for sewing inset circles when I tried it for the first time a couple months ago to make the February Bead-on-a-String blocks for the block lotto, that I thought of it as a way to sew this block ... but I wondered if it would work when the fabrics involved were made fabrics and had lots of layers and seams in them. I also had never inset anything with points, like the leaf shapes.
If you google Dale Fleming 6-minute circle, you'll find links to Dale demonstrating her technique on Simply Quilts (on the HGTV website) and a longer version (with other shapes and examples on The Quilt Show (membership may be required). You'll also find others sharing their experience–clearly I am not the only one who has become a fan.
You can see in my sketch, and in the finished pillow, that the circle bloom overlaps the leaves. I decided that the bloom would be "in front" of the leaves and so, I would need to inset the leaves, then inset the circle into the piece. I created two templates (from freezer paper) and made them 14 1/2 inches square, the same size as large as the background, to help me keep the individual elements aligned.
Here are the in-progress photos I took of the process.
The individual photos (and more) are in my Flickr album: Spring 2014 Challenge. You can also flip through them using the arrows on the photo at the bottom of this post.
I wasn't sure that my sewing machine was going to like sewing through the many layers of made fabric and the glue that holds everything together, especially at the bottom of the circle, where I was sewing the circle into the leaf/background seams.
It worked beautifully, the first time, with no ripping or re-sewing. I was amazed.
The last photo in the mosaic above shows the wrong side and how it all somehow worked.
I added the curvy stem by hand appliqué of a bias strip, sewn into a 1/2 inch tube.I wasn't sure that my sewing machine was going to like sewing through the many layers of made fabric and the glue that holds everything together, especially at the bottom of the circle, where I was sewing the circle into the leaf/background seams.
It worked beautifully, the first time, with no ripping or re-sewing. I was amazed.
The last photo in the mosaic above shows the wrong side and how it all somehow worked.
Since I wasn't entirely happy with the center of my string-pieced circle, I also added three circles by hand appliqué using a US dime as my template to cut and prepare the circles.
Since I knew it was going to become a pillow, I used a plain muslin fabric for the back ... which makes it easy to see the good, bad and the ugliness of my quickie free motion quilting.
I outlined the pieced and appliquéd shapes, quilted the background with a free motion fill design–similar to Leah Day's Bed of Roses, though mine actually feel more like fried egg flowers with spiral centers–and added veins to the leaf shapes. There's an extra layer of batting behind the circle bloom.
After it was quilted, I turned it into a pillow by added a plain fabric lapped back and binding the edges.
And then, after a weekend of gray rainy days, it was ready for it's day in the morning sun.
Sometimes a little play and a small challenge piece can spark a new idea ... and this experience was no different ... I can't wait to see if my new idea works.
I'll be linking to the Finishes party for A Lovely Finish when it's published later this month. This is also a NewFO finish for me in April. If only the rest of my life was going so well and ahead of schedule ...
Saturday, April 19, 2014
A Baker's Dozen of Scrappy Purple Blocks
Last night's Friday Night Sew-in was a success at my house.
Almost all of those 425 triangles were sewn into 13 of my what I think of as Broken Dishes Star blocks.
It was an evening of a lot of chain sewing, followed by lots of pressing, followed by more chain sewing as the triangles became half square triangles, which were dealt like cards into 13 piles of half light-medium and half light-dark squares ... which finally became blocks.
While all this chain sewing and marathon pressing was going on, I watched some episodes from last season's Orphan Black in preparation for the new season which starts tonight. I'm not a Sci-Fi fan, but I really like this show about a group of clones who discover each other and their history.
Dealing with all those triangles was less tedious as I stitched along with Sarah, Alison, Cosima, Helena, Beth and the others (all played by one talented actress).
The thirteen blocks on the left in an on-point orientation are the result of last night's effort. The eight on the right are the blocks I made a couple years ago as part of the rainbow scrap challenge.
This morning, I couldn't resist pulling out the stack of 84 blocks in 4 color groups and putting some of them up on the wall to see them all together.
Now, all the purple blocks for my on-going Rainbow Scraps Challenge projects are done, though, I have a couple of ideas ... if I don't run out of month.
To see more scrappy purple projects, check out the links at Scrap-happy Saturday.
Since I will likely be enjoying these blocks on my design wall for a few days, I'll also be linking this post to Judy's Design Wall Monday.
Friday, April 18, 2014
Scrappy Signs of Progress ...
Sometimes we can see signs of progress even before we sew one stitch. Here's the evidence of my progress for the Rainbow Scraps Challenge.
On the left, 450 scrappy purple triangles, in stacks of light (top two), medium and dark. On the right, the scraps from die-cutting those triangles. This is a few more than I'll need to make the 13 more purple broken dishes star blocks I need.
My plan for tonight's Friday Night Sew In is to turn these triangles into half-square triangle (HST) units and the triangle squares into blocks.
Thursday, April 17, 2014
Two Quilts That Can Finally Be Revealed
It's been a while since I shared the little quilt that I made for Kate's annual swap of little quilts.
I named it Little Strings, for the tiny string-pieced triangles.
Now that all the swapped quilts have been received, I can share the quilt I received in the swap, made by none other than Kate herself:
You can see all the quilts with information about who made them and to whom they went to in the swap in the Grand Reveal on the blog for Another Little Quilt Swap.
In the Cotton Robin group last summer, one of the round robin quilts took the longest trip ever reaching its destination (literally on a slow boat from Canada to New Zealand). When all seemed lost, a replacement quilt was started and then, when the wayward quilt arrived, a group of us decided to use it as a center and make a round robin quilt for Julie, our fearless leader.
By the time I received the quilt from Rachel, it had already passed through the hands of five quilters and looked like this:
At this point, it measured approximately 43 by 59-inches. The rounds seemed to be wider and wider and I felt my challenge was to add something narrower that was still graphically strong. I decided to continue using the dark blue that Rachel had added to border her beautiful appliqué rows and to add colors from the center. After I added my round, it looked like this:
After me, Tami and Laurina added borders, Nan quilted the quilt and Jay added the label and binding and it looked like this:
The finished quilt is approximately 70-inches square, large enough to wrap up and feel appreciated.
I love the little quilts we make as part of the Cotton Robin and can't wait until next month when the last quilt will arrive, ready to be backed and quilted, but it was fun to work on this quilt with many rounds.
Tuesday, April 15, 2014
The Internet Made Me Do It
When Melody posted about making pissaladière–a south of France dish made with caramelized onions, anchovies and ripe olives on a thin, pizza like crust–I started getting nostalgic about the time I spent living in France and eating things like pissaladière and pizzas baked in wood-fired ovens.
Then I read Lori's post, with a review of the book, Almost French: Love and a New Life in Paris by Sara Turnbull, and how the author married a Frenchman lived in France for 8 years, adopted many French customs, but never became French. More nostalgia ensured and I thought about how my own life in France was a long time ago and only lasted three years, but has had a lasting effect on me.
Over the weekend, Kate shared something new for dinner, a spinach, egg and pecorino pizza ... which got me thinking about my favorite pizza when I lived in France. It had a thin crust and was topped with a tomato sauce, lardons (a style of bacon), eggplant and an egg. For lunch today, my pizza had these, along with some mushrooms.
My pizza crust wasn't as thin, but had a nice crisp bottom (thanks to the cast iron pizza pan) and my pizza was piled high with the veggies in a very UN-French way, and I don't actually remember whether there was cheese on top way back when and next time I'll try it without, but all the flavors from my memory was there and it was a nice culinary trip down memory lane.
The only thing missing was the pili-pili–an oil infused with chile peppers and herbs. In Provence, where there's pizza, there's pili-pili in a bottle, sitting on the tables, to be drizzled on top of the pizza. I had completely forgot about it until my pizza was sliced and on a plate and I realized it was missing. I'm going to try making some–this recipe from the New York Times looks like the stuff I remember–for the next time the Internet makes me nostalgic for my favorite French pizza.
Monday, April 14, 2014
In Other News ... Snow? Really?
I woke up to ice on the deck and this forecast:
I expected snow on the mountains, but theres a 50-50 chance it will snow here today.
I no longer feel bad about putting off gardening tasks. Today I am putting off anything that requires going outside and trying to convince Johnny Be Good that he really doesn't want to go out either.
It's a Quilter's Prerogative
A funny thing happened when I made this month's Triangles-in-a-Square blocks for my Mod-Mod Quilt-Along queen-size quilt.
I chose fabrics from my original, inspirational stack of fabrics–won in a blog giveaway at the end of last year.
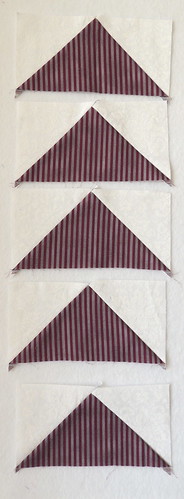
After deciding that I wanted to use the stripe as the large triangle in the block, I knew I couldn't use my favorite, 4-at-once, no waste, flying geese technique because I wanted to end up with the stripes going the same direction in all the blocks.
I ended up creating a template, starting with the paper foundation piecing pattern included in the block directions as Method #3.
If you're curious, I blogged about making the template and cutting the fabrics on the Block Lotto blog, here:
And Then There Was Method #4
It worked well for me and I quickly made the 9 blocks I needed.
Since these were my original, inspiration fabrics for the color way for my quilt, I was confident that they would work in my quilt and didn't pull out the blocks already made for this project until AFTER I'd made them.
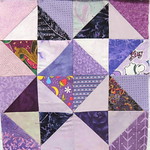
You can guess what happened, right? Once I put some of them on the design wall, arranged as they will be in the quilt, I didn't like them so much.
As is my usual, I suspended disbelief and left them on the wall overnight to see how I'd feel in the morning ... when I decided I wanted something with clearer, lighter colors. Here's how my design wall looks now, with the replacement blocks. Your mileage my differ, but even on an overcast, badly lit day in the studio, I like these better.
I am reminded, once again, of the value (to me) of my design wall. I'm also struck by how much my idea of the colors I want in this quilt have changed in just a few months. And how it's a quilter's prerogative to change her mind as work on a project progresses.
I'm joining the list for Design Wall Monday.
This is one of two quilts I'm making as part of the Mod-Mod Quilt-Along. In the other, a 60-inch square throw sized quilt, I am throwing caution to the wind and making the blocks each month in the designated color for the Rainbow Scraps Challenge. I am such a control freak when it comes to my quilts that I just have to suspend disbelief and quilt on ... here's how those blocks look so far.
If you like what you see and want to jump in, you can the individual block directions on my Free Block Patterns page and the Mod-Mod-QAL updates on the Block Lotto here:
Introduction and January update: It’s a Mod-Mod Quilt-Along
Wednesday, April 09, 2014
Spring Challenge - Work-in-Progress
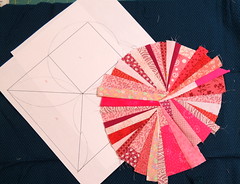
Here's where I started, with an idea, a sketch and a bit of fabric made from (mostly) pink strings.
I haven't made a lot progress so far this month, but I've made some.
More "fabric" made from scraps: a big blue square and some green rectangles.
I think you can see where I'm headed with my simple idea ...
I haven't made a lot progress so far this month, but I've made some.
More "fabric" made from scraps: a big blue square and some green rectangles.
I think you can see where I'm headed with my simple idea ...
I'm joining the party for WIP Wednesday on Freshly Pieced and Esther's WOW (WIPs on Wednesday). on her blog. Be sure to check out what others have in-progress and the beautiful, free, Easter Rose table runner pattern Esther has designed.
Sunday, April 06, 2014
Making Blocks for Scrappy Quilts
Sunday was gray and cold and windy here, feeling more like winter than anything else. It made it easy to stay inside and continue to play with purple scraps. The result was a purple haze on my design wall.
These are the blocks for the four ongoing projects I'm working on as part of the Rainbow Scrap Challenge. Two are new this year, two are old (and older) projects that I hope to finish by year's end as I work my way, month by month, color by color.
As I moved from block-to-block and project-to-project, I realized that my approach to these scrappy blocks isn't always the same.
Each of the Broken Dishes blocks is made from 32 triangles. When cutting fabrics for these, I don't really think about the individual fabrics and how they will play together, only their VALUE. The placement of the light, medium and dark fabrics creates the stars in these monochromatic blocks and they do seem to be proof of the idea that if you use 50 different fabrics, they will work.
FYI, the 8 broken Dishes blocks on my design wall are from a previous iteration of the Rainbow Scraps Challenge. My goal this month is to make 13 more.
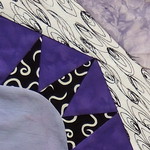
The paper pieced Briar Patch blocks contain 3 purple fabrics plus 2 black and white prints (one light and one dark). In each of these blocks, I do think about choosing three fabrics that play well together.
But because I doubt that the blocks will be lumped together by color in the quilt, I don't worry if the blocks made from a single color, like these six scrappy purple ones aren't great together.
For the Triangles-in-a-Square blocks for my Mod-Mod Throw, because I know they WILL be grouped together in the quilt, I paid more attention to the group of 14 fabrics and how they ALL worked together.
I still used a mix of purples that were closer to red on the color wheel and those leaning toward blue, but all six blocks are happy to be adjacent to one another (and definitely happier together than those Briar Patch blocks) ... or at least I think so.
I made these using the 4-at once method (#1 in the instructions) and the paper foundations (method #3) to make 2 more. I'll have more to say about these and the Mod-Mod quilt-along next week.
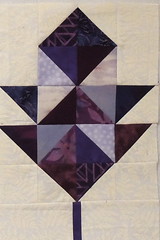
I confess I am not entirely happy with my purple Oak Leaf block.
While I do want to have enough contrast between the 10 purples in this block–because I want the individual triangles to be obvious–this one seems to have almost too much value contrast and would, I think, benefit from more mediums and fewer dark fabrics.
If I get all those Broken Dishes blocks made before the end of the month, maybe I'll try remaking this one and see what happens.
When you make scrappy blocks, do you choose fabrics that coordinate, choose them based on value or color, or just randomly choose and use them ... or do you have your own technique for choosing fabrics?
As I moved from block-to-block and project-to-project, I realized that my approach to these scrappy blocks isn't always the same.
Each of the Broken Dishes blocks is made from 32 triangles. When cutting fabrics for these, I don't really think about the individual fabrics and how they will play together, only their VALUE. The placement of the light, medium and dark fabrics creates the stars in these monochromatic blocks and they do seem to be proof of the idea that if you use 50 different fabrics, they will work.
FYI, the 8 broken Dishes blocks on my design wall are from a previous iteration of the Rainbow Scraps Challenge. My goal this month is to make 13 more.
The paper pieced Briar Patch blocks contain 3 purple fabrics plus 2 black and white prints (one light and one dark). In each of these blocks, I do think about choosing three fabrics that play well together.
But because I doubt that the blocks will be lumped together by color in the quilt, I don't worry if the blocks made from a single color, like these six scrappy purple ones aren't great together.
A side effect of my gray, overcast day is that some of the purple fabrics in these blocks look a little dead. They are actually more lively and purpley in person ... but they still don't all play well with one another.
For the Triangles-in-a-Square blocks for my Mod-Mod Throw, because I know they WILL be grouped together in the quilt, I paid more attention to the group of 14 fabrics and how they ALL worked together.
I still used a mix of purples that were closer to red on the color wheel and those leaning toward blue, but all six blocks are happy to be adjacent to one another (and definitely happier together than those Briar Patch blocks) ... or at least I think so.
I made these using the 4-at once method (#1 in the instructions) and the paper foundations (method #3) to make 2 more. I'll have more to say about these and the Mod-Mod quilt-along next week.
I confess I am not entirely happy with my purple Oak Leaf block.
While I do want to have enough contrast between the 10 purples in this block–because I want the individual triangles to be obvious–this one seems to have almost too much value contrast and would, I think, benefit from more mediums and fewer dark fabrics.
If I get all those Broken Dishes blocks made before the end of the month, maybe I'll try remaking this one and see what happens.
When you make scrappy blocks, do you choose fabrics that coordinate, choose them based on value or color, or just randomly choose and use them ... or do you have your own technique for choosing fabrics?
Subscribe to:
Posts (Atom)