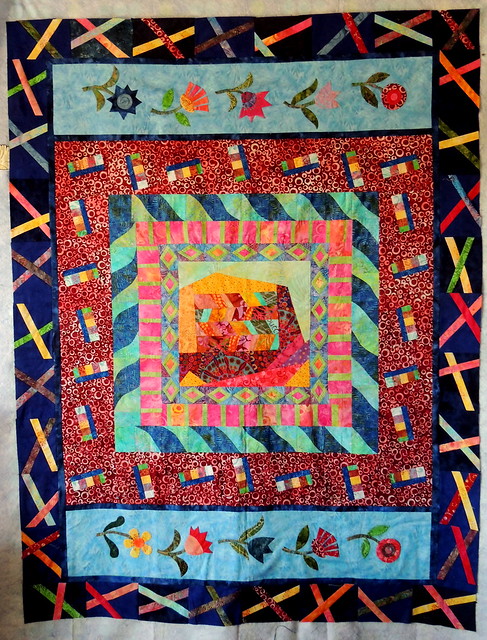
Showing posts with label cotton robin. Show all posts

Thursday, July 16, 2015

Butterflies and Birds and Bunnies ... Oh My!

The latest round of Julie's Cotton Robin has concluded and all has been revealed. I had so much fun this year working on–and being challenged by–this round of little quilts and was delighted by the quilt that came back to me.


For those unfamiliar with the Cotton Robin, here are the basics:
  1. Make a center that is no larger than 9 inches square (or a comparable-sized shape) and mail it to Julie.  Optionally you may include additional fabrics (totally up to a quarter yard) and/or instructions.  This year, Julie asked us to challenge ourselves in some way. Once the package goes to Julie, things become pretty much anonymous. 
  2. Receive a package from Julie which contains a center and mailing info for this and all future rounds.  Add a border and send it on to the next person. 
  3. Receive a package with a center with one border and add the second (last) border. The quilts should be no larger than 20 inches square (or something comparable if it isn't square). Send it to the next person. 
  4. Receive a finished quilt top, add backing and batting, quilt and bind it. Mail the finished quilt home.  
Here are some of my in-progress photos and notes of the four Cotton Robin quilts I contributed to this year, along with a photo of the finished quilts, one for each of the steps above.   It's a longish and photo-heavy post, so if you want to just cut to the chase and see ALL the finished Cotton Robin quilts, scroll up and follow the link at the top of this post. 

My Center 
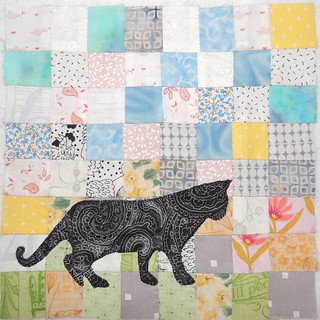

My Center
The challenge I set for myself was to create a soft, low-volume quilt. I pieced a scrappy center from 64 one inch (finished size) low-volume squares and added a machine appliqué cat silhouette. The cat is from a book by Carol Armstrong–if you have been around long enough, you might recognize that I've used it before in a doll quilt I made in for a swap–click over to see Ela and her Doll Quilt ... and those in the Block Lotto may see this cat again in a block for this month–it's a quilter's choice month with the theme of pets. 

I didn't include a note with my Cotton Robin package, but hoped that the center and the fabrics included conveyed my intention.

I included two fabrics–one which was used (the green background in the second round) and one that was returned to me with my quilt.  

Round One 
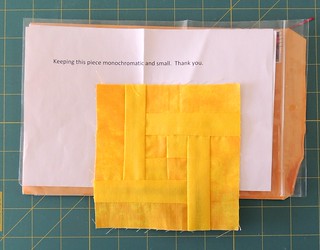


Center with Directions - Keep in Monochromatic and SmallI confess that when I received this package, with the note, Keeping this piece monochromatic and small, I wondered about the person who was really challenging themselves (and us) to make a monochromatic yellow quilt.

The center was 5 inches square (to finish at 4 1/2 inches).

My first inclination was to turn the square into a circle and make it the center of a sun (aka New York Beauty block). But then I realized that was exactly what I did for the first round last year and left it alone.
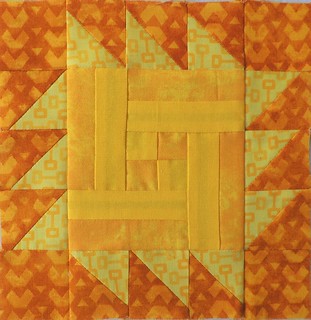
1st Border AddedI looked in my stash for a pair of yellow/gold fabrics that matched the two in the center and had as much contrast as possible and made a round of 1 1/2 inch half-square triangles.  The quilt was now 6 inches (finished size).


Maybe I pushed a little too far into golden brown territory.  I don't know.  Here's how Mary Jane's finished quilt came out:


Round Two


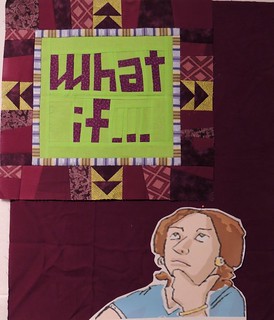
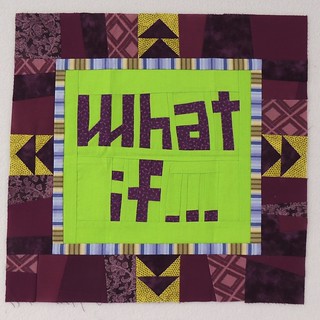
Second quilt arrivesSometimes, you receive a package and an idea immediately takes hold.  You can't shake it even if you aren't sure you have the skill set necessary to achieve it ... but when a quilt is actually asking you, "what if ..." I think you have to go for it and so I did.

My vision was that the center was a thought bubble and someone was thinking and asking themselves that question. I googled for images of a "cartoon thinker" ... and Google returned many images of MEN!  (bad, sexist Google). I tried again with "woman thinking" and found some candidates including a cartoon woman sitting in front of a computer.  I saved her, cropped her, resized her (multiple times) and started playing with the idea on my design wall.

I found a fat quarter of hand-dyed fabric in my stash that was a good match for the fabrics used in the first round and used it to define the dimensions of my round. 
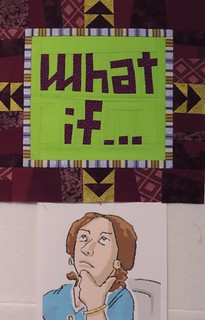
First idea for Quilt #2 Playing with placement and proportion

At the guild retreat last winter, someone had some bright green that I knew would be a match for the background of the center and I asked for a bit of it so I could continue it into the last round.   I also continued the look of the improvisationally pieced second round, added a couple more arrow blocks, procrastinated a lot and then faced the cartoon lady thinker.

I didn't have a clue whose quilt this was, but at some point I thought it might be Glen's–a woman with very red hair ... I sent her a cryptic email to confirm or eliminate the possibility that maybe my thinker should be a red head, found it wasn't her and continued on.  I built the fused, raw-edge appliqué in layers–skin, eyes, hair, clothing, jewelry–then attached it to the pieced background.
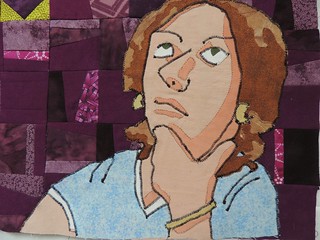
Building the appliqué Cartoon Woman ThinkerI decided that I would use an open zig-zag stitch for the black lines in the cartoon ... and hoped that whomever was the owner of this quilt would see it as in the cartoonish style I intended and wouldn't disapprove of the messy look.

The rest of the raw edges were stitched with matching thread.

Since a lot of this was new territory for me, I started stitching, knowing that it could all go terribly wrong and I'd be starting over.

I sent the finished top onto Helen, with my apologies.  This was her first experience of the Cotton Robin; I knew she was a little worried about the quilting/finishing round and I was sending her this challenge to finish.  She did a great job.  Here is the finished quilt, being held by her son.


It's probably a good idea that I didn't know this quilt was Cathy's until Helen posted that she had mailed it to her ... I would have been totally intimidated knowing I was was trying something foreign and new-to-me on a quilt for a quilter that is so accomplished and productive.  I guess it's true, sometimes ignorance is bliss.

Finishing a Quilt


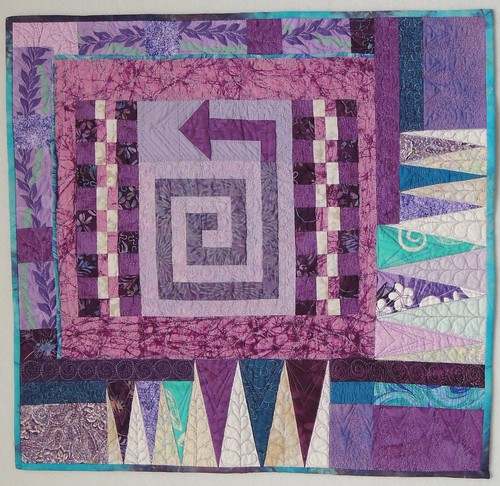
Speaking of intimidation ... the quilt I received to finish was going home to our fearless leader in the Cotton Robin, Julie.  Julie has done a such a great job of organizing us for four years–I wanted to finish a perfectly beautiful quilt for her.  I loved everything about the quilt that Julie, Diane and Shannon had made except for one thing ... I was never quite sure which way was up. Since I couldn't decide on a logical "top," I didn't sew on the hanging sleeve and left it for Julie to decide.

Finished Quilt 4 - 2015 Cotton Robin

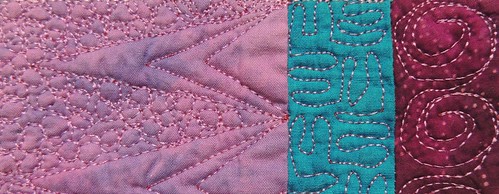
I quilted spirals in the spiral, a checkerboard in the checkerboard, triangle shapes in the triangles and a leafy vine outlining the leafy vine print in the borders. I repeated these shapes in some of the plain strips and rectangles and added some straight lines, pebbling and feathers.  I used 2 purple threads, one lighter and one darker, but it's really hard to tell in the finished quilt.

Quilting Detail from Last Cotton Robin Quilt.

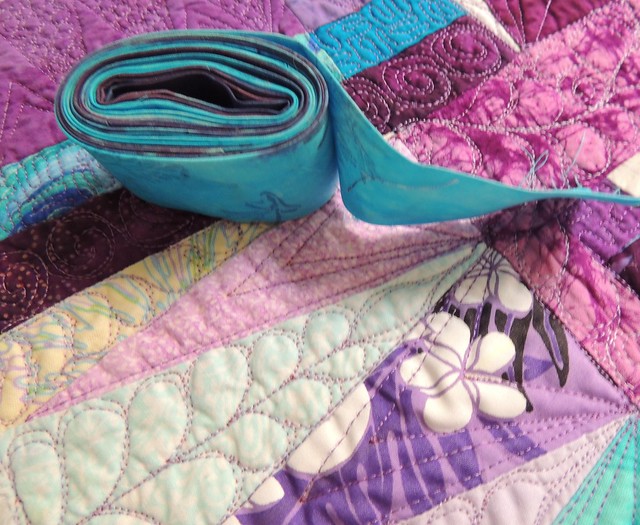
I couldn't decide if the binding should be purple or turquoise, then found a hand-dyed fabric that had both colors.
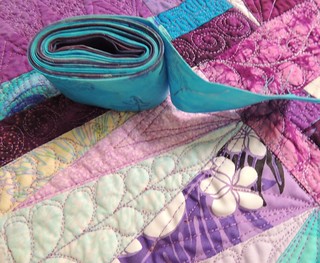
Ready to Bind It's not perfect, but it was so much fun. I hope Julie, Cathy and Mary Jane (and everyone else who participated in the Cotton Robin this year) love their quilts as much as I love mine. As soon as I get the bedroom that will become my home office unpacked and situated, I plan to hang the last two Cotton Robin quilts on the wall there so I can appreciate them every day.

For more of the in-progress photos of these four quilts, this link will take you to my photos on Flickr.

If you've read this far and want to see the rest of the quilts from the Cotton Robin, here's the link to The Big Reveal.

It wasn't until the big reveal that I found out my quilt was made by me, Terri, Rachel and Jay. Thank you all for making me an amazing little quilt.

I'm celebrating these finishes, finally revealed, at: 

Richard and Tanya's Link a Finish Friday
Can I Get a Whoop Whoop? on Confessions of a Fabric Addict
Nina-Marie's Design Wall Friday
Fabric Frenzy Friday
QuiltShopGal's Creative Goodness Linky Party

Sunday, June 07, 2015

Finishing the last quilt in the Cotton Robin

I am determined to finish the last quilt of this year's Cotton Robin this weekend.  After I finished the quilting, I went looking in the purple bin of stash fabrics for binding ... but none of the purples were quite right.   Turquoise was another possibility, but when I auditioned from turquoise fabrics, they all felt like too much turquoise.  And then I found a small piece of this hand dyed, hand screened fabric. 

Binding fabric

The splotchy mix of purples and turquoise made me think of old Reese's Peanut Butter Cup commercials - "You got chocolate on my peanut butter!"  I think it's going to be perfect.

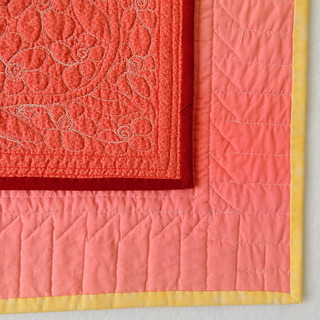
We can't reveal the little round robin quilts until they have all been finished and returned home–probably sometime in July–but here's a peek of the corner of this one, with the binding, ready to go.  

This will be my Slow Stitch Sunday project later today.


Ready to Bind

Monday, April 27, 2015

Little Bits of Improvisation

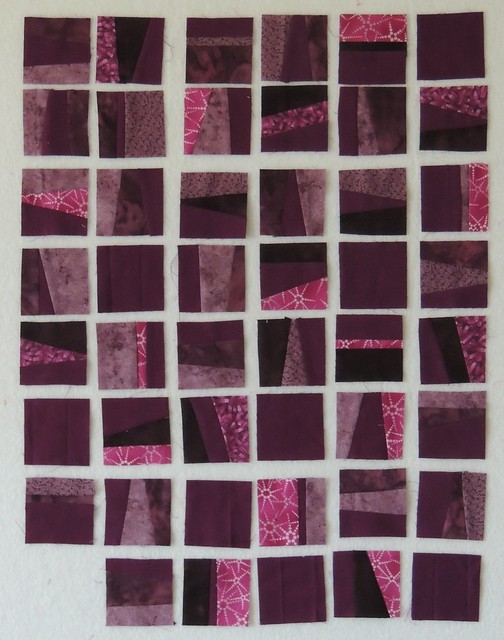
I played with purples and a little improvisation this weekend.  This morning, all trimmed square, here's what's on my design wall, this Monday.

Improvised Purple Squares

(It's a cold, gray, Monday morning and so the colors in this photo are less than accurate)

Some of these may be used in one of the Cotton Robin quilts at my house which I plan to finish and send on it's way this week.

I am also joining the lists for the Rainbow Scraps Challenge and Monday Making.

Monday, November 24, 2014

When you can't quilt ... PLAN

Over the weekend, I was shocked to find that simply pushing a rotary cutter was painful and the up and down of working on blocks on a design wall and sewing and pressing seams wore me out.  I'm frustrated that a couple of projects I hoped to plan this month ... may not happen.

In the meantime, I'm PLANNING for the future.

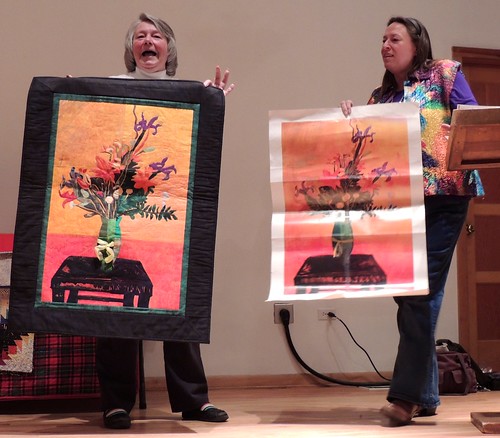
Just about the last thing I did before getting hit by the cell phone menace early Tuesday morning was attend the guild meeting.  Myrna (on the left) shared a variation of the slice quilt that she will be organizing in 2015. Each person in a group of six, buys a poster, slices it into 6 pieces (in any way she wants) and hands them out to the other members. This is Myrna's quilt and the poster she used for her piece (held by guild president Cindy).

A Great Challenge Idea

I have ALWAYS wanted to work on a slice quilt.  I signed up immediately and hope that enough other members who need to meet in the evening or on the weekend will join me. 

Julie has announced that she'll be leading the Cotton Robin one more time and I can't wait. This year, she is asking us to challenge ourselves with a color theme that's new to us and ... I have an idea.  Click over to the cotton robin to check out the dates for this year (and also look at all the quilts we made last year–it was big fun and I am ready for more of the same.) 

I may start my Cotton Robin quilt with a little hand appliqué ... I'm thinking I might be able to handle that while I'm mending. 

I took paper and colored pencils to the urgent care today and sketched an idea for a modern quilter's code ... as it turned out, I waited for more than 2 hours before I was seen and spent another 2 hours mostly waiting once I made it to the back of the house, so I was glad to have something with which to entertain myself. 

For those that are following my saga, the consensus continues to be that I'm bruised but not broken, which is good news, if a little unbelievable because everything still hurts so much ... 

Wednesday, September 03, 2014

Projects in Progress

I'm getting back into the swing of things and my design wall is filling up with signs of my progress.

 Miscellaneous Blocks

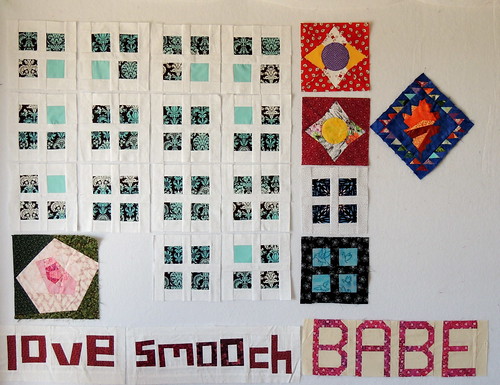
I've got last month's Little Windows Lotto Blocks to be mailed and 14 more, made for my Mod-Mod Sampler. Some more words and a Rose, to be added to the back of the quilt I shared on Monday, a couple of this month's Sweet Dreams Lotto Blocks, waiting for some friends and the twin center I made for my Cotton Robin quilt, still waiting for me.

And that's what in-progress on Wednesday at my house.

Tuesday, July 08, 2014

Enjoying the Process

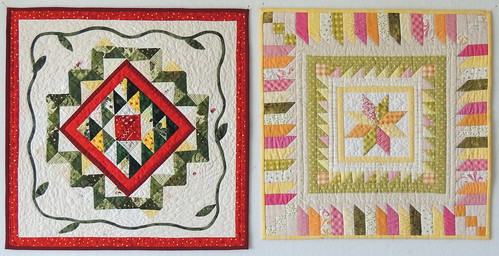
The third year of Julie's Cotton Robin has just wrapped with The Big Reveal where she shares all the finished quilts and tells us who did which parts for which quilts.   I've participated all three years and, for me, the sum of the experiences is always greater than it's parts and getting my own beautiful little quilt back is like a bonus gift at the end.

This year, my hands touched six of the quilts made by the group (plus my unfinished twin quilt which is my work-in-progress to share today). Here are some details (and a lot of photos) from my Cotton Robin journey this year.

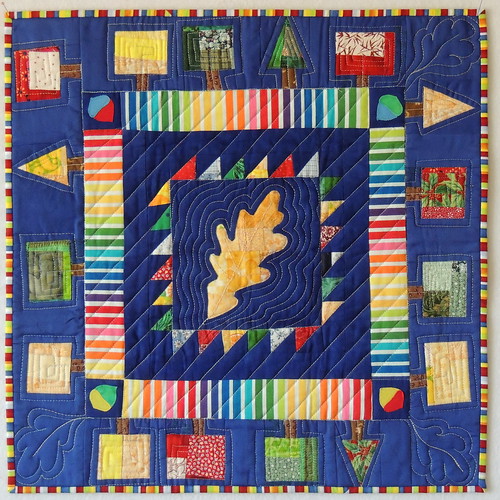
At the end of last year/beginning of this year I was on a bit of a binge of making and using pieced made fabric and that is reflected in the center and fabrics I sent out into the world for my quilt.

My package with extra fabricsI used made fabric for the oak leaf which is reverse hand-appliquéd and for the 1 inch half-square triangles.

I sent along more squares of made fabrics along with some of the blue batik background.

In last year's Cotton Robin, none of the fabric I sent along (normal, commercial yardage) was used by anyone, so I wouldn't have been surprised if all the funky bits of pieced made fabrics came back to me ... but that didn't happen.

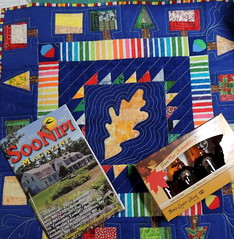
My quilt arrived last weekend, with a maple syrup sampler and a magazine from New Hampshire ... I was immediately made nostalgic for that corner of the world.

My 2014 quilt with goodiesElizabeth (in Michigan) added the first borders, with the colorful stripe and the acorns in the corners.
Glen (in Louisiana) used some of the made fabrics to create the trees in the second border.
Marie turned the little top into a quilt.

Here's my beautiful little quilt and some detail photos.  The quilt is just under 19 inches square.

My 2014 CottonRobin Quilt


When the center block for the first round arrived last winter, I had no idea who had made it. It turns out, it was Glen.

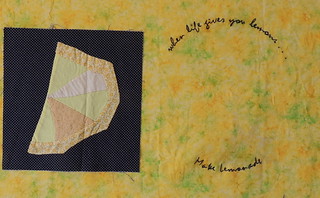
Quilt #1 - What I receivedWhenever I looked at the lovely hand-appliquéd lemon wedge, that phrase, "when life gives you lemons, make lemonade," kept coming to mind.

As usual for me, whatever I've BEEN working on can heavily influence my creative process.  In February, it was stitchery (the redwork pillows I stitched during the Olympics) and inset circles (for the Bead-on-a-String blocks we made for the Block Lotto.

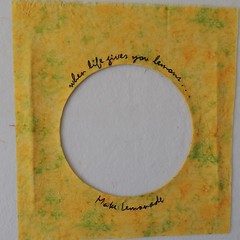
After rejecting the idea that I could piece all the letters in that phrase that was firmly stuck in my head and squeeze them into a small border, I decided to stitch it ... in the round ... around the lemon.

After figuring out what size the circle would have to be, I used Adobe Illustrator to wrap the text around it.  First I stitched the words, then I cut the circle and appliquéd it onto the block.  Then I cut away the comers of the block and had a moment of terror when I wondered if I'd just broken a rule ...

Quilt #1 - in progress Quilt #1 - in progress

About that time, I think, Julie posted something about how our borders couldn't be a single fabric border, so, to be sure I wasn't breaking the single-fabric rule,  I added some piping and a black and white fabric.  It didn't feel quite done yet, so I decided it needed something more to continue the circle. I conferred with a friend who was not participating in the Cotton Robin (since I had no idea whose quilt this was) and I added more embroidery to continue the text around the circle with a line with X's and daisies.


This project was sent on to Marie, who added the second round, and Sandra, who finished the quilt and it came out like this:


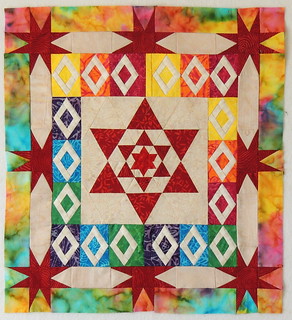
Next for me was Marie's center, with the first round added by Mary Jane.  The note that was traveling with the quilt said it would hang in her vacation cabin with a collection of quilts with a rainbow theme.

Quilt #2 - what I addedI forgot to take a "before" photo, but this is Marie's quilt in progress, with both Mary Jane's border and mine added.

Mary Jane had done a great job interpreting the rainbow theme in her round, but it made for a hard act to follow.

There was some red batik fabric included in the package.  While I was considering how I might repeat some of the elements of Marie's 6-pointed star in the border, I happened across a book on my bookcase, Friendships in Bloom, which was full of round robin quilts and patterns for various kinds of rounds, including this one with the partial star blocks.  Finding the multicolor hand dyed fabric in my stash was another lucky accident.  It's not the kind of thing I normally buy, so it surprised me when I found it, but I thought it was a good choice to pull in all those rainbow colors and frame the quilt.


I resized the directions to create a much smaller border and used a Tri-Recs ruler to cut the tiny triangle units I needed.  I sent the top onto Rachel, who added some perfect (and amazing) quilting to finish this one.


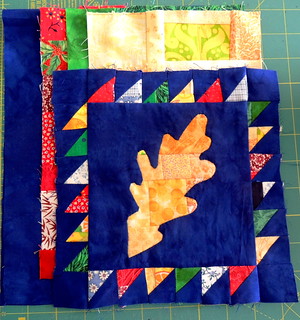
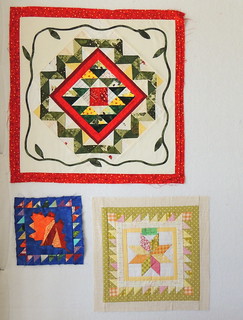
Next it was my turn to finish a quilt ... actually two, because I volunteered to finish up a quilt for someone who had to drop out of the round robin.   But first, while I had been flipping through Friendships in Bloom looking for ideas, I happened upon a border idea that I thought would be perfect for my oak leaf center so while I was waiting for the last quilts to arrive, I made a twin center.  At the end of May, I took this photo of my design wall.

Design wall - end of MayAt the top is Liz's quilt, with rounds added by Maria and Elizabeth, ready to be quilted.

Below it on the left,  is my twin center, not exactly the same as my yellow oak leaf, but another leaf (I used quilting stencils for the leaf patterns) made from orange made fabric.

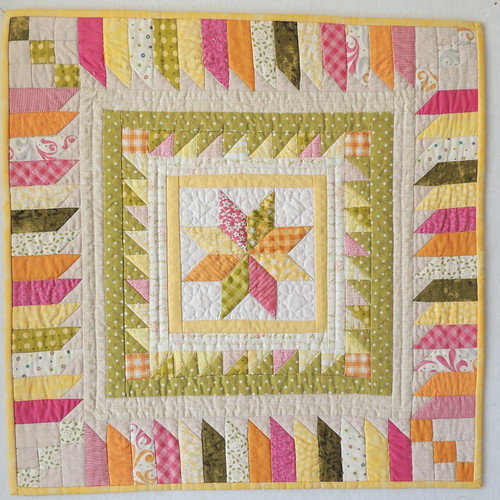
And on the right, is Kristin's center with one border added by Marybeth.  I loved the colors in this quilt and was glad that there were some fabrics (from a jelly roll, maybe) included because I didn't find many fabrics in my stash in this fresh color palette.

I haven't made any progress, except for deciding upon a design in my head, with the leaf block ... and it is my WIP Wednesday contribution.

I loved all the clean lines in Kristin's quilt so far, so I continued them with a piano key border of her fabrics (and some of mine) with half-square-triangle-like points at the end of each "key."

I quilted it with a lot of free-motion stitch-in-the-ditch to accent all the lines and some tiny 2 inch feather wreaths in the background of her Lemoyne star center.  I used what I think is an old Caryl Bryer Fallert-designed gradient fabric in some of the colors from Kristin's fabrics for the  backing and what was probably an even older Moda Marble in the same yellow as  the plain border in the quilt (I suspect the border was made from a new Moda fabric which is why the colors matched exactly). Here are some of the in-progress photos.


And the finished quilt.

Kristin's Finished Quilt

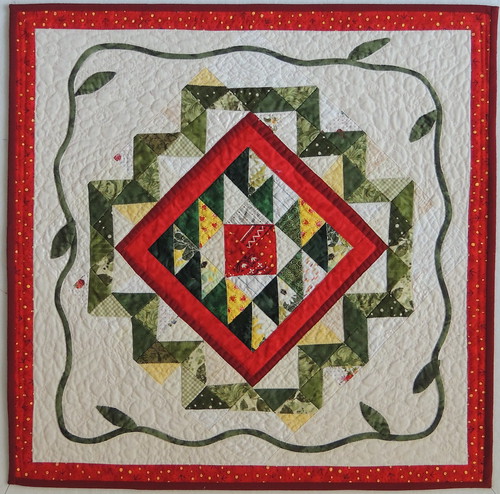
The quilting for Liz' quilt started out pretty much the same way, with lots of stitch-in-the-ditch to outline all those triangles in her center and Maria's first round.  Me being me, I couldn't resist going back and adding feather shapes in all the light halves of those half-square triangles ... I also kept thinking about adding something to that vine ... that something turned out to be more leaves, some berry clusters and a lot of flowers, which also were used as filler for the rest of the background.   As I said last night at a meeting with the Chicken River Modern Quilters, "My name is Sophie and I am an over quilter."  I sometimes manage to restrain myself–I was pretty proud of the restraint I showed in Kristin's quilt–but not usually ...  here are some details from this quilt (taken from the front and back).
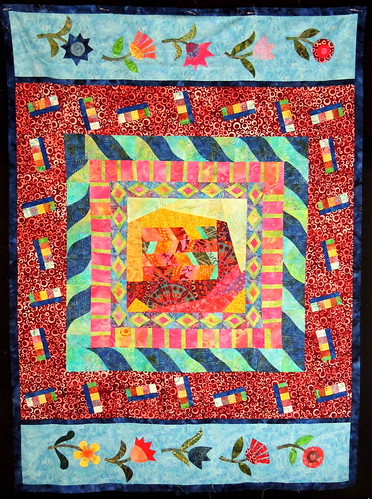

And here's the finished quilt. I chose a darker red fabric for the binding to echo the two reds in a border between the center and first round.

Liz' quilt finished

(I couldn't decide which way should be "up" for this quilt.  I like this orientation. )

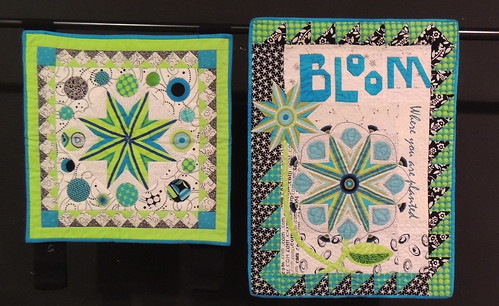
I washed and blocked both quilts before adding the binding. I was a little afraid of the red fabrics in Liz' quilt, but thanks to some color-catchers doing their job well (and turning quite red), it all turned out OK.   When I was done with the last round, I was a little surprised that both quilts ended up being almost exactly the same size.  Here they are together on my design wall where I enjoyed them until it was time for them to go home.

Two finishes

Are you wondering yet where the sixth quilt that passed through my hands is?  As it turns out, I made the seven sisters center that Kate used for her Cotton Robin quilt.  I sent it to her a long time ago as part of a block exchange.   It was fun for me to see what robineers Marie, Vivi and Mary Jane did to it. 


Good bye quilts, good bye Cotton Robin.  I hope Julie is up for another round, because I'm ready to commit ... again :-) 

Wednesday, June 11, 2014

Baste, Quilt, Bind, Repeat

Backs of two quiltsI haven't been sharing much of the quilting going on at Sophie Junction because I've been finishing a couple of small round robin quilts for the last round of the Cotton Robin.

We cannot reveal photos of the quilts until all the quilts are finished and have returned home, but, I don't think I'm revealing much by showing you the BACK of the two little quilts I'm taking to the post office later today.

I hope the quilters receive them love them as much as I do.

While I'm on a roll with the rhythm of baste, quilt, bind, I will make the back for my little pinwheel quilt and keep going after I send these two little beauties home.

And that's what's in-progress on Wednesday on my house.  I'm linking with WIP Wednesday on Freshly Pieced.

Friday, May 30, 2014

1000th Post Giveaway Winners and Playing Catch-up

I thought I would have a  new finish to share today, but last Friday,  I strained my back moving a heavier-than-expected box that was delivered when I was away.  It put me out of commission for a few days and has slowed me down for the past week.


But I did manage to choose three winners for my 1000th post giveaway and contact them.  

(I found I couldn't pick just one, so I generated three numbers.)

I completely forgot to share the results here until this morning.  

And the winners are: 


I will be pulling fabrics and making your prizes soon.  Also vying for my attention in the near future are the usual end-of-the-month/beginning-of-the-month rush of activities for the Block Lotto and finishing up the last quilt for the Cotton Robin ... I keep meaning to double check the deadline for the Cotton Robin quilts, but never get around to it–a sure sign of what denial looks like on me ;-) 

As the Block Lotto sneak peekers know, I sent out the most tardy, most sketchy block pattern ever for the June block.  This one could use a tutorial (or two or three) about some of the techniques involved and June is only two days away ...

Finally joining the local guild SEEMED like a no-brainer, good idea, but I realized this morning that this guild has no speakers, just business meetings with monthly deadlines for things that they want from me, followed by Show & Tell.  Now that my Proto-Kitty is almost done–I have one more small tweak in mind–I'll be making a few more for the guild's gift shop/booth and some ribbon toppers.  At least I am meeting some local quilters.  And at the next meeting, we're making placemats/napkins–all for a good cause, but ... I'd love to see an occasional speaker or two and have a chance to learn something new in a workshop.

... And I really want to get back to my Feather Bed quilt! I thought that it might be my goal for a Lovely Finish in June–this quilt is for me and it would really put a smile on my face to finish  it and put it on my bed soon ... but I am going to have to play catch-up pretty quickly to make it happen.

Wednesday, May 21, 2014

Doh!

When I started thinking of how I would create a cat softie, inspired by Beth's, I noticed that the body was almost pillow like and I thought using a pillow form would be a good place to start.

I remembered a tip I saw on Erin's blog about using an inexpensive bed pillow to create two smaller pillow forms for throw pillows.  So, over the weekend I picked up a 20 x 27 inch pillow for $2.50 at Wal*Mart.  I found her post, but even when I re-read it, I managed to misunderstand ... and actually thought I could stitch twice through the middle of the pillow (I used a walking foot) and then cut it apart between the two rows of stitches to form two pillow forms.

I got about 1/3 of the way across the pillow before the needle broke in my sewing machine.  I sent email to Erin asking if she had any tips and she very diplomatically replied, "Did you take the stuffing out first?"

Doh!

Last night, I picked out my stitching and opened up the pillow.  The stuff inside is exactly the same as the bags of poly fill you can buy ... at less than 1/4 the price. Once I had unstuffed the pillow, I realized that I didn't have to use the icky fabric that the stuffing came in and that my new cat innards could be any shape.

Building a Kitty from the Inside Out
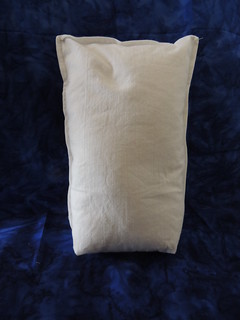
Here's the shape I created from cotton muslin for my test kitty. It's about a foot tall and 8 inches wide, with a boxy bottom (in hopes that the softie will sit up nicely).

It's not the most visually interesting work-in-progress in the studio right now, but it's the one I can share for WIP Wednesday ... and since I cannot stop laughing at how I could misunderstand so completely, I thought some others might be amused, as well as pick up a great tip and remember to read those tips carefully :-)

Yesterday, I picked up the Cotton Robin quilt that I will be quilting and finishing.  It's on my design wall now while I decide how it will be quilted.  I also have my "separated at birth" center that I made as part of the Cotton Robin.  It is similar to the one I sent out into the world to be added to and finished by others–I really want to finish it before my quilt comes home so I can enjoy seeing them side-by-side when it arrives.  I did something like that a couple years ago (though I didn't finish my quilt until long after the cotton robin quilt came home).  Here are those two quilts:

The (separated at birth) Twins

This year's quilts will be very different, but I hope they retain a little of the twin feeling, like these.

Thursday, April 17, 2014

Two Quilts That Can Finally Be Revealed

Tiny Strings - My Little Quilt
It's been a while since I shared the little quilt that I made for Kate's annual swap of little quilts.

I named it Little Strings, for the tiny string-pieced triangles.

Now that all the swapped quilts have been received, I can share the quilt I received in the swap, made by none other than Kate herself: 


You can see all the quilts with information about who made them and to whom they went to in the swap in the Grand Reveal on the blog for Another Little Quilt Swap.

In the Cotton Robin group last summer, one of the round robin quilts took the longest trip ever reaching its destination (literally on a slow boat from Canada to New Zealand).  When all seemed lost, a replacement quilt was started and then, when the wayward quilt arrived,  a group of us decided to use it as a center and make a round robin quilt for Julie, our fearless leader.

By the time I received the quilt from Rachel, it had already passed through the hands of five quilters and looked like this:

Julie's Quilt-in-progress - what I received

At this point, it measured approximately 43 by 59-inches. The rounds seemed to be wider and wider and I felt my challenge was to add something narrower that was still graphically strong. I decided to continue using the dark blue that Rachel had added to border her beautiful appliqué rows and to add colors from the center. After I added my round, it looked like this:

Julie's Quilt-in-progress with my Round added

After me,  Tami and Laurina added borders, Nan quilted the quilt and Jay added the label and binding and it looked like this:


The finished quilt is approximately 70-inches square, large enough to wrap up and feel appreciated.

I love the little quilts we make as part of the Cotton Robin and can't wait until next month when the last quilt will arrive, ready to be backed and quilted, but it was fun to work on this quilt with many rounds.

Saturday, June 22, 2013

Another Great Cotton (Round) Robin Revealed

The little round robin quilts from the Cotton Robin have been revealed, so I can share my photos of the quilts I touched along the way and my own quilt which is home again.

My Little Skier (Center)Here's the center I made. The appliqué design was adapted from a stitchery pattern from last year's Aurifil BOM.

I sent it on it's way, hoping it had enough personality and sufficient color clues to the quilters who would add to it and no additional notes were required.

Here's what Glen Julie and MaryJane did with it.

I never considered such a literal interpretation of the theme, but the snow ball and delectable mountain blocks in the subsequent rounds were a sweet idea.

And here's my little skier girl in a finished quilt.


My Cotton Robin Quilt - Finished!

Center ReceivedThis is the first center I received.

It came from Marie, who asked that we use only batiks in the same colors as in her fabrics.  I knew I wanted to put it on point and to add appliqué.  I was tempted to float the block to make more room for appliqué but decided against it, because I wanted to leave room for the next person to have the space to add whatever border they designed for the little quilt.

Applique Detail - Quilt 1I didn't know that my Bernina was going to die ... and that the appliqué would have to be done by hand.  I brushed off my needle-turn skills and really enjoyed that peaceful calm of hand work as I stitched it.

(FYI, The flowers really aren't as purple as they seem in this detail photo–as much as I wanted to break the color rule, I complied).

After me, the quilt went to Glen for the outer border, and Kate for quilting and binding and looked like this:


Marie's finished quilt

Center +1 round ReceivedThe next quilt, which I now know is Kathleen's, had a beautiful Mola at the center, with several narrow plain borders framing it and a second round of colorful flying geese and another skinny plain border, added by Nan.

I decided to put the focus on the center by repeating those colors in more skinny plain fabric borders and a paper-pieced flowering vine (because Kathleen's note said she didn't care for appliqué).  It's been a while since I had paper pieced anything ... so it was good to re-visit that technique.

Detail of Second RoundHere's a detail photo of my round. I used scrappy yellows for the flowers, a couple of green and black prints and a yellow stripey batik. I couldn't resist adding the cactus print as a border to this tropical quilt–the colors were a perfect match and it someone seemed right to include a piece of the high desert where I live.

I really wish I could have kept this one for the next round and quilted it, but I sent it on to Jay and let her have all the fun. Here's the finished quilt.  I think she chose the PERFECT fabric for binding.

Kathleen's Quilt

Anne's center
The last quilt in my queue began as this asterisk-like block from Anne.  When I received it, two rounds had been added by Julie and Marie to complete the top and my task was quilting and binding.

I treated each of the design elements separately when I added the quilting ... and had lots of fun doing it.

The binding and piping colors were taken from the quilt's center.

Here are some detail photos and one and the finished quilt.

feather quilting detail Anne's quilt - quilting detail

Anne's quilt - detail of piped binding Anne's quilt - quilting detail

Anne's quilt detail

Anne's Quilt

Click over to the Big Reveal on the Cotton Robin group blog, to see ALL the quilts.  It's a pretty spectacular group of finishes.

I'm joining the link parties for Link a Finish Friday.
Related Posts Plugin for WordPress, Blogger...