Showing posts with label FMQ. Show all posts

Friday, May 13, 2016

Leaf Blocks and a Leafy (FINISHED!) Project


Sometimes, it feels like some of my blog posts are me, saying the same old things over and over again ... and I fear that this may be one of those posts. Only the images/projects are new–if you have followed me a while, what I have to say about them may feel very familiar to you, too.

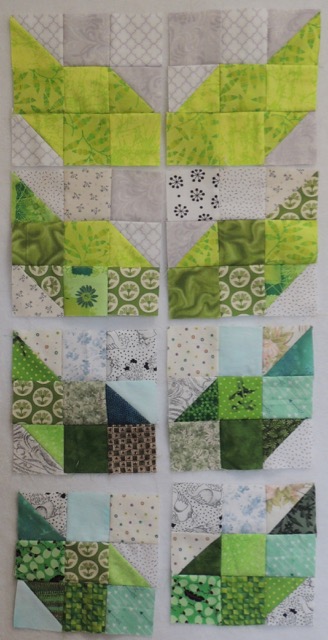
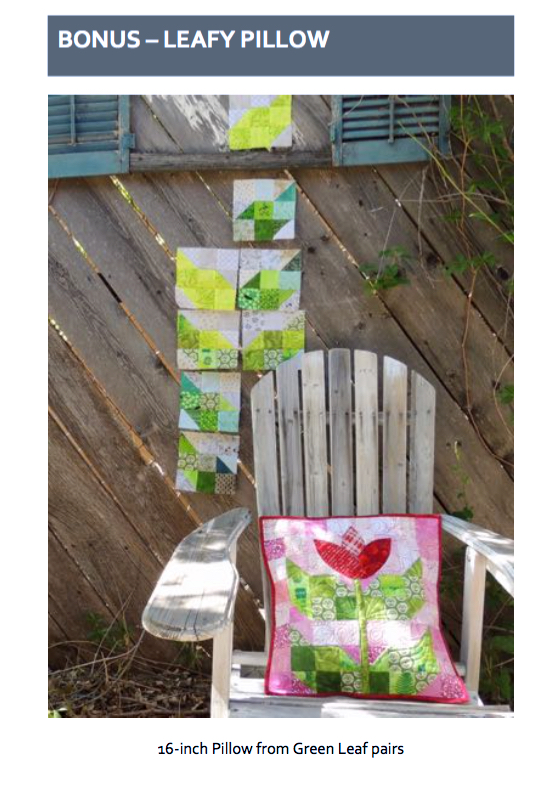
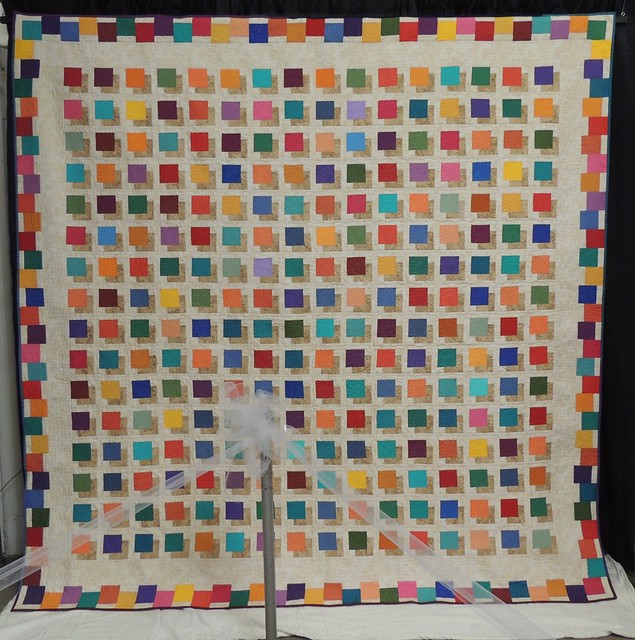
These are the 4 pairs of blocks that I made for this month's Block Lotto.

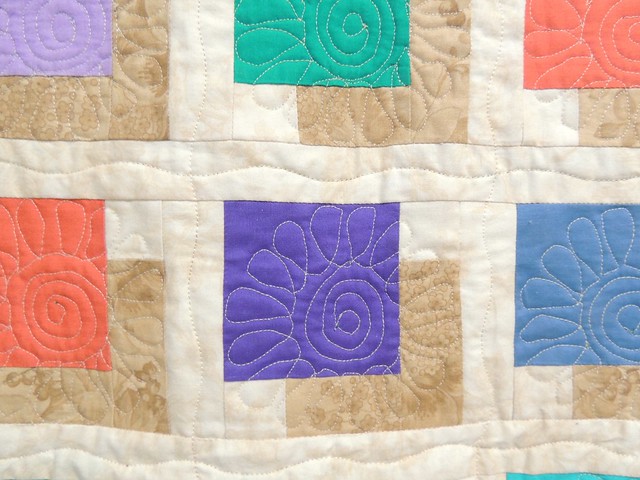
The guidelines for these scrappy green blocks require at least 4 fabrics–2 green and 2 lights (background).  In the photo, my blocks are least scrappy at the top and most scrappy at the bottom.

We are making them in mirror-image pairs.

If you are curious, you can find the details (and link and coupon for the block pattern) here:

Green Leaves of May


I am referring to them as LEAF block pairs, but, of course, you might make them in a non-leaf color and/or arrange them in a non-leafy geometric way.

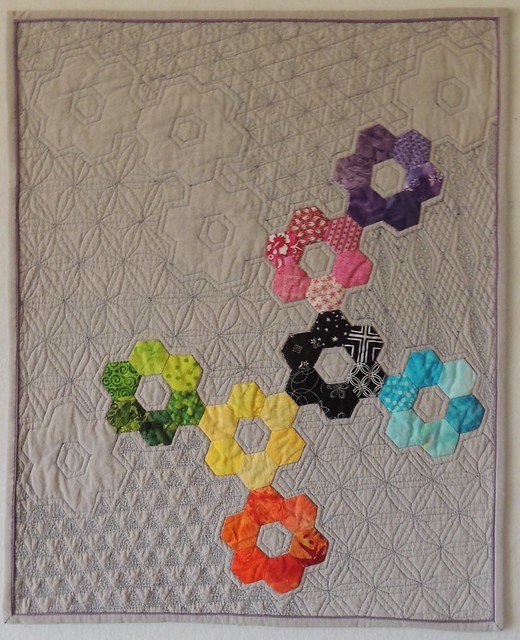
Here are three possibilities, each made from 4 leaf blocks–for my graduated rainbow sampler, I haven't yet decided which arrangement of four blocks I will use.


The first two blocks–which I think of as an X and an O (or, at other times, a butterfly and an emerald) are made from 2 pairs of leaf blocks.  The third arrangement, a scrappy sort of pinwheel, is made using four of the same block.

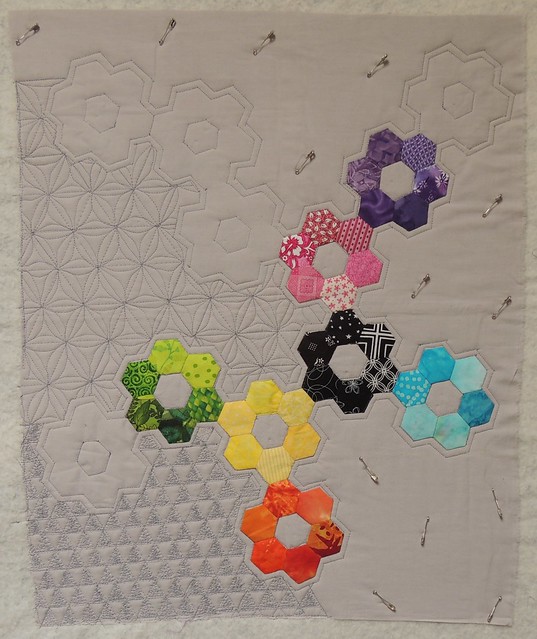
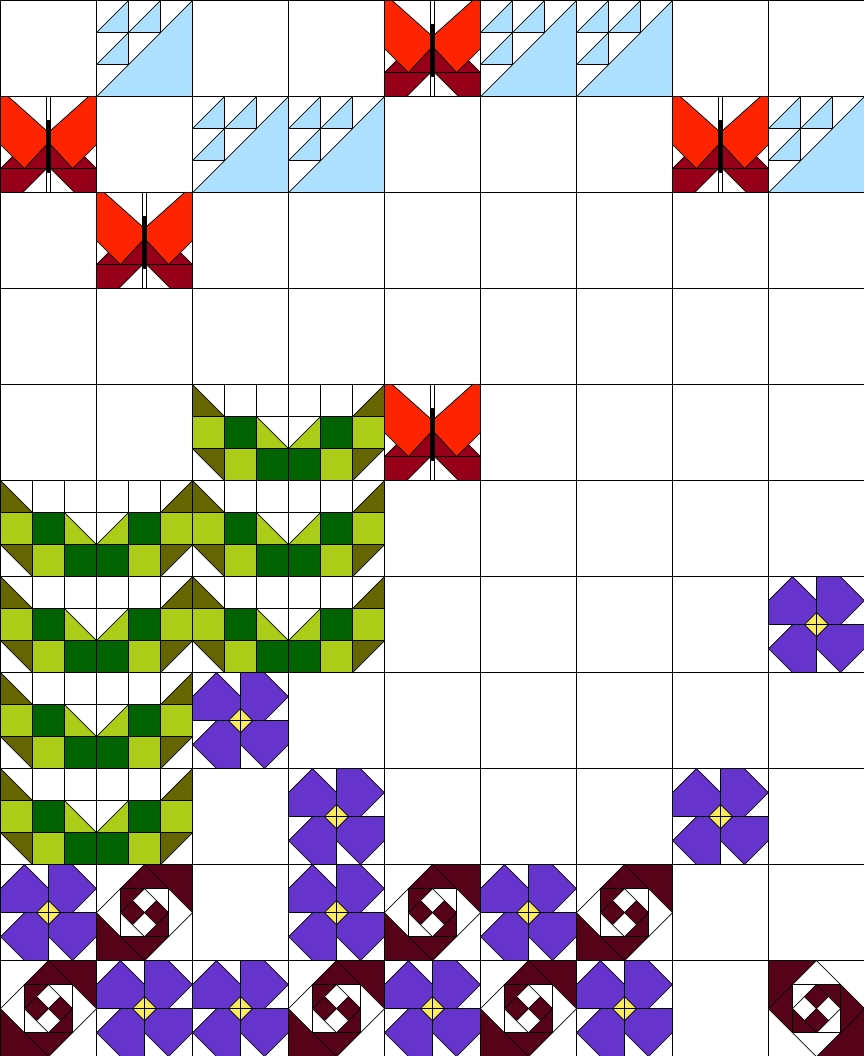
The other possibility is to go with the idea of scrappy green leaves and use the blocks as a basis for creating a plant.  If you look at the updated layout for Old MacDonald's Mystery Sampler, you might see that it is my intended use for these blocks in the quilt.

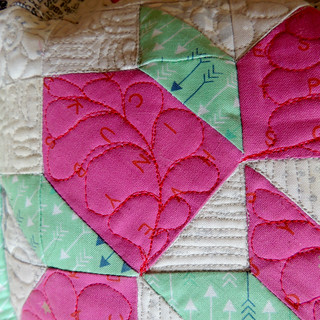
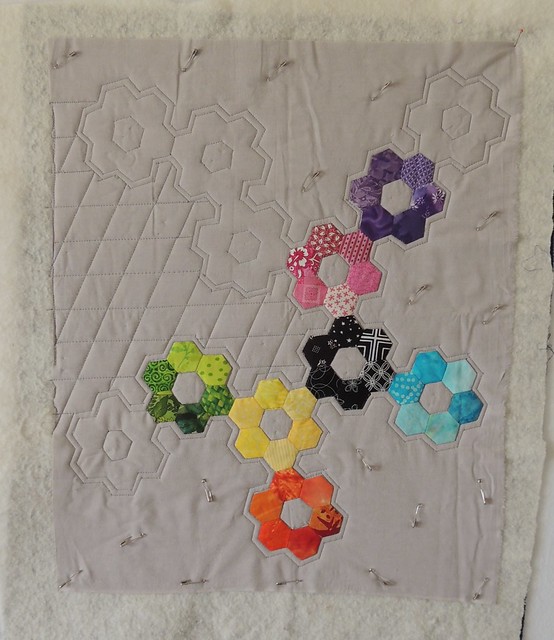
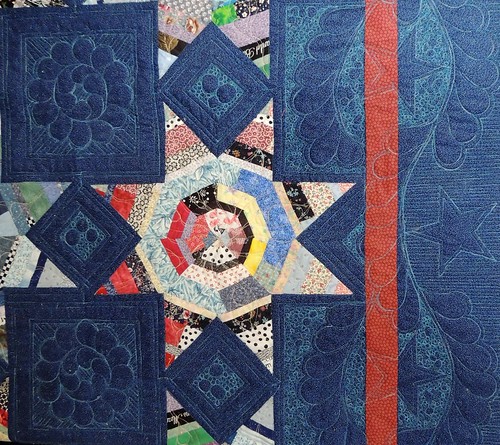
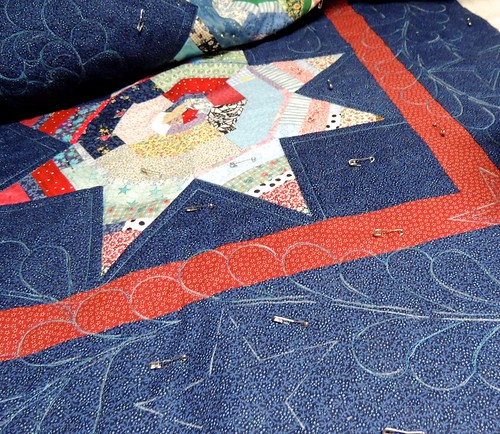
I couldn't resist playing with the idea of creating a blooming plant in a small way, so ... I made a pillow cover.


Pillow Inside


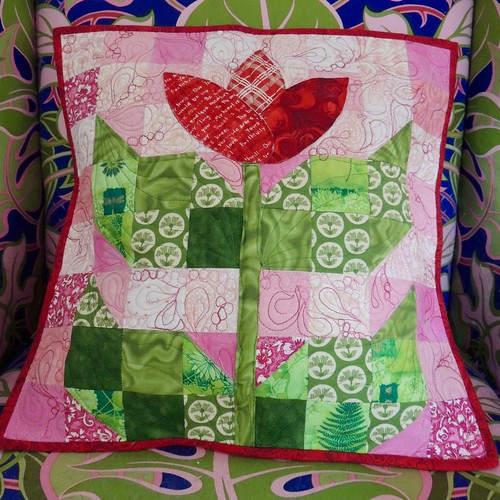
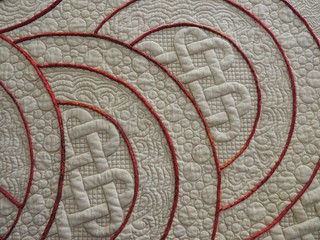
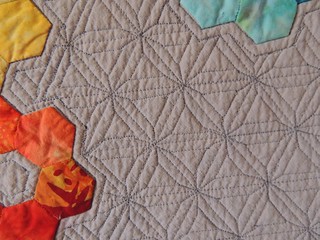
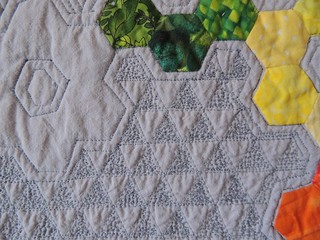
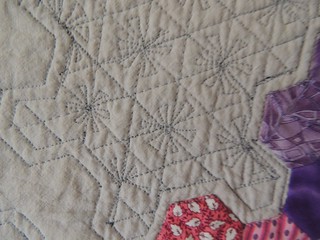
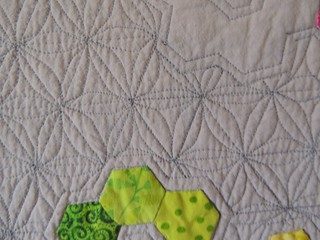
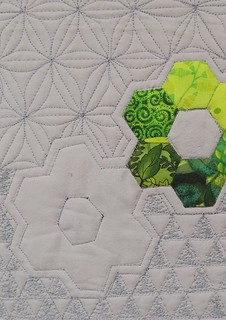
I love small projects like this 16-inch pillow because it's a great way to work on an idea in a small way, try a new technique, or practice/warm-up before you tackle something larger or perhaps dearer to you.  In my case, it had been too long since I'd done any free-motion quilting and needed the practice/warm-up and also wanted to try mixing two motifs in a random way as a filler design.

I also played a little with the limits of combining a scrappy background (including some darker pinks) with the scrappy leaves without losing contrast between them.

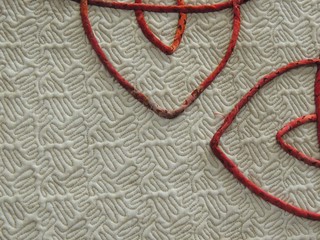
The petals which form the flower are prepared used interfacing with fusible on one side only, fused in placed and then secured with quilting. The stem is a 3-D element that is inserted and, if desired, also held in place with quilting.

The pillow has a simple, unquilted, lapped back.

I included the directions for making the pillow as as a bonus in the block pattern for Green Leaf Pairs - Quilt Block Pattern.


Sunday, January 31, 2016

Under-the-wire Finish for the #intrepidthreadchallenge

challenge fabricsLast fall, Julie at the Intrepid Thread created a challenge based on using fabrics of her choosing. She has a great way with putting fabrics together and so I knew I wanted to play.

Here are the fabrics.

I love text on fabrics and scrappy backgrounds and knew that I would use those mini-charms in whatever I made.

After I saw the fabric, I had lots of ideas ... a few that played ping pong in my head for far too long.

Ultimately I decided to chase down something else that has long ping-pinged in my head: the traditional block whose name is on the tip of my mind whenever I see a modern Swoon block.

I flipped through Brackman's Encyclopedia of Pieced Quilt Patterns and decided Rolling Star, published by The Rural New Yorker on 6/4/1932 looked to be an ancestor to Camille Roskelley's Swoon.

So I started here, and resized it to work with the mini-charms, added a seam that I thought would make construction easier and set to work.

UntitledI used a combination of shapes cute from templates and rotary cut squares and half-square triangles.

I started by putting together the center, then assembled the chunks that would surround it.

I expected the Y-seams in the star in the center ... but was a little surprised when I realized that there would be a lot more Y-seams when it came time to put all my chunks together.

Realizing this block had more Y-seams than I thought

But, as the saying goes, all's well that end's well ... and here's my finished pillow. 


Finished PIllow


The finished pillow measures 12 by 16 inches.

Quilting DetailThe front is simply quilted with loopy feathers, wobbly matchsticks and doodle-y daisies and loops.

The back is made from the rest of the pink fabric, along with a coordinating fabric from my stash, in a simple lapped construction.

Although it was made as a pillow cover, it may end up serving as a table mat at my house.

Thanks, Julie, for the interesting challenge.

Not only was it fun for me–once I finally decided what I wanted to make–I have really enjoyed seeing everyone's creative projects on the Intrepid Thread Challenge Link Up Party.

Sunday, October 18, 2015

More Circles ... For a Good Cause

I used the sample blocks from the 6-minute circle demo I mentioned yesterday to make placemat's for one of my guild's community service projects. You might recognize them as two of last year's lotto blocks: Sunrise and Bead-on-a-String.

4 Placemats for Kitchen Angels

I had fun playing with quilting designs over the weekend and finishing them up–the bindings are sewn down by machine, so no Slow Sunday Stitching for me today.

I wanted to try Karen's Feather Galaxy fill pattern ... but I never quite found my rhythm.

Quilting for "Beaded Placemat"The dark gray thread showed up a lot more than I expected on the gray-on-black background, too.

I will likely try it on another project and probably change it up enough to make it work better for me. You can see what it's supposed to look like in this YouTube video.

Even if it isn't "right," I really do love the combination of spiral, feather shapes and pebbles.

Saturday, June 27, 2015

One more - Lovely Quilting

This quilt, Tree of Life, by Wendy Garrison, won second place in the Medium Art quilt category at Fiber Arts Fiesta that took place last month in Albuquerque.

Tree of Life by Wendy Garrison

I loved the combination of classic quilting designs with the art quilt elements of paint, beading and a layered organza technique to create the trapunto.

I didn't love that the organizers decision to hang this round quilt (with it's black sleeve at the top to allow it to be hung at the show) in front of a pale gray drape.  Both black and gray drapes were used at the show ... so why not hang this quilt on a black background section?   I know the pale gray drapes are a new trend at shows, but because they show every wrinkle and dirty smudge, I don't understand why.

Tree of Life by Wendy Garrison - Detail
In this detail photo, you can see some of the paint, beading and organza layer used to create the trapunto tree.

I have long admired quilts which have paint/dye added after the quilting.  I really loved the effect in the leaves of the tree.

Now that I am a bit more confident in my free motion quilting ... I might have to push myself to feel at the fear and try this technique anyway.

Friday, June 26, 2015

More Beautiful Quilting

Here is another whole cloth quilt from Fiber Arts Fiesta.  This is Renaissance by Judy Murphy.  It is made from dupioni silk and quilted on a home machine. 

Renaissance by Judy Murphy

(sorry for the wonky photo, it was in one of those tight corners which made a good, square, straight-on photos impossible).

It was entered in the category for small traditional quilts. In this category, "small" was equivalent to "medium" in other categories.

It didn't get any ribbon love from the judge, but I thought it was pretty wonderful.  I liked the addition of color by choice of thread color and the combination of quilting designs that I tend to use myself.

Renaissance by Judy Murphy - DetailRenaissance by Judy Murphy

Thursday, June 25, 2015

Beautiful Quilting

Today's quilt from last month's Fiber Arts Fiesta in Albuquerque is Over, Under and Around by Krysyna Swirdczuk. If won the award for Best Machine Quilting.

Over, Under and Around by Krysyna Swirdczuk

I loved the idea of adding the red cording to this whole cloth quilt, along with more traditional trapunto.  Of course, the quilting was wonderful.  It was entered in the large, innovative quilts category.  I think it is, in some ways, a modern take on the whole cloth quilt. 

Over, Under and Around by Krysyna Swirdczuk - DetailOver, Under and Around by Krysyna Swirdczuk - Detail

The individual quilting designs could be considered quite basic.  Combining them with the celtic knot designs (with trapunto for emphasis) and using the red cord to define the interlocking circles elevates those basic quilting shapes.

Over, Under and Around by Krysyna Swirdczuk - Detail

Did you noticed the knotted cording at the edge? 

Friday, June 12, 2015

Small Cogs on a Small Quilt

It's probably symptomatic of the stress/procrastination going on around my house this week, but look what I finished last night.

Cogs

It's drizzly and gray outside and so the natural light is not so good in the studio this morning ... but it may actually make it easier to see the quilting.

Cogs
This little quilt–it measures 18 by 22 inches–started with the intention to play with an idea of using hexies to create the look of cogs and wheels: a small study before making hundreds more hexies for a large scrappy bed quilt.

I used the last scrap of the pale gray hand-dyed fabric for the binding, but decided it needed just a bit of color, so inserted the purple piping.   (It is real piping, added to the binding using Susan Cleveland's Piping Hot Binding technique).

There are five different quilting designs in the background. Only the ghost cogs were marked before quilting; a straight ruler was used to quilt the grid for all of them.   It was interesting to play with grids made from 60 degree angles.

Many of the commenters on the WIP post liked the idea of the ghost cogs and encouraged me to leave them un-quilted, which I did ... if I do something like this again, I will think ahead and put an extra layer of batting behind the ghosts, so that they will have the same fullness/dimension as the appliquéd ones.

Here's a closer look at the quilting–I am not sure why the colors in the upper right photo came out so much better and closer to reality than the rest.

Cogs Cogs - quilting detail
Cogs - Quilting DetailCogs

Some of the photos aren't as sharp as I'd like ... I'm blaming the gray day and lack of natural light ... and may come back and replace them if/when the sun comes out.

I was surprised at how similar two of the designs look (upper left, lower right). The first is made from all straight lights (using a ruler) and the other has freehand curves.

Since it's been a while since I've finished something that I can share on my blog, I'm celebrating it at all these linky parties:

Can I get a Whoop whoop? on Confessions of a Fabric Addict
Crazy Mom Quilt's  Finish it Up Friday
Fabric Frenzy Friday on Fort Worth Fabrics
Free Motion Mavericks on Lizzy Lenard Vintage Sewing
QuiltShopGals' Creative Goodness
Richard and Tanya's Link a Finish Friday
WIPS Be Gone on A Quilting Reader's Garden

Thursday, June 11, 2015

More Sunflowers

This quilt is Sunflower Craze by Melita McCoy.   It's another of the quilts from Fiber Arts Fiesta which took place in Albuquerque May 23-25 that I am sharing each day in June.

At first glance, you might wonder what the name, Sunflower Craze, has to do with the quilt.

Sunflower Craze by Melita McCoy

Upon a closer look, though, both the sunflower and the crazed make more sense. It's a huge quilt, free motion quilted by the Melita on a domestic sewing machine.

Sunflower Craze by Melita McCoy - Detail

After quilting 256 of those individual sunflowers, I might be a bit crazed myself.

Wednesday, June 10, 2015

Cogs - Work in Progress update

I have spent a little more time quilting the doll quilt.

Quilting in Progress

It's providing a break from what is turning out to be a more-stressful-than-necessary move.  I'm not sure why I expected my often dishonest, negligent landlords to behave any differently now that they are selling the house and I am trying to gracefully leave this house ... sigh.

Detail of in-progresss Doll quilt.I originally had a different plan for the quilting, but the idea of using a variety of designs based on a equilateral triangle grid took hold ... here's a closer look at the first two.  Both are unmarked, using a ruler.

(I haven't decided how to quilt the centers of the "cogs"or if/how to quilt the ghost cogs.)

I am joining the lists for:

Scraptastic Tuesday (June)
Esther's WOW (Wips on Wednesday)
Let's Bee Social on Sew Fresh Quilts
WIP Wednesday on Freshly Pieced


Monday, June 08, 2015

Hexies at Home

I started this little quilt last winter with the intention of submitting it for Kate's Another Little Quilt Swap.

Back in March, I blogged about the new metallic thread I planned to use ... I tried and failed miserably and because I had waited until the last possible moment before the swap deadline to try (and fail), I missed out.  I ripped out the failing stitching and put it away ... until yesterday.

Maybe it was all those interesting hexies at Fiber Arts Fiesta that inspired me. Yesterday afternoon, I made a new start on quilting with some more conventional cotton thread.

Quilting begins

The hexie cogs are English paper pieced and hand appliquéd.  Now that I have no plans for the finished quilt, it has become an opportunity to play/practice free motion quilting and try something new.  It measures approximately 18 by 23 inches. 

It's what's on my design wall today. 

Thursday, April 02, 2015

Then & Now - The String Star Quilt is Finished!

As I was quilting the golden oldie UFO string stars and thinking about the differences between my quilting tastes and skill set back when I pieced the string stars and now, the name for the quilt was born: Then & Now. The finished quilt measures approximately 74 by 90-inches and was made using templates in Gwen Marston's book Liberated String Quilts.

I set things up a bit too close to one of the skylights in the studio, so the natural lighting is a little uneven, but you get the idea.

Then & Now

Back Then, I struggled when putting together the star blocks–none of them were flat–and had problems matching the points/seams when sewing the blocks together.  Now,  I have been quilting twice as long as then.  I would have used a different technique to assemble the blocks–thank you Jan Krentz–with a better result: flat stars and matched seams. I would have chosen different proportions for the borders and probably included an inner border to float the star blocks.

Then, I chose the stencils I used for the quilting design, but was afraid that my quilting wasn't up to the task.  Now, it's easier for me to just go for it, even if my quilting still really isn't up to the task.  I embraced the attitude that every quilt is practice for those that follow ... and I practiced a few things while I finished this quilt. I used the stencils for the border and the large square spaces, but winged it for the rest.

Then & Now - Detail

Celebrating this finish on these lists:

Can I get a Whoop whoop? on Confessions of a Fabric Addict
Crazy Mom Quilt's  Finish it Up Friday
Fabric Frenzy Friday on Fort Worth Fabrics
Lizzie Lenard's Free Motion Mavericks
QuiltShopGals' Creative Goodness
Richard and Tanya's Link a Finish Friday
Mrs Sew & Sow's Scraptastic Tuesday for April

Tuesday, March 31, 2015

Plan B - My pillow for March FMQ Challenge

Em, of Em's Scrapbag, calls it a Plan B when you use blocks made for a different purpose in a new project.  I like that.   Here's my Plan B pillow, made for the March FMQ challenge.

March Pillow for FMQ CHallenge

And here's how it started.

The ideaAfter a demo and presentation of improvisational piecing at the Modern Mini-group, I wanted to try something more abstract than my usual.

At the time I had just finished Jenny's Welcome Spring stitchery design and thought I could improvise some borders, so I gathered some fabric scraps that would coordinate.

After playing around a bit, I had created a border that I thought looked interesting on it's own but ... absolutely horrible next to the stitchery.

I considered (and dismissed) a few ideas for using the improvised strip with the stitchery.


My Improvised Border   Ugh


Plan B

And then, Plan B was born.

I put a simple print border around Welcome Spring and combined my improvised border with another fabric and use it was the background for the March FMQ challenge.

I chose option #1:

Use the free FMQ tutorial provided by Patsy, from the 2012 FMQ Challenge, to create a FMQ Pillow adapting her border approach to your pillow design.  To clarify, you get to decide the number size of your pillow, the number of borders you wish to use, as well as which of the designs Patsy shared in this free tutorial, as you feel appropriate.

It was suggested that we sketch out our plan and practice first, but since this was my Plan B (and dangerously close to the end of the month), I just went for it.  Here are photos (front and back) of the quilting, before it was assembled into a pillow.

Quilted - before assembly into pillow

Quilting from the back

Thursday, March 26, 2015

Practice, Practice ...

The saying goes that practice makes perfect. I'm not sure that's exactly what's happening with the quilting of the golden oldie UFO string stars quilt.

Practice, Practice

Once committed to a couple of ideas, I kept going ... like with all that pebbling.  Now, I find myself still quilting practicing. I'm adding those parallel lines around the outside edge now. All that will be left is adding something in the red border in a different color thread (because I couldn't cover it in more of the teal/turquoise variegated thread.)

I'm not sure my pebbles have improved, but I'm a lot more comfortable using rulers now.

Updating to add a link to Angie's WIPS Be Gone list–this golden oldie UFO definitely qualifies–and to Lizzie's Free Motion Mavericks

Sunday, March 22, 2015

Quilting Progress

I made a lot of progress quilting the string stars quilt during the Friday Night Sew-In.  Here's a peek at where I am now:

Quilting Progress on String Stars

I've quilted everything that's marked and done some straight line quilting (with the help of a ruler) to add some stitch-in-the-ditch and echo stitching in the spaces around the stars.  I've added some unmarked, much more typically "me," quilting in the star blocks–I haven't yet decided if it's too stridently different from those classic marked feather shapes. 

I will be adding some fill designs around the feathers and inside the plain squares. 

Waiting to be stitched and unstitchedIn the evenings, I've begun stitching down the red binding on the kids charity quilt –since I've already shared so many photos of that quilt in the last week, I'll show you how I stow quilts waiting for handwork in my den.  I expect to finish the binding on the little quilt today, as part of my Slow Stitch Sunday ... and I might think about unstitching some quilting on the other quilt that I started last fall, then decided it was wrong and needed to be ripped out ... 


Friday, March 20, 2015

Alien Feathers and Plans for a Friday Night Sew-In

I've marked the golden oldie string star quilt and started quilting it last night.  These marked feathers felt like alien feathers to me, they are so different from my usual–the unmarked, perfectly imperfect feather-like shapes. I have begun to wonder if anyone will see me in this quilt when I'm done.

Alien Feathers

I'm a roll with this, so my plan for tonight's Friday Night Sew-In, is to keep going ... it is also my current golden oldie UFO project, so I am joining Angie's WIPS Be Gone.  I'm joining the linky party there today, as well as Free Motion Mavericks.

Next up will the be the bright logs raffle quilt.  The quilting design will definitely not be marked.  I have pieced the back ... my cat Grace Hopper helped me measure the top for that effort.

Grace helps (again)

Whenever fabric or a quilt top is spread on my worktable, Grace will be there to help–she's a fiber-loving girl.  If the fabric or top is large enough to drop to the floor of my studio, her big brother, Johnny Be Good, will roll up in whatever touches the floor, making it difficult to move or adjust.  If I am quilting late into the night, both of them will join me on the sewing machine table and curl up on a piece of whatever I'm trying to quilt.  Both of them will no-doubt be part of my Friday Night Sew-in tonight ...

I'm sharing the photo of this quilt top to ask for your input on what color thread(s) you would use on this?  Help!
Related Posts Plugin for WordPress, Blogger...