
Showing posts with label finishes. Show all posts
Showing posts with label finishes. Show all posts
Thursday, October 27, 2016
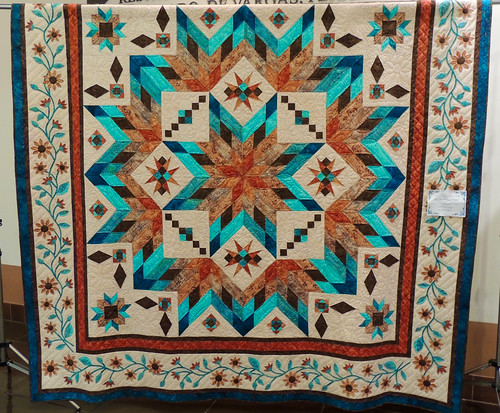
The One That Got Away ...
I often buy raffle tickets for quilts, mostly to support the quilters and guilds that make them, but ... I rarely want to win as much as I wanted to win this one. This is another of the quilts at the Northern New Mexico Quilters Guild's show in which I had a small part. I helped piece the center–I blogged about it here, coincidentally just after another move ...
Friday, May 13, 2016
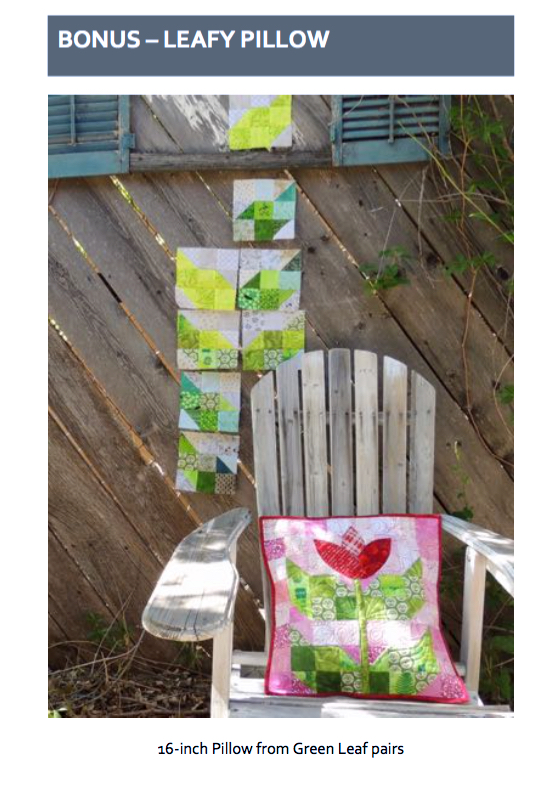
Leaf Blocks and a Leafy (FINISHED!) Project
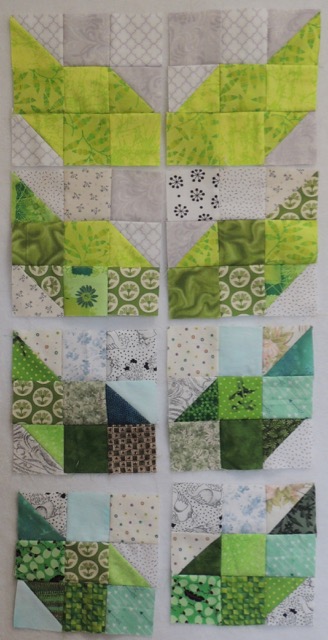
These are the 4 pairs of blocks that I made for this month's Block Lotto.
The guidelines for these scrappy green blocks require at least 4 fabrics–2 green and 2 lights (background). In the photo, my blocks are least scrappy at the top and most scrappy at the bottom.
We are making them in mirror-image pairs.
If you are curious, you can find the details (and link and coupon for the block pattern) here:
Green Leaves of May
I am referring to them as LEAF block pairs, but, of course, you might make them in a non-leaf color and/or arrange them in a non-leafy geometric way.
Here are three possibilities, each made from 4 leaf blocks–for my graduated rainbow sampler, I haven't yet decided which arrangement of four blocks I will use.

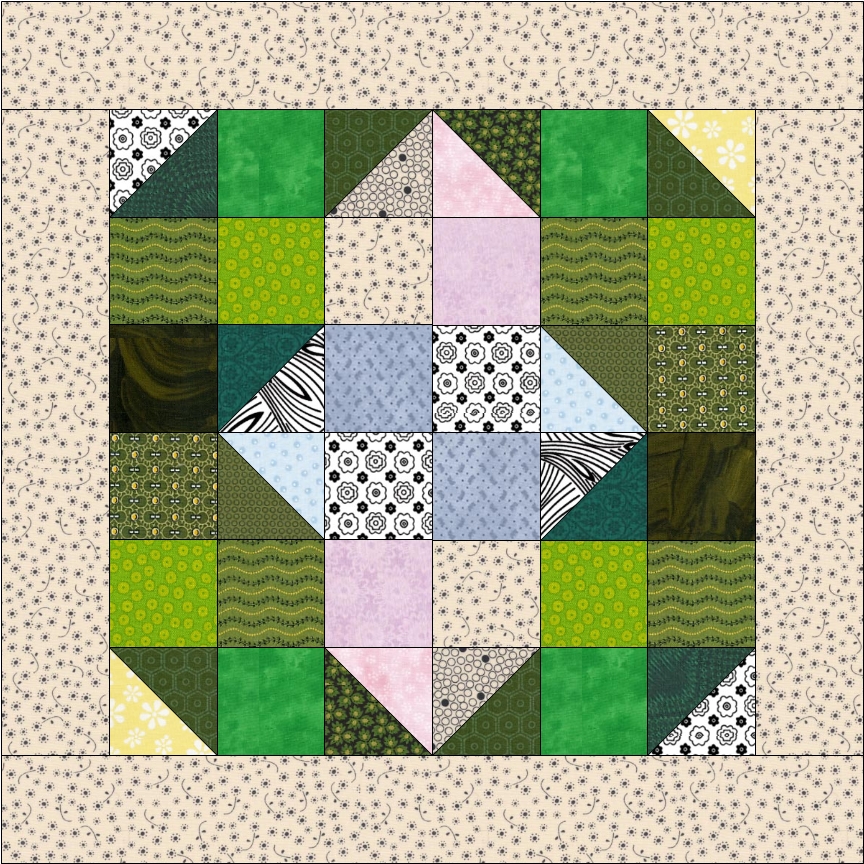

The first two blocks–which I think of as an X and an O (or, at other times, a butterfly and an emerald) are made from 2 pairs of leaf blocks. The third arrangement, a scrappy sort of pinwheel, is made using four of the same block.
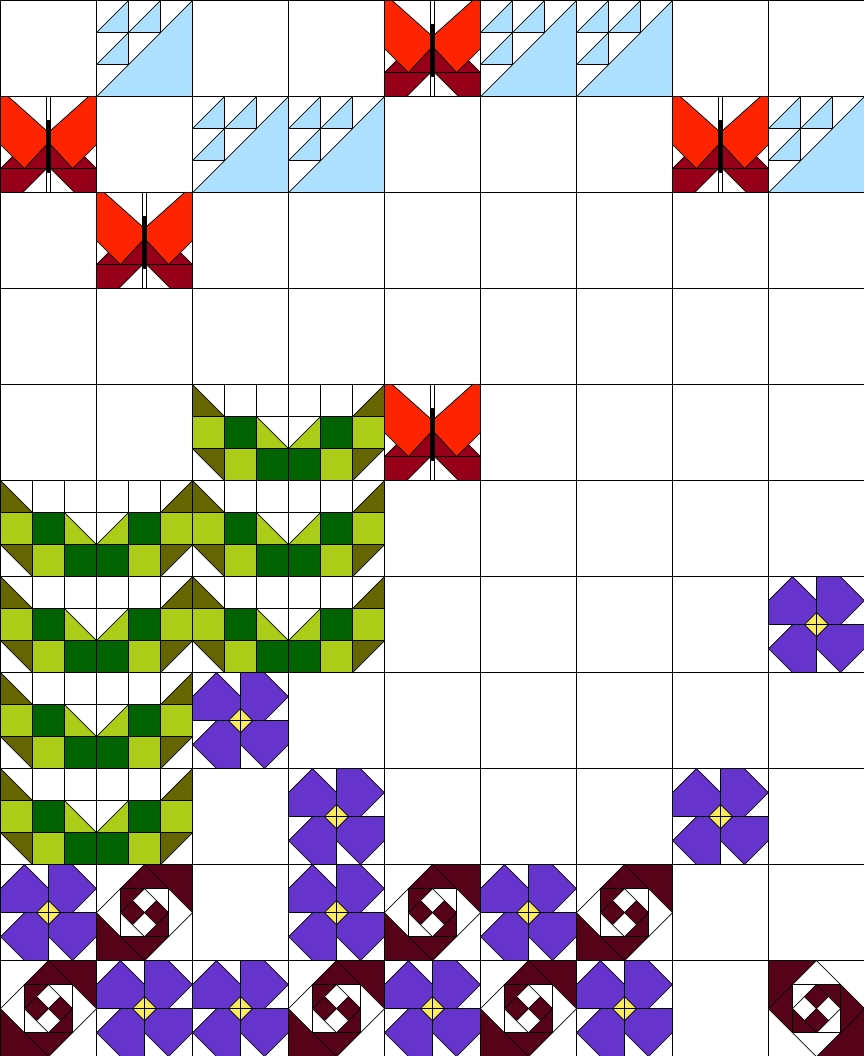 The other possibility is to go with the idea of scrappy green leaves and use the blocks as a basis for creating a plant. If you look at the updated layout for Old MacDonald's Mystery Sampler, you might see that it is my intended use for these blocks in the quilt.
I couldn't resist playing with the idea of creating a blooming plant in a small way, so ... I made a pillow cover.
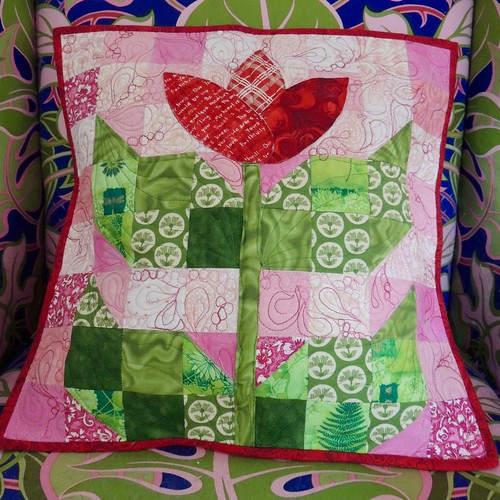
I love small projects like this 16-inch pillow because it's a great way to work on an idea in a small way, try a new technique, or practice/warm-up before you tackle something larger or perhaps dearer to you. In my case, it had been too long since I'd done any free-motion quilting and needed the practice/warm-up and also wanted to try mixing two motifs in a random way as a filler design.
The petals which form the flower are prepared used interfacing with fusible on one side only, fused in placed and then secured with quilting. The stem is a 3-D element that is inserted and, if desired, also held in place with quilting.
The pillow has a simple, unquilted, lapped back.
I included the directions for making the pillow as as a bonus in the block pattern for Green Leaf Pairs - Quilt Block Pattern.
Wednesday, March 09, 2016
Floating Squares (with Pinwheels)
Don't measure, just cut ... and then cut again.
 That's how I mis-remembered something Melissa Averinos posted on Facebook. What she actually posted was:
MeasureTWICE rarely
CutONCE as many times as you feel like.
Nonetheless, it was the push I needed to move forward with an idea that involved cutting with scissors, without measuring.
It started like this.
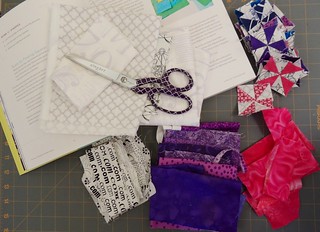


The book is The Improv Handbook for Modern Quilters, A Guide to Creating, Quilting and Living Courageously. It has sat on my bookshelf for almost a year, waiting, for me to find an opportunity to play.
The link is an Amazon affiliate link, so if you follow it and buy the book, I may benefit in a (very) small way.
When I put together those tiny 1 1/2-inch pinwheels from the bonus triangles squares I blogged about on Monday, I asked one of those dangerous What If? questions. What if I used the floating squares score in Sherri Lynn Wood's book as a setting for those tiny pinwheel blocks?
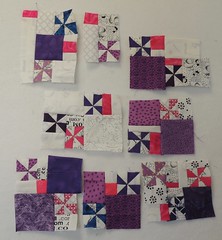
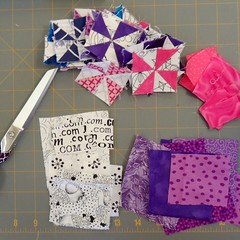 I pulled pink, purple and black and white fabrics from my scraps for my fabrics and cut my squares, with scissors without measuring. I treated the pinwheels as one of my sets of fabric squares.
Then I sewed them into "chunks" (without pressing!) until all the squares had been used.
The light fabrics that had been used in my pinwheel blocks was used as filler.
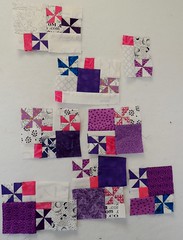
My intention was to make a small doll-sized quilt. But honestly, this was so much fun and I couldn't help but think how much more fun it would be to use this technique to make a big quilt. I ended up with eight chunks. I roughly trimmed them (with the scissors--still no measuring!) and plugged in the iron and pressed them.
I put them on the design wall and moved them around a bit to get a rough idea how I thought I'd put them together ... then just kept sewing until they were all attached to one another.
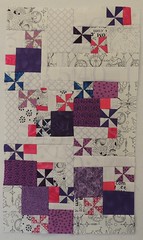
The result felt a little too narrow, so I cut a few more squares and made it a little wider.
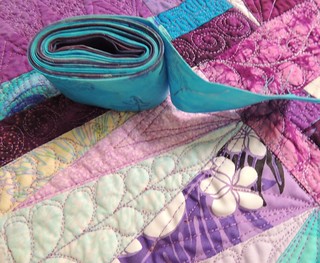
This little quilt came together so quickly and easily, I kept going ... and layered it and quilted it with a spiral.
The finished quilt is 15 inches wide and 22 1/2 inches tall. I stitched down the binding while re-watching the Downton Abbey finale. I already miss that show ...
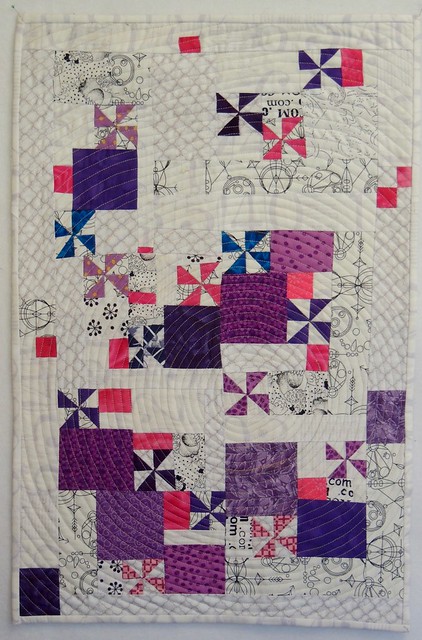
I thought this little exercise would be great way to try a new process with a small commitment and I am satisfied with the result. I like the inclusion of the pinwheels and the idea of using an improv technique as a setting for traditional blocks.
Making this small quilt (from a limited number of squares), made me want more. Although I often work improvisationally, putting away the rotary cutter was surprisingly freeing.
Often for me, little projects like this one are a way to get back to quilting when I fall into a rut.
Thanks to Sherri Lynn Wood for the great ideas in her book and to Melissa Averinos for the Facebook push.
I'm joining the lists for Scraptastic Tuesday, WOW (WIPs on Wednesday), Mid-week Makers and Can I get a Whoop Whoop? Fabric Frenzy Friday.

Measure
Cut
Nonetheless, it was the push I needed to move forward with an idea that involved cutting with scissors, without measuring.
It started like this.

The book is The Improv Handbook for Modern Quilters, A Guide to Creating, Quilting and Living Courageously. It has sat on my bookshelf for almost a year, waiting, for me to find an opportunity to play.
The link is an Amazon affiliate link, so if you follow it and buy the book, I may benefit in a (very) small way.
When I put together those tiny 1 1/2-inch pinwheels from the bonus triangles squares I blogged about on Monday, I asked one of those dangerous What If? questions. What if I used the floating squares score in Sherri Lynn Wood's book as a setting for those tiny pinwheel blocks?
I pulled pink, purple and black and white fabrics from my scraps for my fabrics and cut my squares, with scissors without measuring. I treated the pinwheels as one of my sets of fabric squares.Then I sewed them into "chunks" (without pressing!) until all the squares had been used.
The light fabrics that had been used in my pinwheel blocks was used as filler.
My intention was to make a small doll-sized quilt. But honestly, this was so much fun and I couldn't help but think how much more fun it would be to use this technique to make a big quilt. I ended up with eight chunks. I roughly trimmed them (with the scissors--still no measuring!) and plugged in the iron and pressed them.
I put them on the design wall and moved them around a bit to get a rough idea how I thought I'd put them together ... then just kept sewing until they were all attached to one another.
The result felt a little too narrow, so I cut a few more squares and made it a little wider.
This little quilt came together so quickly and easily, I kept going ... and layered it and quilted it with a spiral.
The finished quilt is 15 inches wide and 22 1/2 inches tall. I stitched down the binding while re-watching the Downton Abbey finale. I already miss that show ...
I thought this little exercise would be great way to try a new process with a small commitment and I am satisfied with the result. I like the inclusion of the pinwheels and the idea of using an improv technique as a setting for traditional blocks.
Making this small quilt (from a limited number of squares), made me want more. Although I often work improvisationally, putting away the rotary cutter was surprisingly freeing.
Often for me, little projects like this one are a way to get back to quilting when I fall into a rut.
Thanks to Sherri Lynn Wood for the great ideas in her book and to Melissa Averinos for the Facebook push.
I'm joining the lists for Scraptastic Tuesday, WOW (WIPs on Wednesday), Mid-week Makers and Can I get a Whoop Whoop? Fabric Frenzy Friday.
Thursday, July 16, 2015
Butterflies and Birds and Bunnies ... Oh My!
The latest round of Julie's Cotton Robin has concluded and all has been revealed. I had so much fun this year working on–and being challenged by–this round of little quilts and was delighted by the quilt that came back to me.

For those unfamiliar with the Cotton Robin, here are the basics:
I didn't include a note with my Cotton Robin package, but hoped that the center and the fabrics included conveyed my intention.
I included two fabrics–one which was used (the green background in the second round) and one that was returned to me with my quilt.
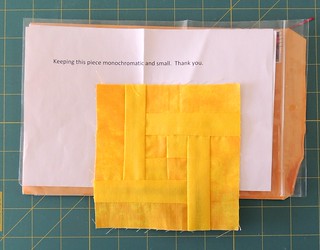 I confess that when I received this package, with the note, Keeping this piece monochromatic and small, I wondered about the person who was really challenging themselves (and us) to make a monochromatic yellow quilt.
The center was 5 inches square (to finish at 4 1/2 inches).
My first inclination was to turn the square into a circle and make it the center of a sun (aka New York Beauty block). But then I realized that was exactly what I did for the first round last year and left it alone.
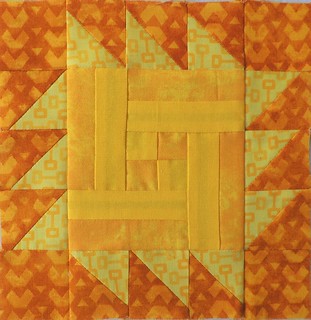 I looked in my stash for a pair of yellow/gold fabrics that matched the two in the center and had as much contrast as possible and made a round of 1 1/2 inch half-square triangles. The quilt was now 6 inches (finished size).
At the guild retreat last winter, someone had some bright green that I knew would be a match for the background of the center and I asked for a bit of it so I could continue it into the last round. I also continued the look of the improvisationally pieced second round, added a couple more arrow blocks, procrastinated a lot and then faced the cartoon lady thinker.
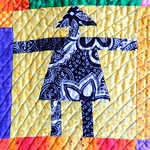
I didn't have a clue whose quilt this was, but at some point I thought it might be Glen's–a woman with very red hair ... I sent her a cryptic email to confirm or eliminate the possibility that maybe my thinker should be a red head, found it wasn't her and continued on. I built the fused, raw-edge appliqué in layers–skin, eyes, hair, clothing, jewelry–then attached it to the pieced background.
 I decided that I would use an open zig-zag stitch for the black lines in the cartoon ... and hoped that whomever was the owner of this quilt would see it as in the cartoonish style I intended and wouldn't disapprove of the messy look.
The rest of the raw edges were stitched with matching thread.
Since a lot of this was new territory for me, I started stitching, knowing that it could all go terribly wrong and I'd be starting over.
I sent the finished top onto Helen, with my apologies. This was her first experience of the Cotton Robin; I knew she was a little worried about the quilting/finishing round and I was sending her this challenge to finish. She did a great job. Here is the finished quilt, being held by her son.

It's probably a good idea that I didn't know this quilt was Cathy's until Helen posted that she had mailed it to her ... I would have been totally intimidated knowing I was was trying something foreign and new-to-me on a quilt for a quilter that is so accomplished and productive. I guess it's true, sometimes ignorance is bliss.
Speaking of intimidation ... the quilt I received to finish was going home to our fearless leader in the Cotton Robin, Julie. Julie has done a such a great job of organizing us for four years–I wanted to finish a perfectly beautiful quilt for her. I loved everything about the quilt that Julie, Diane and Shannon had made except for one thing ... I was never quite sure which way was up. Since I couldn't decide on a logical "top," I didn't sew on the hanging sleeve and left it for Julie to decide.
I quilted spirals in the spiral, a checkerboard in the checkerboard, triangle shapes in the triangles and a leafy vine outlining the leafy vine print in the borders. I repeated these shapes in some of the plain strips and rectangles and added some straight lines, pebbling and feathers. I used 2 purple threads, one lighter and one darker, but it's really hard to tell in the finished quilt.
I couldn't decide if the binding should be purple or turquoise, then found a hand-dyed fabric that had both colors.
 It's not perfect, but it was so much fun. I hope Julie, Cathy and Mary Jane (and everyone else who participated in the Cotton Robin this year) love their quilts as much as I love mine. As soon as I get the bedroom that will become my home office unpacked and situated, I plan to hang the last two Cotton Robin quilts on the wall there so I can appreciate them every day.
For more of the in-progress photos of these four quilts, this link will take you to my photos on Flickr.
If you've read this far and want to see the rest of the quilts from the Cotton Robin, here's the link to The Big Reveal.
It wasn't until the big reveal that I found out my quilt was made by me, Terri, Rachel and Jay. Thank you all for making me an amazing little quilt.
I'm celebrating these finishes, finally revealed, at:
Richard and Tanya's Link a Finish Friday
Can I Get a Whoop Whoop? on Confessions of a Fabric Addict
Nina-Marie's Design Wall Friday
Fabric Frenzy Friday
QuiltShopGal's Creative Goodness Linky Party

For those unfamiliar with the Cotton Robin, here are the basics:
- Make a center that is no larger than 9 inches square (or a comparable-sized shape) and mail it to Julie. Optionally you may include additional fabrics (totally up to a quarter yard) and/or instructions. This year, Julie asked us to challenge ourselves in some way. Once the package goes to Julie, things become pretty much anonymous.
- Receive a package from Julie which contains a center and mailing info for this and all future rounds. Add a border and send it on to the next person.
- Receive a package with a center with one border and add the second (last) border. The quilts should be no larger than 20 inches square (or something comparable if it isn't square). Send it to the next person.
- Receive a finished quilt top, add backing and batting, quilt and bind it. Mail the finished quilt home.
Here are some of my in-progress photos and notes of the four Cotton Robin quilts I contributed to this year, along with a photo of the finished quilts, one for each of the steps above. It's a longish and photo-heavy post, so if you want to just cut to the chase and see ALL the finished Cotton Robin quilts, scroll up and follow the link at the top of this post.
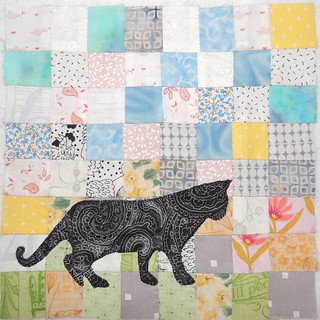
My Center
The challenge I set for myself was to create a soft, low-volume quilt. I pieced a scrappy center from 64 one inch (finished size) low-volume squares and added a machine appliqué cat silhouette. The cat is from a book by Carol Armstrong–if you have been around long enough, you might recognize that I've used it before in a doll quilt I made in for a swap–click over to see Ela and her Doll Quilt ... and those in the Block Lotto may see this cat again in a block for this month–it's a quilter's choice month with the theme of pets.
I didn't include a note with my Cotton Robin package, but hoped that the center and the fabrics included conveyed my intention.
I included two fabrics–one which was used (the green background in the second round) and one that was returned to me with my quilt.
Round One
I confess that when I received this package, with the note, Keeping this piece monochromatic and small, I wondered about the person who was really challenging themselves (and us) to make a monochromatic yellow quilt.The center was 5 inches square (to finish at 4 1/2 inches).
My first inclination was to turn the square into a circle and make it the center of a sun (aka New York Beauty block). But then I realized that was exactly what I did for the first round last year and left it alone.
I looked in my stash for a pair of yellow/gold fabrics that matched the two in the center and had as much contrast as possible and made a round of 1 1/2 inch half-square triangles. The quilt was now 6 inches (finished size).
Maybe I pushed a little too far into golden brown territory. I don't know. Here's how Mary Jane's finished quilt came out:

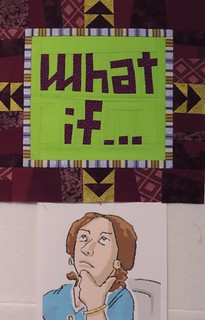
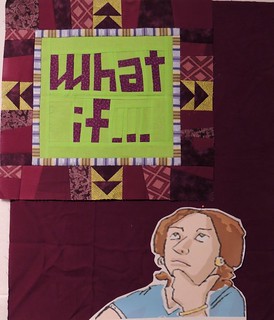
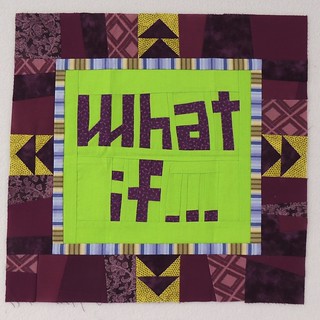 Sometimes, you receive a package and an idea immediately takes hold. You can't shake it even if you aren't sure you have the skill set necessary to achieve it ... but when a quilt is actually asking you, "what if ..." I think you have to go for it and so I did.
My vision was that the center was a thought bubble and someone was thinking and asking themselves that question. I googled for images of a "cartoon thinker" ... and Google returned many images of MEN! (bad, sexist Google). I tried again with "woman thinking" and found some candidates including a cartoon woman sitting in front of a computer. I saved her, cropped her, resized her (multiple times) and started playing with the idea on my design wall.
I found a fat quarter of hand-dyed fabric in my stash that was a good match for the fabrics used in the first round and used it to define the dimensions of my round.
Round Two
Sometimes, you receive a package and an idea immediately takes hold. You can't shake it even if you aren't sure you have the skill set necessary to achieve it ... but when a quilt is actually asking you, "what if ..." I think you have to go for it and so I did.My vision was that the center was a thought bubble and someone was thinking and asking themselves that question. I googled for images of a "cartoon thinker" ... and Google returned many images of MEN! (bad, sexist Google). I tried again with "woman thinking" and found some candidates including a cartoon woman sitting in front of a computer. I saved her, cropped her, resized her (multiple times) and started playing with the idea on my design wall.
I found a fat quarter of hand-dyed fabric in my stash that was a good match for the fabrics used in the first round and used it to define the dimensions of my round.
At the guild retreat last winter, someone had some bright green that I knew would be a match for the background of the center and I asked for a bit of it so I could continue it into the last round. I also continued the look of the improvisationally pieced second round, added a couple more arrow blocks, procrastinated a lot and then faced the cartoon lady thinker.
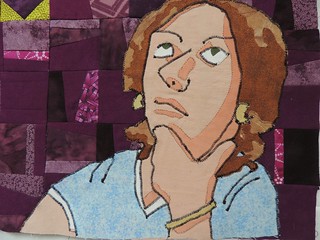
I didn't have a clue whose quilt this was, but at some point I thought it might be Glen's–a woman with very red hair ... I sent her a cryptic email to confirm or eliminate the possibility that maybe my thinker should be a red head, found it wasn't her and continued on. I built the fused, raw-edge appliqué in layers–skin, eyes, hair, clothing, jewelry–then attached it to the pieced background.
I decided that I would use an open zig-zag stitch for the black lines in the cartoon ... and hoped that whomever was the owner of this quilt would see it as in the cartoonish style I intended and wouldn't disapprove of the messy look.The rest of the raw edges were stitched with matching thread.
Since a lot of this was new territory for me, I started stitching, knowing that it could all go terribly wrong and I'd be starting over.
I sent the finished top onto Helen, with my apologies. This was her first experience of the Cotton Robin; I knew she was a little worried about the quilting/finishing round and I was sending her this challenge to finish. She did a great job. Here is the finished quilt, being held by her son.
It's probably a good idea that I didn't know this quilt was Cathy's until Helen posted that she had mailed it to her ... I would have been totally intimidated knowing I was was trying something foreign and new-to-me on a quilt for a quilter that is so accomplished and productive. I guess it's true, sometimes ignorance is bliss.
Finishing a Quilt
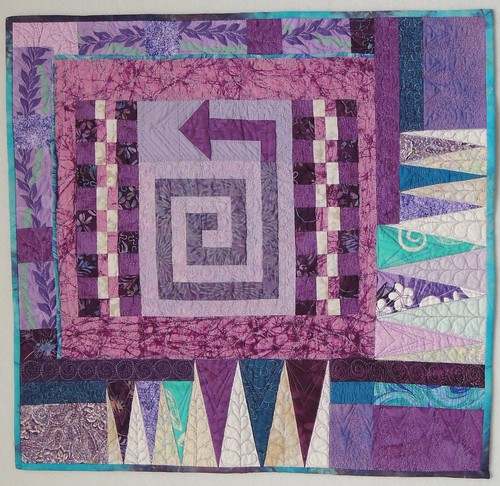
Speaking of intimidation ... the quilt I received to finish was going home to our fearless leader in the Cotton Robin, Julie. Julie has done a such a great job of organizing us for four years–I wanted to finish a perfectly beautiful quilt for her. I loved everything about the quilt that Julie, Diane and Shannon had made except for one thing ... I was never quite sure which way was up. Since I couldn't decide on a logical "top," I didn't sew on the hanging sleeve and left it for Julie to decide.
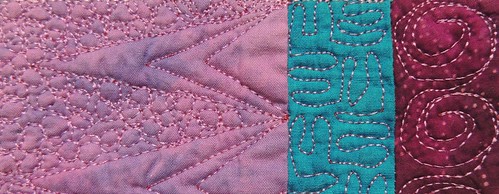
I quilted spirals in the spiral, a checkerboard in the checkerboard, triangle shapes in the triangles and a leafy vine outlining the leafy vine print in the borders. I repeated these shapes in some of the plain strips and rectangles and added some straight lines, pebbling and feathers. I used 2 purple threads, one lighter and one darker, but it's really hard to tell in the finished quilt.
I couldn't decide if the binding should be purple or turquoise, then found a hand-dyed fabric that had both colors.
It's not perfect, but it was so much fun. I hope Julie, Cathy and Mary Jane (and everyone else who participated in the Cotton Robin this year) love their quilts as much as I love mine. As soon as I get the bedroom that will become my home office unpacked and situated, I plan to hang the last two Cotton Robin quilts on the wall there so I can appreciate them every day.For more of the in-progress photos of these four quilts, this link will take you to my photos on Flickr.
If you've read this far and want to see the rest of the quilts from the Cotton Robin, here's the link to The Big Reveal.
It wasn't until the big reveal that I found out my quilt was made by me, Terri, Rachel and Jay. Thank you all for making me an amazing little quilt.
I'm celebrating these finishes, finally revealed, at:
Richard and Tanya's Link a Finish Friday
Can I Get a Whoop Whoop? on Confessions of a Fabric Addict
Nina-Marie's Design Wall Friday
Fabric Frenzy Friday
QuiltShopGal's Creative Goodness Linky Party
Friday, June 12, 2015
Small Cogs on a Small Quilt
It's probably symptomatic of the stress/procrastination going on around my house this week, but look what I finished last night.
It's drizzly and gray outside and so the natural light is not so good in the studio this morning ... but it may actually make it easier to see the quilting.
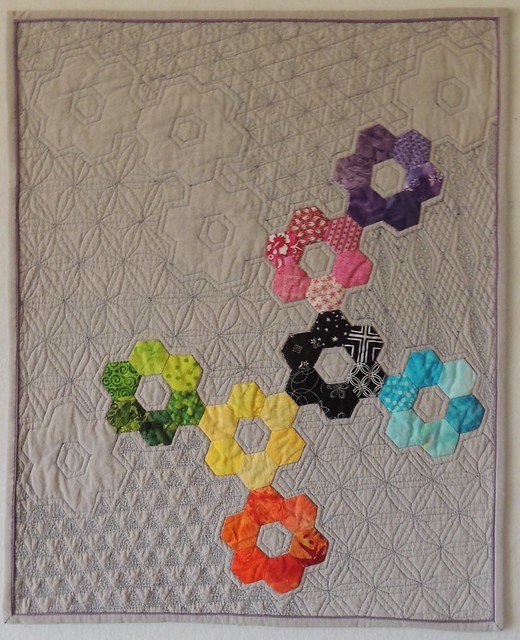
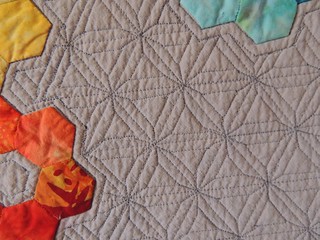
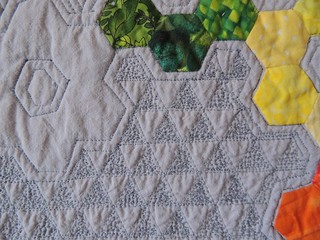
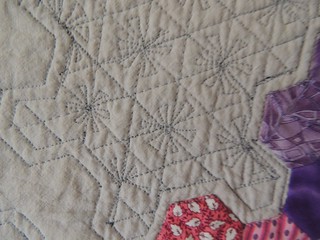
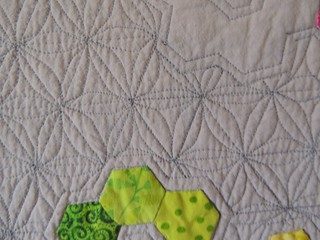
This little quilt–it measures 18 by 22 inches–started with the intention to play with an idea of using hexies to create the look of cogs and wheels: a small study before making hundreds more hexies for a large scrappy bed quilt.
I used the last scrap of the pale gray hand-dyed fabric for the binding, but decided it needed just a bit of color, so inserted the purple piping. (It is real piping, added to the binding using Susan Cleveland's Piping Hot Binding technique).
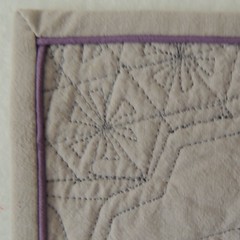
There are five different quilting designs in the background. Only the ghost cogs were marked before quilting; a straight ruler was used to quilt the grid for all of them. It was interesting to play with grids made from 60 degree angles.
Many of the commenters on the WIP post liked the idea of the ghost cogs and encouraged me to leave them un-quilted, which I did ... if I do something like this again, I will think ahead and put an extra layer of batting behind the ghosts, so that they will have the same fullness/dimension as the appliquéd ones.
Here's a closer look at the quilting–I am not sure why the colors in the upper right photo came out so much better and closer to reality than the rest.
Some of the photos aren't as sharp as I'd like ... I'm blaming the gray day and lack of natural light ... and may come back and replace them if/when the sun comes out.
I was surprised at how similar two of the designs look (upper left, lower right). The first is made from all straight lights (using a ruler) and the other has freehand curves.
Since it's been a while since I've finished something that I can share on my blog, I'm celebrating it at all these linky parties:
Can I get a Whoop whoop? on Confessions of a Fabric Addict
Crazy Mom Quilt's Finish it Up Friday
Fabric Frenzy Friday on Fort Worth Fabrics
Free Motion Mavericks on Lizzy Lenard Vintage Sewing
QuiltShopGals' Creative Goodness
Richard and Tanya's Link a Finish Friday
WIPS Be Gone on A Quilting Reader's Garden
It's drizzly and gray outside and so the natural light is not so good in the studio this morning ... but it may actually make it easier to see the quilting.
This little quilt–it measures 18 by 22 inches–started with the intention to play with an idea of using hexies to create the look of cogs and wheels: a small study before making hundreds more hexies for a large scrappy bed quilt.
I used the last scrap of the pale gray hand-dyed fabric for the binding, but decided it needed just a bit of color, so inserted the purple piping. (It is real piping, added to the binding using Susan Cleveland's Piping Hot Binding technique).
There are five different quilting designs in the background. Only the ghost cogs were marked before quilting; a straight ruler was used to quilt the grid for all of them. It was interesting to play with grids made from 60 degree angles.
Many of the commenters on the WIP post liked the idea of the ghost cogs and encouraged me to leave them un-quilted, which I did ... if I do something like this again, I will think ahead and put an extra layer of batting behind the ghosts, so that they will have the same fullness/dimension as the appliquéd ones.
Here's a closer look at the quilting–I am not sure why the colors in the upper right photo came out so much better and closer to reality than the rest.
|  |
 |  |
Some of the photos aren't as sharp as I'd like ... I'm blaming the gray day and lack of natural light ... and may come back and replace them if/when the sun comes out.
I was surprised at how similar two of the designs look (upper left, lower right). The first is made from all straight lights (using a ruler) and the other has freehand curves.
Since it's been a while since I've finished something that I can share on my blog, I'm celebrating it at all these linky parties:
Can I get a Whoop whoop? on Confessions of a Fabric Addict
Crazy Mom Quilt's Finish it Up Friday
Fabric Frenzy Friday on Fort Worth Fabrics
Free Motion Mavericks on Lizzy Lenard Vintage Sewing
QuiltShopGals' Creative Goodness
Richard and Tanya's Link a Finish Friday
WIPS Be Gone on A Quilting Reader's Garden
Thursday, April 09, 2015
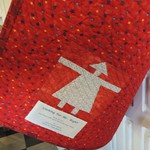
Looking for Mr. Right - My Finished Wall Hanging
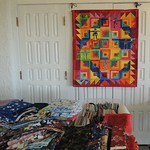
It was an 11th hour finish of the wallhanging I made for the Northern New Mexico Quilt Guild's retreat raffle quilt. Here it is thrown over the rail on the porch outside the retreat center.
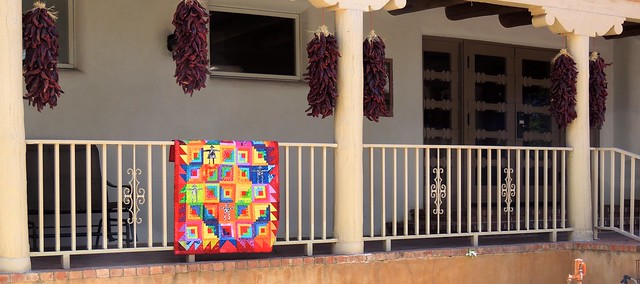
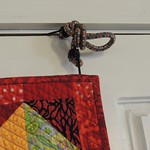
I didn't take a photo of it hanging inside (on an improvised hanging system using a curtain rod and two bungee cords ... that worked surprisingly well)–I will update this post with a photo of that because I had low expectations that it would work at all. Here it is "test hanging" on the gray-green wall in my kitchen earlier today.
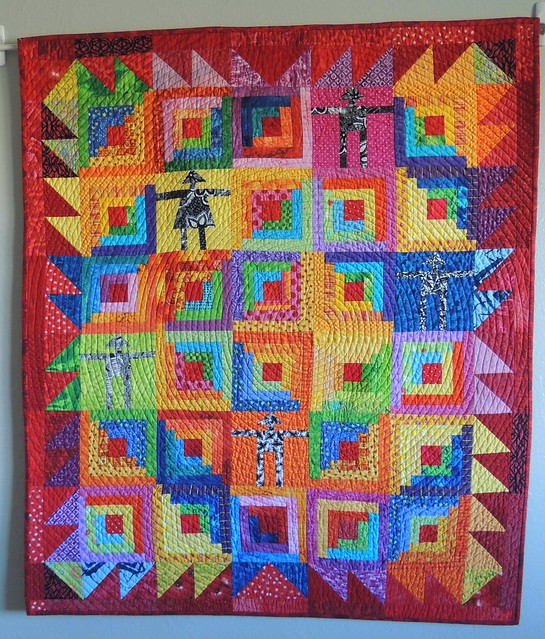
At some point during the quilting and binding, in my easily amused mind, the quilt became Looking for Mr. Right.
The quilt measures 36-inches wide by 42-inches high. The spiralling quilting lines are approximately 1/2-inch apart - quilted on my little purple Bernina using the the walking foot. Here it is one more time, in the sunny courtyard ... my outdoor photography definitely need work :-)

The quilt top has been waiting to be quilted for a while ... I ended up finishing the quilt the day before the retreat. I'm celebrating this 11th hour finish on the following:
Block Lotto Show & Tell
Can I get a Whoop whoop? on Confessions of a Fabric Addict
Crazy Mom Quilt's Finish it Up Friday
Fabric Frenzy Friday on Fort Worth Fabrics
QuiltShopGals' Creative Goodness
Richard and Tanya's Link a Finish Friday
I didn't take a photo of it hanging inside (on an improvised hanging system using a curtain rod and two bungee cords ... that worked surprisingly well)–I will update this post with a photo of that because I had low expectations that it would work at all. Here it is "test hanging" on the gray-green wall in my kitchen earlier today.
Updated with a few more photos of the quilt: hanging at the retreat behind the fabric sale table; a close-up of my improvised quilt hanging system (using two bungee cords); and a peek at the back.
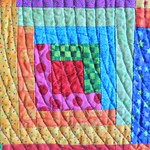
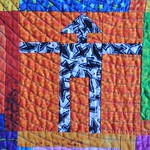
After tormenting myself trying to decide on thread colors and quilting design, I decided to go with a simple spiral, using medium gray thread. I tried a different approach to quilting the center of the spiral (bad idea), but I am still happy enough with the result. Here are detail photos of a log cabin block, an Oklahoma Boomer and one of Julie's "Boomerettes"(there is a second boomerette on the back).
(click for larger images on Flickr)
(click for larger images on Flickr)
At some point during the quilting and binding, in my easily amused mind, the quilt became Looking for Mr. Right.
The quilt measures 36-inches wide by 42-inches high. The spiralling quilting lines are approximately 1/2-inch apart - quilted on my little purple Bernina using the the walking foot. Here it is one more time, in the sunny courtyard ... my outdoor photography definitely need work :-)
The quilt top has been waiting to be quilted for a while ... I ended up finishing the quilt the day before the retreat. I'm celebrating this 11th hour finish on the following:
Block Lotto Show & Tell
Can I get a Whoop whoop? on Confessions of a Fabric Addict
Crazy Mom Quilt's Finish it Up Friday
Fabric Frenzy Friday on Fort Worth Fabrics
QuiltShopGals' Creative Goodness
Richard and Tanya's Link a Finish Friday
Thursday, April 02, 2015
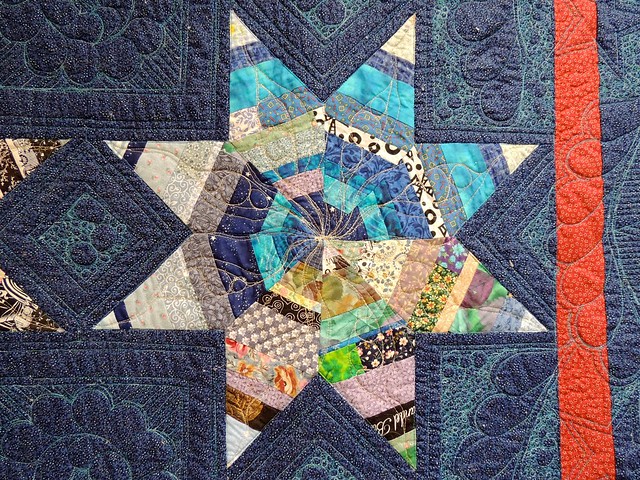
Then & Now - The String Star Quilt is Finished!
As I was quilting the golden oldie UFO string stars and thinking about the differences between my quilting tastes and skill set back when I pieced the string stars and now, the name for the quilt was born: Then & Now. The finished quilt measures approximately 74 by 90-inches and was made using templates in Gwen Marston's book Liberated String Quilts .
.
I set things up a bit too close to one of the skylights in the studio, so the natural lighting is a little uneven, but you get the idea.
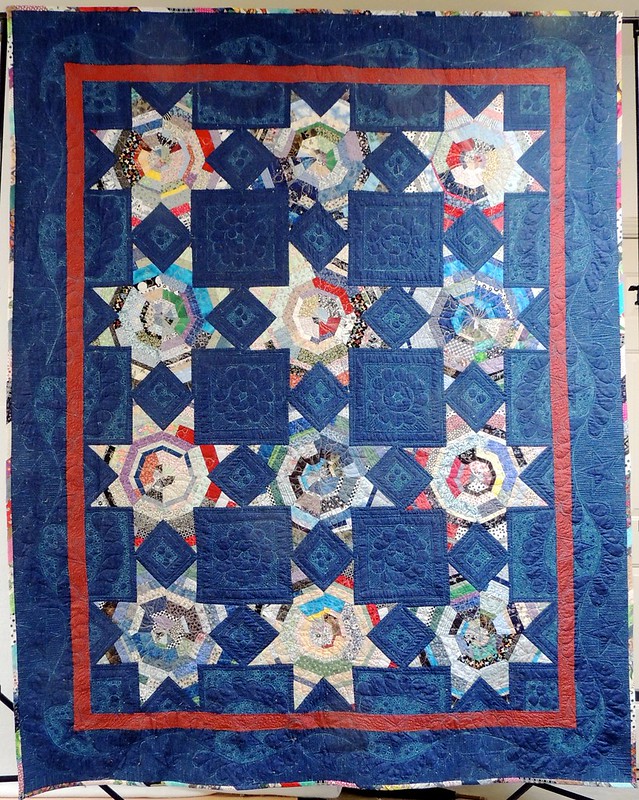
Back Then, I struggled when putting together the star blocks–none of them were flat–and had problems matching the points/seams when sewing the blocks together. Now, I have been quilting twice as long as then. I would have used a different technique to assemble the blocks–thank you Jan Krentz–with a better result: flat stars and matched seams. I would have chosen different proportions for the borders and probably included an inner border to float the star blocks.
Then, I chose the stencils I used for the quilting design, but was afraid that my quilting wasn't up to the task. Now, it's easier for me to just go for it, even if my quilting still really isn't up to the task. I embraced the attitude that every quilt is practice for those that follow ... and I practiced a few things while I finished this quilt. I used the stencils for the border and the large square spaces, but winged it for the rest.
Celebrating this finish on these lists:
Can I get a Whoop whoop? on Confessions of a Fabric Addict
Crazy Mom Quilt's Finish it Up Friday
Fabric Frenzy Friday on Fort Worth Fabrics
Lizzie Lenard's Free Motion Mavericks
QuiltShopGals' Creative Goodness
Richard and Tanya's Link a Finish Friday
Mrs Sew & Sow's Scraptastic Tuesday for April
I set things up a bit too close to one of the skylights in the studio, so the natural lighting is a little uneven, but you get the idea.
Back Then, I struggled when putting together the star blocks–none of them were flat–and had problems matching the points/seams when sewing the blocks together. Now, I have been quilting twice as long as then. I would have used a different technique to assemble the blocks–thank you Jan Krentz–with a better result: flat stars and matched seams. I would have chosen different proportions for the borders and probably included an inner border to float the star blocks.
Then, I chose the stencils I used for the quilting design, but was afraid that my quilting wasn't up to the task. Now, it's easier for me to just go for it, even if my quilting still really isn't up to the task. I embraced the attitude that every quilt is practice for those that follow ... and I practiced a few things while I finished this quilt. I used the stencils for the border and the large square spaces, but winged it for the rest.
Celebrating this finish on these lists:
Can I get a Whoop whoop? on Confessions of a Fabric Addict
Crazy Mom Quilt's Finish it Up Friday
Fabric Frenzy Friday on Fort Worth Fabrics
Lizzie Lenard's Free Motion Mavericks
QuiltShopGals' Creative Goodness
Richard and Tanya's Link a Finish Friday
Mrs Sew & Sow's Scraptastic Tuesday for April
Tuesday, March 31, 2015
Plan B - My pillow for March FMQ Challenge
Em, of Em's Scrapbag, calls it a Plan B when you use blocks made for a different purpose in a new project. I like that. Here's my Plan B pillow, made for the March FMQ challenge.

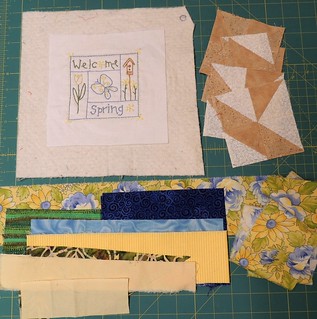
And here's how it started.
 After a demo and presentation of improvisational piecing at the Modern Mini-group, I wanted to try something more abstract than my usual.
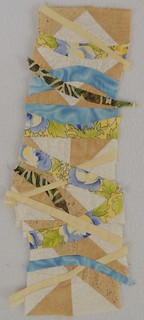
At the time I had just finished Jenny's Welcome Spring stitchery design and thought I could improvise some borders, so I gathered some fabric scraps that would coordinate.
After playing around a bit, I had created a border that I thought looked interesting on it's own but ... absolutely horrible next to the stitchery.
I considered (and dismissed) a few ideas for using the improvised strip with the stitchery.

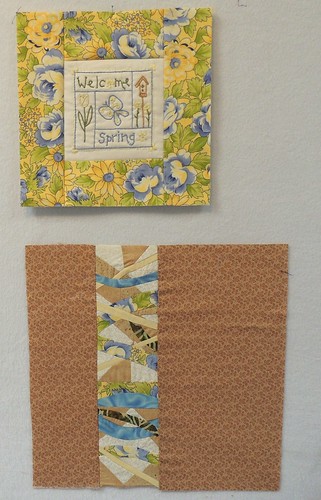
And then, Plan B was born.
I put a simple print border around Welcome Spring and combined my improvised border with another fabric and use it was the background for the March FMQ challenge.
I chose option #1:
Use the free FMQ tutorial provided by Patsy, from the 2012 FMQ Challenge, to create a FMQ Pillow adapting her border approach to your pillow design. To clarify, you get to decide the number size of your pillow, the number of borders you wish to use, as well as which of the designs Patsy shared in this free tutorial, as you feel appropriate.
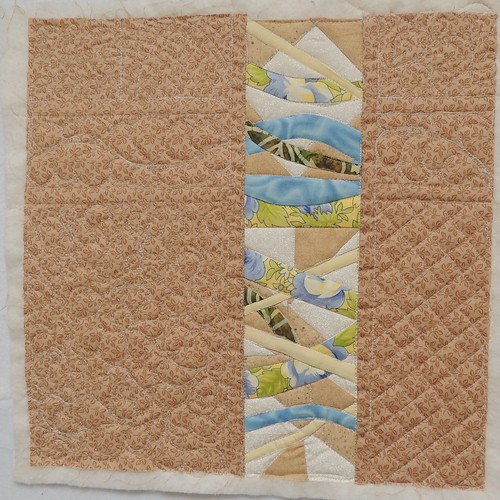
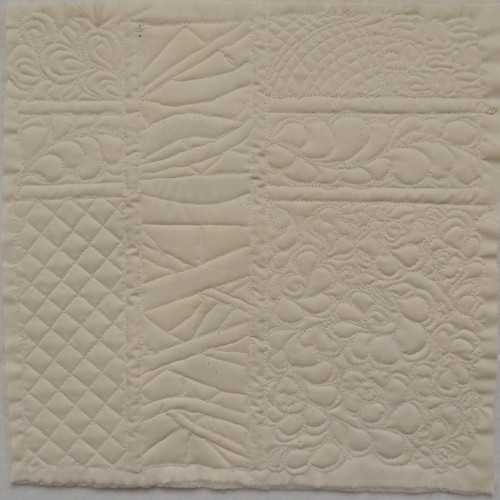
It was suggested that we sketch out our plan and practice first, but since this was my Plan B (and dangerously close to the end of the month), I just went for it. Here are photos (front and back) of the quilting, before it was assembled into a pillow.
And here's how it started.
After a demo and presentation of improvisational piecing at the Modern Mini-group, I wanted to try something more abstract than my usual. At the time I had just finished Jenny's Welcome Spring stitchery design and thought I could improvise some borders, so I gathered some fabric scraps that would coordinate.
After playing around a bit, I had created a border that I thought looked interesting on it's own but ... absolutely horrible next to the stitchery.
I considered (and dismissed) a few ideas for using the improvised strip with the stitchery.
And then, Plan B was born.
I put a simple print border around Welcome Spring and combined my improvised border with another fabric and use it was the background for the March FMQ challenge.
I chose option #1:
Use the free FMQ tutorial provided by Patsy, from the 2012 FMQ Challenge, to create a FMQ Pillow adapting her border approach to your pillow design. To clarify, you get to decide the number size of your pillow, the number of borders you wish to use, as well as which of the designs Patsy shared in this free tutorial, as you feel appropriate.
It was suggested that we sketch out our plan and practice first, but since this was my Plan B (and dangerously close to the end of the month), I just went for it. Here are photos (front and back) of the quilting, before it was assembled into a pillow.
Subscribe to:
Comments (Atom)
