Showing posts with label liberated quilting. Show all posts

Friday, June 19, 2015

Something Different

There were a couple of art quilts at Fiber Arts Fiesta in Albuquerque last month that were very distinctive, with a style of their own.  They were made by Chris Arnold, using unusual and re-purposed fabrics from thrift stores.

This very large quilt is Buffalo. It was in the category for large Art quilts.

Buffalo by Chris Arnold

The buffalo is a collage of fabrics appliquéd on top of a star made of ticking fabrics. The outer border is improvised, using re-purposed fabrics.  I love me some up-cycling.

Buffalo by Chris Arnold - DetailBuffalo by Chris Arnold - Detail

Thursday, June 18, 2015

Improvisation - New Mexico Style

Can color and shape give you a sense of place?  I think these two quilts made by Megan Sturges are proof that it can.

This is Icon of Blessings.

Icon of Blessings by Megan Sturges

And this is Do You or I or Anyone Know?

Do You or I or Anyone Know ... by Megan Sturges

Both quilts were in the category of Medium-sized Pictorial quilts at Fiber Arts Fiesta, that took place in Albuquerque last month. I love the use of free-form piecing to create pictorial forms.

Saturday, June 06, 2015

Isn't It Great?

Isn't it great when you go to a quilt show and find out that a friend has won a ribbon?

This is Ami Krenzel's quilt, Echoes of Spring. It was the second place winner in the category Small Innovative pieced and/or appliquéd quilts.

Echoes of Spring by Ami Krenzel

Ami had blogged about it as she made it, so I recognized it immediately. Of course, it is even better in person. I love those organic improvisational curves and all that fabulous quilting.

Echoes of Spring by Ami Krenzel - Detail Echoes of Spring by Ami Krenzel - Detail


Here's Ami's other quilt from the show, in the same category, Into the Woods.

Into the Woods by Ami Krenzel

Each day in June, I am sharing photos and observations from the Fiber Arts Fiesta that took place in Albuquerque May 21-23.

Monday, April 27, 2015

Little Bits of Improvisation

I played with purples and a little improvisation this weekend.  This morning, all trimmed square, here's what's on my design wall, this Monday.

Improvised Purple Squares

(It's a cold, gray, Monday morning and so the colors in this photo are less than accurate)

Some of these may be used in one of the Cotton Robin quilts at my house which I plan to finish and send on it's way this week.

I am also joining the lists for the Rainbow Scraps Challenge and Monday Making.

Wednesday, March 18, 2015

Scattered Progress

I've been working on a brand new project, a very old project, and a couple of projects you've seen before.

I resurrected another of my moldy golden oldie UFOs–a string star quilt top–pieced a back, and pulled out the stencils I planned to use for part of the quilting design.

Marking a Golden Oldie String quilt

I don't usually mark quilts and I think my fear of trying this is what has kept it unfinished for so long.  I decided that it's time to face this particular fear ... and do it anyway. If you have a favorite tip for working with quilting stencils and/or marking a quilt, I'd love to hear it. 

Softly Crinkled after washingSpeaking of fears ... it turned out that my fear about the dyes in the backing fabric for the kids charity quilt was unfounded.

It came through the wash fine and is now softly crinkled and ready to be trimmed and bound.  I am planning to use a red tone-on-tone print for the binding.


Planning to try a new threadAll the English paper piecing and hand appliqué on my little hex project is complete and it's ready to be quilted.  I decided to try this new metallic thread from Artistic in gunmetal.


First block for a scrappy QOV quilt
I think the best excuse for starting a new project (when you have a plethora of unfinished ones like me) is to make a quilt for a good cause.  I caught up with the guilds QOV mini-group and started a quilt that will be made from blocks like this one.

Lately, I have been feeling scattered and have allowed myself to flit from one project to another ... I am hoping it will end up resulting in a bunch of different kinds.

At least it makes for an interesting WIP Wednesday update ;-)


Friday, February 28, 2014

February Finishes and Failures

In February, some quilting happened ... but I made ZERO progress on a couple projects that were goals for this month.  With my 20-20 hindsight, I can see that perhaps my recent obsession with espresso machines was one way to avoid those projects ... hmm.

I DID make scrappy pink blocks for four ongoing rainbow scraps projects.


Pink scraps also found their way into two new projects.


I made a basket of string-pieced heart pins and sent them to dozen quilters to thank them for their support of the Block Lotto site.

Then I used the left-over bits of string fabric to make liberated star blocks for a future to-be-determined project.


I am joining the February NewFO Challenge linky party with these two new projects.

I spent a lot of time watching the Olympics coverage on TV in February, which allowed me to finish up the stitching for a pair of large Redwork pillow covers.


I also made a whole lot of Bead-on-a-String blocks: for the lotto and for two Mod-Mod quilts.

BUT ... because I failed to put a single stitch into my designated goal for a Lovely Finish, nor get much beyond creating a pattern for the Tea Towel Challenge, I am feeling pretty pathetic on this last day of the month ...

Can I blame my failures on a retrograde Mercury?  It seems as soon as Mercury started moving forward again, I had an idea for something completely different for my Tea Towel challenge quilt–I am still hopeful I will be able to make that happen.

Or maybe my optimism for March is fueled by a return to my routine and a first-thing-in-the-morning coffee?  As it turns out, after serving up the best cappuccino that I've ever made, the Goodwill bargain refused to make another.  After spending too much time trying to make it work and talking with the manufacturer (who offered to service it for $400), back to Goodwill it went.  the experience helped me decide on a replacement, which I did find locally. I'm not sure how a single cup of coffee in the morning can make things feel more ordered and normal around here, but it has.  I am ready to march on to March.

Friday, February 21, 2014

The Last of February's Scrappy Pink Projects

These are  bits of string fabric that were left after I made the pink string-pieced heart pins I shared a week ago.


Most of the rectangles were in the neighborhood of 2 by 2 1/2-inches.

Maybe if I had tossed them right away, they wouldn't have kept calling my name until I DID something with them.

I used them as centers for these scrappy pink liberated star blocks.


I have some ideas but no real plans for these–suggestions welcome.  For the moment, they are just decorating my design wall while the remaining string-pieced scraps continue to call to me and say, "let's play" ... and I cannot believe I seem to have started yet another new project.

I'm joining Angela's list for the Last Pink Saturday and, a little burnt out on pink, waiting to read what color scraps I'll but pulling out and playing with in March.

Tuesday, February 04, 2014

Thinking about Color and Composition

For those who wondered, yes,  washing the Silly Strings quilt and letting it relax and dry flat on the work table did eliminate the waving sides created by the spiral quilting.


I celebrated the finish Monday morning by putting it on the table and enjoying a cuppa in my lime green mug.  Then I threw it on the floor and took a straight on photo.


It might not be obvious, but the colors in this quilt are the same as the one I made a year ago, using the April and December blocks from the 2012 Block Lotto.  

This month the Linky Party topic on the Block Lotto is Color.  These two little quilts have me thinking about how the proportions of the colors you use in a palette can make a big difference. The quilt on top is mostly cream with a dash of turquoise; the quilt on the bottom is pretty much the opposite, mostly turquoise with cream as an accent.  They both have a orangey brick red, yellow green and pale blue. The older quilt has one additional color, a medium blue. 


You can see a sliver of the sisal rug that originally inspired my color choices in the lower left corner of the photo. (Note to self: you really need to vacuum!) When I chose fabrics for the Silly Strings quilt with a plan to put it on the table, I decided to stick with the rug-inspired palette, but use it in different proportions. You can see the (clean) rug, better in this photo from last year (with the photo-bombing cat, Johnny Be Good).


I remember being told or reading rules somewhere about how much of any specific color you should use in a quilt; I think for yellow it was no more than 30%.  It's possible one of the table-topping quilts breaks the old rules for color proportions, but I like them both.  And ever since we used yellow and gold as a background for some liberated basket blocks for the Block Lotto, I've been dying to make a yellow quilt ... sometimes, some rules really are meant to be broken.  If nothing else, the experience is a great way to learn.

I have been asking quilters to suggest (and show) color combinations for the Block Lotto–coming up with new blocks is easy for me, but choosing color ways outside my own taste is a challenge.   I wonder what would happen if we used Sophie's Sisal Rug for color inspiration for a future lotto block color palette?

I am joining the February Linky Party on the Block Lotto with this post.  I'd love for you to blog about color and share your ideas, too.

Friday, June 07, 2013

A Little Finish with a Long Story

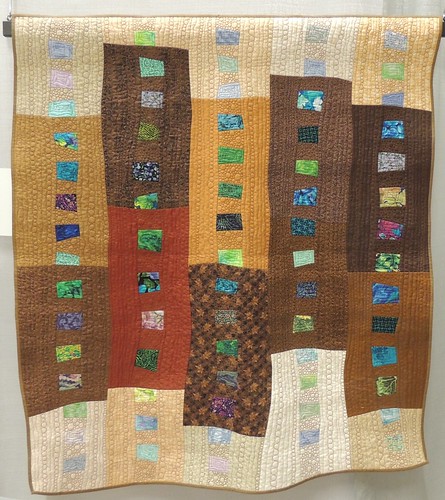
I call this little doll quilt, Upcycled Shoo Flies, because it was begun when I was cleaning up some small red and pink and white scraps (from making free-pieced loving words for the Block Lotto) on my work table and instead of tossing them, I made a dozen 4-inch liberated shoo fly blocks. The finished little quilt measures 19 by 24 inches.

Recycled Flies- Wonky Flies Doll Quilt

If you like the wonky shoo fly blocks and think you'd like to make some of your own, check out my tutorial, Three Ways to Wonkify a Traditional Quilt Block.

After I put them together into this top, I wasn't quite happy with it.  When I won a strip of a vintage sheet, I  remade it with some of the floral strips.

Quilting from the back
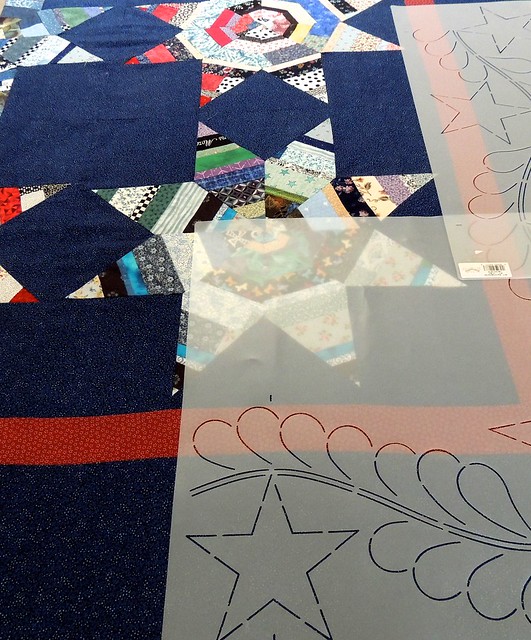
When I came back to this quilt early this year, I thought it would be fun to try quilting from the back in the plain border. I didn't have enough of the floral sheet for a back, so I pieced the back and used it fo borders on the back. First, I quilted the center of the quilt–feathers winding around the white background, outlining, then echoing the print in the floral strips. Then I flipped the quilt over, used painters' tape to mark the inside edge of the border and quilted the borders by outlining, then echoing the flowers in the print.

I felt like Murphy's law started working overtime as soon as I decided to finish up this long-ago pieced quilt.  I mentioned earlier this week how I started quilting it shortly after my Bernina came back from a trip to the dealer for a routine maintenance.  Actually it was exactly 2 weeks after ... and the machine stopped working (again) soon after I started quilting the feathers in the white background.

Aaargh - out of threadWhen I resumed the quilting earlier this week, I managed to get to the borders before I ran out of thread. Usually, I celebrate when I finish off a coneof thread ... but not this time. I didn't have any more of the Lace White thread, but I was feeling so motivated to finish this silly little lark of a project, so I decided to use another "white" of the same type of thread. Grace insists ... it's time to take a break

A couple nights ago, I was determined to keep going until it was done ... my cat, Grace Hopper, had other ideas and late Wednesday night, insisted I stop quilting and go upstairs to bed now.

I was able to finish yesterday evening ... and Grace was happy to keep me company while I stitched down the binding late last night. I had pulled out the last of the vintage sheet with a plan to use it for a hanging sleeve, but decided I liked it for the binding.  The tiny pink piping was added using Susan Cleveland's Piping Hot Binding technique.

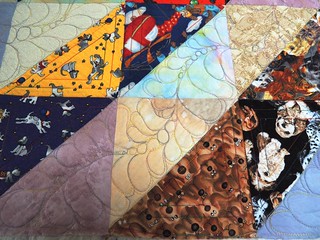
Here are a few more detail photos of the finished quilt.

Upcycled Shoo Flies - Quilting detail front and back Upcycled Shoo Flies-piped binding Upcycled Shoo Flies-detail Upcycled Shoo Flies-quilting detail

This sweet little girly doll quilt makes me smile because it's truly a silk purse made from a sow's ear: a recycled sheet and small scraps that were on their way to the trash. Even though crazy things kept going wrong and a bossy cat got in the way, it's finally done.

Now I just have to decide where to hang it and appreciate it for a while.

I'm celebrating this finish by joining the linky parties on:
Can I get a Whoop Whoop?
Finish It Up Friday
Link a Finish Friday

And because Grace helped so much with this quilt:
Feline Friday

Wednesday, February 27, 2013

Where does it come from?

How do we completely lose interest in a project ... or suddenly feel the urge to pick it up and work on it again?

That's what I've been wondering as the urge to turn these blocks, this perennial WIP, into a quilt has taken hold in a big way.

Working on the Rose Border

I put the word blocks together last night and pulled out the large rose blocks today to begin work on the border. I have a bunch of blocks–many sent to me by friends from the Block Lotto–but I'll need a bunch more.

Will this urge continue?  Will I have the time and inclination for a Lovely Finished top for February after all?

I'm linking with WIP Wednesdays at Freshly Pieced and Esther's Blog.

Friday, February 01, 2013

The Perennial UFO

This is an old photo, but that's OK, since no progress has been made since I last admired these blocks.

Whenever February rolls around, I am motivated to pull it out and put it up on the wall and work on it ... and yet it remains unfinished.

  The idea 

The word blocks were won in the Block Lotto three years ago. The wonky rose blocks were made by me and others from the block lotto community to help me get this quilt together and yet I haven't been able to make it happen . . . yet.

A Lovely Year of Finishes This is my February choice for a Lovely Year of Finishes, organized
by Melissa of Sew Bittersweet Designs and Shana of Fiber of All Sorts.

It's an ambitious choice for me–I have some other commitments for February that will also have to be finished, but ... I'm up for the challenge.

Wednesday, January 02, 2013

Working with Words

Here's a sneak peek at my work-in-progress for the In Your Words blog hop that begins on Monday, January 7.

The piecing and appliqué are now complete, but for the sake of the element of surprise, you'll have to come back at the end of next week to see the rest ... which I plan to quilt, bind and embellish in the meantime.

I wasn't sure how well my "twin" quilt would work with the original, from last year's Cotton Robin, especially since I intentionally took the design in a completely different direction. I think they are going to play nicely together.

It's been a while since I made any free style letters--I'd forgotten how much fun they can be.  Want to guess what I'm spelling?


WIP Wednesday at Freshly Pieced


I am linking up to WIP Wednesday over at freshly pieced. Go check out what other people have in progress today. 

Wednesday, December 19, 2012

Project Mashup–My Twofer Twin Quilt in Progress

It's really just a nice case of synchronicity.

I'd been planning to add words to one of my works-in-project; someone dropped out of the group and there was an opening in the In Your Words Blog Hop.  My design idea and words were a fit for the theme of revealing who you are or more about you and I asked if there was room for one more ...

The commitment (and deadline!) means it's more likely I'll get busy and FINISH it.

The little quilt project was one begun a year ago, when I signed up for Julie's Cotton Robin.  Because the fabric I contributed for my quilt was one of two matching Michael Miller fabric sample headers, I decided to make two centers, send one with one set of the fabrics for the round robin and finish the other myself.

The TWIN idea
The starter fabrics are on the right and  my Twins-Separated-at-Birth star blocks made from that crazy, not quite a stripe fabric at the bottom of the collection of fabrics are below.

The "twins"

And here is the round robin quilt I received, begun with the block on the right and completed by Laurina, Andra and Nan. I blogged about this quilt and the cotton robin last summer here: Revisiting the Cotton Robin.  Julie has a few more spots, if you'd like to play in this medium (small quilts made by 4 quilters, details kept secret until the finished quilts are revealed). You can find details on the Cotton Robin blog.

My Cotton Robin Quilt - Finished

That lovely quilt is a hard act to follow–more than once, I've wished I had finished my own sister quilt before I saw this one, but life, several moves and a couple of job changes got in my way.

Beginning work on the Twin quiltBut I am happy to be finishing it now and am having fun using the twin block and a lot of the same  fabrics to create a very different design.

What I've been up to so far is a bit of hand appliqué.  Sometimes when life hands us lemons, a little handwork is just the sort of meditative activity we need ... to figure out how we're going to make lemonade.

I'm not sure this is working, but it's a start and I am hopeful that I can MAKE it work within the original guidelines of adding two borders.  Come back on Friday, January 11 for my reveal in the In Your Words blog hop to see my finished Separated-at-Birth Twin quilt.

The strip of dot com fabric is an oldie but goodie from my stash, purchased not long after I began quilting.  This is just about all I have left, but it's so perfect for the In Your Words theme that I had to include it.

Remember, if you'd like to participate in the next Cotton Robin, be sure to get in touch with Julie, ASAP.

Friday, July 01, 2011

Liberated Checkerboard Block

Sophie's liberated checkerboard block #2This liberated variation of the classic 16-patch block is easy to cut and sew . . . as long as you take care to keep things organized.

The blocks are made two-at-a time, beginning with 2 large squares. The finished size of your liberated checkerboard block will be 2-to-2 1/2 inches smaller than the these squares.

For the Block Lotto in July 2011 (and these examples), we used 10 inch squares to start: one white and one solid or tone-on-tone (TOT) print in a medium to dark value with high contrast.

CUT FABRICS
  1. Place fabrics on the cutting mat, one on top of the other with edges aligned.  Both fabrics must be right sides up.
  2. Vertical cuts: make 3 straight cuts from the top edge to the bottom edge.  The sections do not have to be even and the cut lines may be as slanty as you decide to make them. There should be at least one inch between the cuts and at the outside edges.  I pulled the sections apart so that you could see them--you don't need to do that and can leave them just as they are on your cutting mat.
  3. Horizontal Cuts: Make three straight cuts from left edge to right edge. If it makes it easier for you, you can rotate the mat (or walk around the table), but avoid moving the cut fabric pieces.  The same 1-inch rule of thumb applies.  

Vertical Cuts    Horizontal Cuts 

PREPARE TO SEW
  1. Create the checkboard by swaping top and bottom fabrics of every other piece.
  2. Carefully move to your sewing area–because these irregular shaped pieces will only go together ONE WAY, carefully move them close to your machine.  I used a 12-inch square ruler as a platter to carefully transfer my pieces from cutting table to sewing table.

Make the Checkerboard     Move to your sewing machine 

SEWING THE BLOCK
 
You now have the pieces for two Liberated Checkerboard blocks.  Sew them together as a 16-patch.  Here’s the approach I used to keep everything organized and correctly oriented–I’m a little dyslexic and so I need to be VERY careful or something will get turned around.

Cut pieces in Place1. Get Organized

Carefully lay out the stacked pieces (for two blocks) next to your sewing machine to prepare for assembly.
From Left-to-right, Top to Bottom2. Begin Working Top-to-Bottom, Left-to-Right

Flip each of the top fabrics in the second column, onto the first column, like turning a page in a book.
Chain Sewing3. Chain Sew the Pairs

Sew the pairs together, from Top-to- Bottom.

After you've sewn the pieces from the "top" block, repeat the process for the second block.

Leave the four pairs of each block connected (by thread)—only snip the thread between blocks.
Pressing - wrong-side view4. Press after every set of seams

I found it easiest to press after the pieces in each column are sewn. Always press toward the non-white fabric–it will make matching the seams easier later.

This photo shows the BACK after the first set of seams have been sewn and pressed.
Press After each column is added5. Layout the Block with Sewn Pieces

Put the sewn, and pressed section back in place in your block layout.
Press and Repeat6. Continue to Work Left-to-Right, Top-to-Bottom

"Turn the pages" of the pieces in the third column and place them on top of the corresponding piece to the left. Chain sew these four seams as before.

Add the third column to the second block of your pair.
Four Rows Sewn7. Press and Repeat

Press the second set of seams and Repeat with the last column of squares.

Your block will now consist of 4 sections (rows) that are held together at the intersections by the thread left in place from chain piecing.
Sew the rows together8. Sew the “rows” together

Fold the top row down. If the seam intersections are connected by the thread from your chain piecing, you may find, as I did, that you do not need pins to accurately sew the seam, matching the intersections.

Stitch and repeat for each row of both blocks until your checkerboard block PAIR is done. 

You may decide to square-up all your blocks and trim to the same size. For the block lotto, we're sending the blocks UNTRIMMED and allowing the winner to decide how he or she will use them.

Sophie's Block Pair #2

Here's a look at how 35 liberated checkerboard blocks randomly arranged  might look--with block photos from Béa, Cathy, Cheri, Ginny, Jennifer, Julie, Kate, Kathie, Linda, Linnea, Mary Jane, Michelle and Toni.

Cathy C's liberated checkerboard block #3Cathy C's liberated checkerboard block #2Cathy C's liberated checkerboard block #1Jennifer S's liberated checkerboard block #5Jennifer S's liberated checkerboard block #4
Jennifer S's liberated checkerboard block #3Jennifer S's liberated checkerboard block #2Jennifer S's liberated checkerboard block #1Kathie's liberated checkerboard block #3Kathie's liberated checkerboard block #2
Kathie's liberated checkerboard block #1MaryJane's liberated checkerboard block #5MaryJane's liberated checkerboard block #4MaryJane's liberated checkerboard block #3MaryJane's liberated checkerboard block #2
MaryJane's liberated checkerboard block #1Toni's liberated checkerboard block #4Toni's liberated checkerboard block #1Toni's liberated checkerboard block #2Toni's liberated checkerboard block #2
Michelle's liberated checkerboard block #1Michelle's liberated checkerboard block #2Michelle's liberated checkerboard block #3Michelle's liberated checkerboard block #4Michelle's liberated checkerboard block #5
Ginny's liberated checkerboard block #1Bea's liberated checkerboard block #1Cheri's liberated checkerboard block #1Bea's liberated checkerboard block #1Bea's liberated checkerboard block #3
JulieP's liberated checkerboard block #1Sophie's liberated checkerboard block #1JulieP's liberated checkerboard block #2JulieP's liberated checkerboard block #3Linda N's liberated checkerboard block #1

Thanks to everyone for the great block photos that made this virtual quilt possible.  If you make a quilt or other project from this liberated checkerboard block, I'd love to see it.
Related Posts Plugin for WordPress, Blogger...