Showing posts with label in progress. Show all posts

Monday, June 13, 2016

Because Sometimes You Just Need a Break ...

I continue to make slow but sure progress making the 80 Lemoyne star blocks needed ... some of which are shown here  on my design wall with the strips intended for the borders.

Lemoyne Stars progress

But this weekend, I really need a break from working with Y-seams and inaccurately cut pieces ... and so I pulled out the golden oldie UFO and made the rest of the Summer Vine blocks from sets of strips–some more coordinated than others–swapped to make these blocks in 2002.

More Summer Vine blocks

Working on one thing can make you really appreciate the other–it was a joy to put together blocks for which the block "kits" are known to be the correct measurements ... and there are no Y-seams! 

I now have 95 of the Summer Vine blocks. I will making at least one more–but likely more than that–before deciding upon a layout and sewing them together. 

If you're curious, you can read more about this very old UFO with links to the pattern and block directions in this blog post.

Saturday, November 09, 2013

It's a Little Intimidating

Like a blank page, there is so much open white space on my red & white sampler, made from this year's lotto block patterns, it's a little intimidating.

Sampler top with December blocks covered

The black rectangle is hiding the 4 blocks made with the December block pattern–don't want to spoil the surprise.

If any of the blocks appeal to you, you'll find links to all the patterns at the top of my Block Patterns page

My plan has always been to make a sample quilt using the 6 by 9 inch lotto blocks for this year, leaving lots of open space for quilting: some of it will be very traditional and marked; some will be unmarked free motion; some will, I hope, have a modern feeling.  I'm excited to get started ... and a little intimidated. 

Tuesday, February 26, 2013

Word Scramble

I thought my loving words quilt needed some blocks with darker backgrounds, so I pieced these letters with red backgrounds for another block to add to the quilt–can you guess what it will be?

Word Scramble

UPDATE:  Hilda and Kate got it right away: 

My Funny Valentine

Thursday, October 11, 2012

Quilting in Progress

Wendy asked what free motion quilting projects we're working on.  Here are three that are on my table right now.

I've been quilting

On the left are a pair of large pillow covers with the quilting complete.  Nearest the machine is a project made from selvages that I plan to work on today. In the background is a a very, very old project, a throw that is now backed and pinbasted and ready to quilt.

Here are some detail photos of the quilted pillow cover fronts--front(finished) and back(with only the star element completed).  As I was quilting these, I thought that they're not exactly "feathers," more like amoebas on a string.  I drew the main curve (string) on each half of the Split Star blocks, but everything else was completely unmarked FMQ--my favorite way to quilt.

Quilting Detail   Back of one star block without fillers added

Saturday, December 17, 2011

Saturday Update

Sewing down the BindingThe quilt has been trimmed and the binding sewn on and now I'm enjoying the process of stitching it down by hand ... all 10 yards of it. I decided on a red/green/gold poinsettia print from my stash for the binding because I liked how it looked with both the front and the back of my quilt–although there's no way anyone will see poinsettias in that skinny binding ;-)

I think another night of movies and stitching and my quilt will be done, done, done ... in time for Christmas.

I also decided to use two of the leftover star blocks to make big square pillow shams.


Inspired by the leftover triangle squares, I added a pieced border around the star blocks:


pieced border added 

And then a plain border to make them the size I need–24 inches


I am looking forward to quilting these smaller pieces--it will be so much easier and quicker.

Saturday, December 10, 2011

Update from the Occupation


This in-progress photo of my Occupation project will tell you a few things.

After my Singer 301 completely balked at sewing with the feed dogs lowered; after trying everything I could think of, talking to a couple of knowledgeable friends;  asking some locals for a recommendation for a good sewing machine mechanic ... I decided to see if I could quilt this large quilt (90" square) on my little Bernina 153.   After muscling through the center blocks, it got easier and seemed possible and so I decided to put diagnosing my 301 on hold and to continue quilting on my purple Bernina.

I am filling all the white areas with unmarked, bendy, wonky, feather shapes–have I used enough adjectives to let you know they are imperfect?  Whether they look like feathers or not, they are adding great texture to the quilt. 

The quilting may not be finished before Occupy your Sewing Room ends, but I am still hopeful that I will be done for Christmas.

After a big Friday Night Sew-in (FNSI) Push, I am now quilting the last round of blocks.  The end is in sight.
.
Grace insists it's time for a breakI was becoming quite obsessed with getting this done last night.  Good thing for me, someone insisted–and she really did dig in and INSIST–that it was time to take a break . . .  or my shoulders would have really been hurting this morning. 

Saturday, November 26, 2011

Turkey, the Macy's Parade and Setting Triangle Math

My Thanksgiving morning was perfectly nostalgic. Up early to put the turkey on and make a nice breakfast. followed by watching the Macy's Thanksgiving parade on TV . . .  updated a bit because as I watched, I cut setting triangles and assembled a Christmas quilt top from those old swap blocks.


With a large design wall, it was a lot easier to figure out what I meant by my mysteriously coded sketch and lay out the blocks.

It seems I always have to go look up setting triangle math, whenever I put blocks on point.  I know that the magic number is the square root of 2–1.414–but I never remember what to do with it ... so off to the computer I go.

Here's how I will remember NEXT time:

  • Since I'll need MORE side triangles, I MULTIPLY the finished block size by 1.414.  Then, because I am going to cut the square into quarters, as for quarter-square-triangle units, add 1 1/4 for the seam allowances.
  • For the corners, I do the opposite and DIVIDE the finished size block by 1.414.  Because I am going to cut them diagonally in half, like half-square-triangle unites, add 7/8 inch.   
For both kinds of triangles, round the measurements to the nearest 1/8 inch ... so you can easily cut them.

For the corners, I used the twelve inch star block as the starting point.  12 / 1.414 + 7/8 = 9 3/8 inches.  Because I inserted six inch 4-patches into the side setting triangles, I used 6 in the side triangle math. 6 * 1.414 + 1 1/4 = 9 3/4.

Monday, April 11, 2011

The Quilt Speaks

My best laid plans to add some plain borders to the Lotto Blocks sampler quilt and call it done were foiled by the quilt–it kept insisting that I needed to more gracefully terminate those Knot and Chain blocks ...

Adding border blocks

. . . and so I pieced some half blocks–technically 60% blocks–and cut some plain rectangles.

Maybe the quilt was right. I think it IS better. 

(Yes, at the bottom of the photo, the quilt is crumpled like that because I had to chase Johnny out from under it.  Grace was watching from a nearby chair and waiting to see if he was going to get into trouble ;-)

You can check out the other design walls (floors, tables, etc) by following the links at the bottom of Judy's Patchwork Times Design Wall Monday blog post.

Monday, April 05, 2010

Quilt-Along Progress Report

When I finished knitting the Brandywine shawl on March 3, I didn't start a new handwork project right away because I expected Bonnie's March block for the quilt-along to arrive any day.  I'd already seen photos of blocks made by Bonnie and others on their blogs and I was already looking forward to piecing the March block.

Except it didn't come and by the end of March, my enthusiasm for the project was considerably dampened.   I was a little irritated with myself for creating yet more orphan blocks, even though it was through no fault of my own . . . this time. 

On March 31, I received an envelope from Bonnie with the patterns from March-through-May.  And over the weekend, I pieced 3 each of the March and April blocks.  I pulled out the January and February blocks and put the first four months of the year up on the design wall.

January through April

Four months down, eight more to go.

Obviously, I still haven't yet squared up and trimmed the blocks . . .  maybe I'll do that before I pack them away again. 

There are individual photos of the blocks on Flickr in my Quilt-along 2010 photo set, if you want to take a closer look.

And for links to the design walls of other quilters around blogland, check out Judy Laquidera's Design Wall Monday blog post.

Thursday, April 01, 2010

Waste Not Want Not

The story of the scrappy red and turquoise doll quilt I finished piecing this afternoon can be easily expressed by a simple equation.

    Sophie's Wonky Fly Block #6   
+  Single Wonky Rose Block   
_______________

  Wonky Fly Doll Quilt (Top)

In the past week or so, I've been working on the April Lotto blocks and writing directions for how to create the wonky Shoo Fly blocks we're making in flower prints this month. Here are my lotto blocks, you can find many more examples on the Block Lotto blog–the sneak peekers and I have already made a total of 80 blocks for this month.

Sophie's 12 Blocks

My directions for making the 8 inch liberated-style shoo fly blocks are blogged here:

Three Ways to Wonkify a Traditional Quilt Block

After I had everything ready to go for the April Block Lotto today, I switched gears and started making the rose blocks that I shared earlier this week. As I sewed and trimmed those rose blocks, I noticed that I was accumulating a pile of small, irregular red and pink triangles and my mind kept thinking, Wonky Flies. Instead of tossing my trimmings, I put them aside and, last night I pulled out some white scraps and started piecing the small wonky shoo flies.

The scrappy shoo fly blocks are approximately 3" square . . . though none of them are actually square. All the fabrics came from the trimmed roses and my white and blue scrap bags. The top measures 18 x 24 inches. Now, I just have to decide how to quilt it.

Wonky Fly Doll Quilt (Top)

Now that I've responded to my persistent imagination, I'm headed back to the rose garden and working on more roses for my border for the love letters word quilt . . . and wondering what my creative mind will cross-polinate next.

Wednesday, February 03, 2010

Playing with Scraps

I Love the Block LottoWhile I watched all three hours of LOST last night, I pulled out some scraps and free-pieced a few words and played some more with strings.

I'm having too much fun with these words, but I really ought to make some more "love letters" for the block lotto this month.


Block Lotto Blog Badge - in progress I'm sure my recent adventure with strings informed my decision to string piece the heart.

This afternoon, I pulled out more scraps and played with the idea of a black & white border.

Since black and white quilts never seem to photograph very nicely and I'm thinking this doll-sized quilt could become a blog badge for supporters and friends of the Block Lotto, I'm inclined to go a different way. . . isn't it interesting how seeing something on a computer screen can make you see how/why you don't like it as much as you thought ;-)

Block Lotto Blog Badge - in progress

It's back to the design wall and more playing with scraps for me, I think . . .

Edited to add, here's a photo of where I ended up.

Block Lotto Love (with borders added)

The borders will be trimmed a bit. I will probably bind it in a bright blue or red.

Tuesday, February 02, 2010

Progress Report ... and thoughts on Abstraction in Quilt Design

Johnny rarely ends up in my quilt photos–his baby sister is the one who is fascinated by fiber–but when I was trying to take a photo of this finished top on my bed, he refused to budge. So here it is, Johnny Be Good and all.

Johnny inspects the completed top

(I'm not sure, but I think that light circle means there's a spot on the lens of my camera . . .  grumble, grumble)

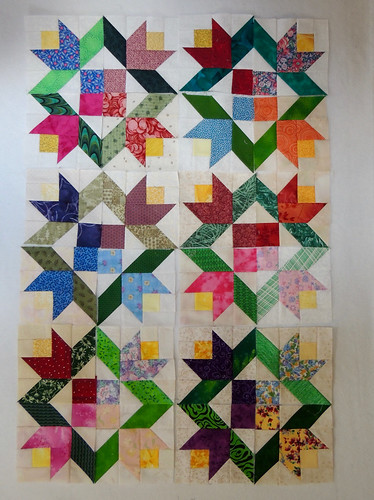
As I was sewing the blocks together, I was thinking about the Lazy Gal Liberated Amish 2010 challenge that I recently joined and about the process of abstracting a traditional Amish quilt into a new quilt design.  I couldn't help but think about how the quilt I was putting together,  based on Gwen Marston's Liberated Wedding Ring quilt (from her book, Liberated String Quilts) was itself a liberated abstraction of a traditional quilt pattern and how it shares the essence of a wedding ring quilt, interpreted in a freer way.  Gwen's quilt has beautiful, traditional quilting . . . and I plan to attempt the same.

While I initially was eager to start working on my Liberated Amish challenge quilt, I actually think that the time spent thinking about it while I finished putting together the string quilt has been good for my thought/design process.

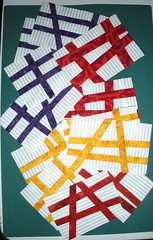
This is the quilt from the Faith and Stephen Brown collection that I have chosen as a starting point for the Liberated Amish challenge.

005:Nine Patch-Midwest c.1920 74"x62" 

To me, it's a 9-patch quilt that doesn't scream 9-patch and it features a wide range of values.  So, those are the two characteristics I hope to create in my quilt.

I feel like I'm ready to go, but I may pull out a UFO and finish it while I think about it a little more ;-)

Thursday, January 21, 2010

What holds you back from finishing quilts?

Quilting some Mini-WreathsYesterday, Linda commented, "Judging by the stack of quilt tops, actual quilting is definitely not a fav."

Judging from the stack of quilt tops around here, you might think the same is true of me . . . but it isn't, not really. However, I often fear that the quilting design that's probably been in my head since I started putting the blocks together either won't be as wonderful as I imagine it or (more likely) that my lack of skill will prevent me from realizing the design. And that fear, while not an actual quilt making step, is often a big hurdle for me when it comes to turning works-in-progress to finished quilts.

I'm working on the doll quilt in the photo. I feared that the diagonal quilting through the chains would reveal that all those 1/2 inch squares aren't exactly perfect . . . which it does if you look close. And now, I'm facing my fears about the 17 two inch feather wreaths which seemed like the right quilting design for those open spaces . . . with mixed results.

I know I could send out my quilt tops to one of the many talented long-armers, but the artist in me wants to control that design element of my quilts. So here I am, facing my fear and doing it anyway . . . knowing that not doing so holds me back from finishing my quilts.

Does anything hold you back from finishing yours?

Wednesday, January 20, 2010

Do you have a favorite part of quilt making?

One of my favorite thingsI enjoy almost all of the aspects of quilting, but I was thinking today that I especially enjoy squaring and trimming the quilt, after the quilting is done.

I don't know why I decided to quilt and bind the banner I made for the Block Lotto group blog. The only practical use I can imagine for this quilted object is as a too-long too-skinny table runner to use when friends from the Block Lotto are in town.

I used a 4" border quilting template even though the top border is only 2". Initially, I was only going to use that template on the side and bottom borders, but I ended up fitting and editing the design around the letters at the top. It was actually fun and worked quite well.

Quilt Design DetailI haven't yet chosen a fabric for the binding. My initial feeling is a blue plaid, cut on the bias . . . I wonder if I'll find any among my plaid fabrics?

Here's a detail of the quilting design. I also outlined the letters.

I know I have a quilt top waiting to be quilted for which I planned to use this dogwood flower border. Maybe it's time to put that together?

. . . but back to my question. Do you have a favorite step in quilting? Choosing color palette or fabrics? Designing? Piecing (or appliquéing) the blocks? Assembling the top? Or something else?

Saturday, January 02, 2010

I Didn't Dream This One

Dianah did. Don't you love the way one idea can spark another among quilters?

You can read more about it on her blog, here: X's or O's? I love how she set the blocks slightly off square, used different sizes and created all that great white space for quilting.

My own little spark, sparked a smaller idea . . . to use up the trimmed off bits from my Tic-Tac-Toe blocks to make smaller Tic-Tac-Toes . . . they're post card sized, but the idea of a table runner is also noodling in my head. Maybe I'll sleep on it?

I Know I had a Plan for These

Christmas Star Quilt WIP unpackedI decided to spend the afternoon with an old quilt project and move it forward.

I pulled out the package which had a bunch of blocks, an assortment of Christmas fabrics–the holidays always make me feel like working on Christmas projects in January, an inspiration photo (for the pieced border) and a scribbled layout I had designed.

Now, if only I knew what those letters in the layout stood for . . .


I had a plan . . .

After counting up the numbers of blocks I have and comparing it with letters on this scribble of a plan, my guess is that C is for Checkerboard (16-patch) blocks and R is for the Reverse version of The Dewey's Victory block . . . but what the heck did I mean by "S" and "P"?

I thought I might have blogged by intentions, but only found this In Progress blog post, which talks about an early decision to pull apart some blocks from the swap and turn them all into Dewey's Victory blocks.

It's clear that my project du jour will first mean putting together a Design Wall that I can use in the itty bitty loft–which has neither the space nor suitable walls. I'm going to need that design space to figure out what I intended and move this project forward.

Note to Self: all future notes to self should be a bit more expansive and understandable than that scribble . . . and have a key provided ;-)
Related Posts Plugin for WordPress, Blogger...