Showing posts with label handpiecing. Show all posts

Monday, March 14, 2016

Updates from My Design Wall

My design wall hasn't changed much ...

DesignWall

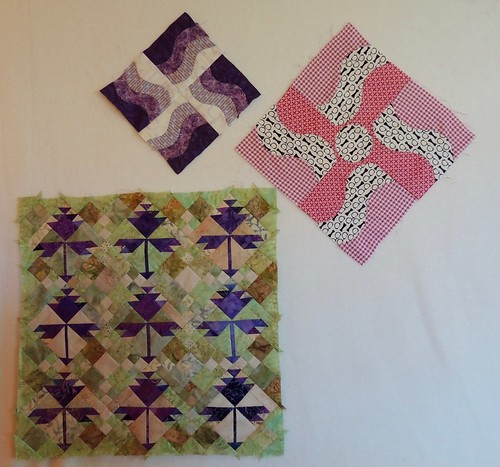
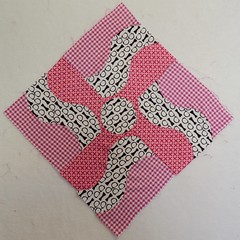
I still haven't made much progress on the borders for the mini-Clover Blossom quilt ... I am procrastinating my decision to make 80-some more tiny triangles for the border.  My Curvy Rails block for the Modern Quilts Unlimited Magazine's Challenge, Everything Old is New Again, is still there.  If you haven't yet voted for your favorite Modern interpretation of the traditional rail fence block, you can click the link to check out all the entries and vote for your favorite ... though Moira's block seems to be the Donald Trump in this social media vote.

Hand Pieced Units
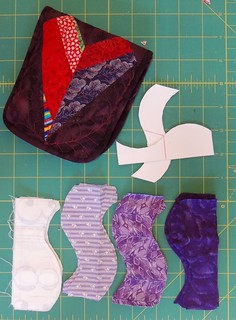
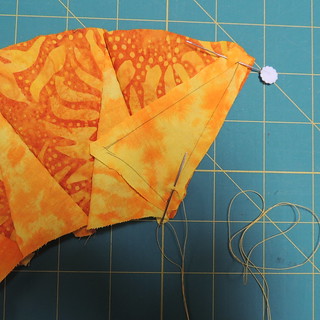
The purple block is the redesign of Curvy Rails that I blogged about yesterday.

PBS kindly re-broadcast the finale of Downton Abbey last night, so I hand-pieced the new curvy units and watched it one last time.

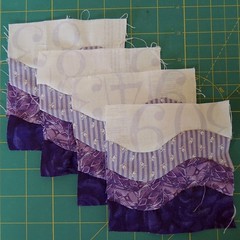
I sewed them together on the machine this morning.

Wavy Gravy Test Block


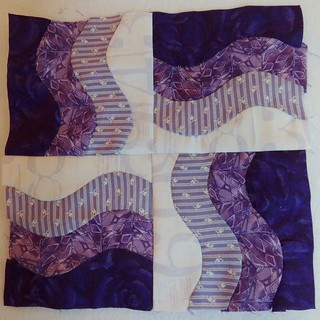
I DO prefer the redesigned block (which I am calling Wavy Gravy), but I can't say if it's because:


  • I like the smaller size (8 inches square)
  • It needed a fourth fabric
  • It has much better value contrast
  • I like it better without the center circle
  • I prefer the scrappiness of the fabric choices to being limited to fabrics by one designer or one fabric manufacturer
What do you think?  

I plan to hand piece a few more of these blocks this week to see how they look together and consider it as a possible new big, long-term rainbow scraps challenge project. 

What do you plan to do this week? 

I'm joining the lists for Monday Making and  Design Wall Monday


Sunday, March 13, 2016

Design, Redesign and Some Hand-Piecing ...

Curvy Rails - On PointYesterday, I shared this block, designed for Modern Quilts Unlimited Magazine's Everything Old is New Again Challenge.

The blocks this month are supposed to be inspired by the traditional Rail Fence block.

If you are curious to see all the entries and vote for your favorite, here's the link:

MQU Challenge

After my Curvy Rails block was made and posted, I wondered if maybe it wasn't quite ready for prime time.  Part of it was my choice of fabrics.  I also wasn't sure about the circle in the center, which I liked in my drawing, but not so much in my block.

A happy coincidence I discovered when I created the templates for this block was that it was constructed from two shapes - 4 s-shapes and 8 of the pieces on either side.

I liked the symmetry and wondered if I could accent that symmetry a bit more.  Here is the revised design.

I thought it might be a fun block to make in many colors for the Rainbow Scrap Challenge.

Ready to Hand-Piece
I also thought it would be a fun block to hand piece ... and so here is my plan for Slow Sunday Stitching today.

I created templates for hand-piecing a smaller, 8-inch block, cut up some purple scraps and grabbed my hand sewing kit.  After I run some errands this afternoon and make a start on cleaning up the garden, I'll be good to go.

I'm joining the lists for Oh Scrap!  and Slow Sunday Stitching.

Sunday, June 29, 2014

More of the Same (Sunflower Block)

I finished hand-piecing my second Sunflower block and setting it inside the (machine) pieced background this week.

Sunflower Block #2

The sunflower is 14 inches across.  The block is 18 inches square (finished size).

Tonight, I'll start cutting fabrics and slow stitching another Sunflower-inspired block in this series.

Wednesday, June 25, 2014

Stitching Slivers and Suspending Disbelief

Hand-Pieced Sunflower in ProgressI shared this work-in-progress photo on the Block Lotto earlier this week as an example of how sometimes, in life and quilting, we just have to trust the pattern (or path), suspend disbelief and carry on.

At this point, I had sewn together about three-quarters of the 64 "petals" and background pieces that will form the outer edge of the circle of my next sunflower block.

Bringing Order to the ChaosWhen the ring was complete, I added the slivers of green fabric that fit between each of the 32 petals. It felt like I was bringing order to the chaos ... but there was still no guarantee that when I was done, everything will fit, the block will lay nice and flat and the center of my sunflower will fit.

I think it helped that I started with a full-sized drawing.  I could see the exact size of those green slivers and decide they were do-able ... though whether *I* can stitch them accurately enough to have success with this block remained to be seen.

What seems a pretty simple pattern turns out to have 98 pieces–not counting the background frame that will be added if/when I successfully pieced this block.  Stay Tuned.


Pattern and Block in ProgressI'm linking to the WIP Wednesday party at Freshly Pieced and Esther's WOW (WIPS on Wednesday).

Sunday, June 22, 2014

My Summer of Sunflowers Project

Tools of the TradeAs 21st Century quilters we are blessed to have a plethora of patterns,  tools and technology available to help us design and make quilts. So what I am doing with this stuff?

In January, when I had to come up with a replacement for a missing 12th block for a hand-pieced block of the month, I discovered the elegance of designing a block by hand, using a compass and a technique as easy as folding paper to divide an arc into even segments. I enjoyed the process so much, I knew I wanted to design more blocks this way ... and that's how I decided a summer project: 12 original blocks, pieced by hand, one each week throughout summer.

I started by making the quarter-circle template at the top, using the compass to draw arcs in 1-inch increments, then folding it half and in half again (and again) to create 16 equal segments. I used a rule to draw lines on the creases and then made copies of the template on which I started doodling and coloring block ideas.

Today, I'll be cutting the pieces for the block in the photo.  The sketch peeking through underneath is the proof of concept block I shared earlier this week.

Here is the pieced circle, front and back, before it was pressed and set into the background

Hand-pieced Sunflower Circle   Back of Hand-pieced Sunflower Circle

The circle is 14 inches in diameter, so that even though there are a lot of pieces–67 in this block–they are large enough to be able to sew easily.  It just takes time ... but since I enjoy the process, it's enjoyable time.

Detail of piecingHere's a close look at what that slow-stitching looks like.

The pieced donut shapes are sewn in a continuous line, zig-zagging up and down the triangles.  As a new triangle is added, each short seam is lined up and held in place with the threaded needle at one end and a pin at the other. I actually use small, short, designed-for appliqué pins, but the flower pin in the photo is easier to see.

I set the sunflower circle into the machine-pieced background using the 6-minute circle technique–exactly as in Marie's tutorial here:

Marie's Creative Space: Circle Tutorial

I'm joining the links for Slow Sunday Stitching and for the Handmade discussion of the month on the Block Lotto.

And here's my first completed Summer Sunflower block, one more time. I am not happy with the circle in the center ... since it's hand-stitched, it will be able to take apart and try again before the end of Summer.

Proof of Concept-My First Sunflower

Sunday, June 01, 2014

Sunrises and Project Synchronicity in June

Sophie's Sunrise Block #3Sunrise is the block we're making for the Block Lotto in June. It was inspired by a New York Beauty block I saw on Barbara Brackman's blog a while ago ... but morphed into a half-circle sun for the Lotto.

It can be made by paper foundation piecing the arc and adding the inner half circle and outer border by your favorite method for sewing those things on machine or ... you could choose to hand-piece it, as I did this block.

Hand-piecing is slower, but also relaxing, meditative and very accurate.  I am preparing another couple lotto blocks today and will begin slow-stitching them tonight.

Preparing to (slow) StitchFor this block, I created actual size templates–I printed the templates onto card stock, then cut OFF the seam allowances–and used them to draw the exact shape onto the back of the fabrics.

I know that I'm easily amused, but I think it's fun to hand-stitch the arc: you start at the point of one of the half-rays and put it together in one long seam.  When you get to the end, you can continue to stitch, adding the background to the outside of the arc.

I don't actually use a thread long enough to do all that without a couple stops and starts, but it still has a nice rhythm to me.

If you like this 7 by 14-inch (finished size) block, you can read more (and download the templates you'll need to make it) on the Block Lotto here:

Summer Sunrise (Block) in June

(I'll be adding it to my Free Quilt Block Patterns page soon).

2 Sunrise Quilt BlocksFor more information on hand-piecing, I found this tutorial that covers the basics:

How to Hand Piece

Here's my hand pieced block again, next to one that was made on the machine.  Again, it's that easily amused thing, but I love how they came out perfectly matched.

After I finish with the lotto blocks, I'll be working on more for my mod-mod quilts.

Although this shape could be made in any color and could be seen as a sun, a flower or just an interesting spiky shape, I kind of like that the color for the Rainbow Scraps Challenge this month is YELLOW.

I'm joining Kathy's party for Slow Stitch Sunday and looking forward to an evening of

Tuesday, January 28, 2014

January's Lovely Finish

Sometimes, less is more.

Sometimes, several failed attempts will lead you to the answer.   And that's how it was when I was auditioning borders for this quilt.

Here's the first attempt.  I didn't have to go any further before it seemed clear to me it would pull too much attention away from the main dish–the hand pieced sunflower blocks.

After trying several others, I realized that less is more and that I liked the quilt with it's narrow checkerboard, just as it is.


To complete this top, I had to draft a block pattern for the one I couldn't find when I pulled out this Block of the Month from 2010, make those blocks, bring some order to this visual cacophony of color and cats in deciding upon an arrangement, and decide on borders and make them.

I'm linking to the Lovely Finishes party ... and thinking about what to choose for a February finish.

To make Melissa and Shanna super happy, my January goal-setting post is here.

Monday, January 27, 2014

Designing on the Wall

For those who wondered if I am still arranging and re-arranging those brightly colored hand-pieced sunflower-style blocks on my design wall ... after moving them around (a lot) I did sew them together a week ago or so.


This weekend, I added the inner border blocks, by trial and error (the rejects are out of frame of the photo). I still need three more 4-patch corners before I move onto my plan for the outer border.

Grace Hopper, the photo-bombing cat, had just jumped in my chair to prevent me from sitting until I took care of something for her.  I think she found the little dot of light my camera produced more interesting than the quilt I was trying to photograph.

Look closely and you can see the paper sketch in the upper right corner.

After seeing a product placement post on someone's blog for triangles on a roll, I immediately had two thoughts:
  1. It would be a great way to make the spiky border I envisioned.
  2. The commercial product would most likely not be available in the size I needed, nor would I be likely to find it in Santa Fe. 
So, I drew my own, perfectly proportioned for my quilt ... now all I have to do is print a bunch of foundations, glue-stick them together to create segments for each side and get busy paper piecing the border. 

I don't know if this will be finished in time to be officially counted as a Lovely Finish this month, but I'm happy enough with the progress, that, either way, it will truly be lovely to me.

Wednesday, January 15, 2014

On the Design Wall with a Different Point of View

I often say (and blog) that one of the things I love about quilting is that there is rarely one right answer or only one path when making quilts.  I was reminded of how true that is for me this morning, when I read Cynthia's second installment of her Scrap-A-Pallooza series.

Specifically when she is arranging her scrap blocks on the design wall, she says,
I find I am most successful if I do this step quickly and try not to over think it.
I guess that makes me an over-thinker, because I find I am most successful, if I do this step SLOWLY and play with the blocks over the course of a day or a few days.   Last night I finished the last two of the hand-pieced blocks.


This morning I added them to the rest of the blocks on the design wall, where each triplet of blocks was kept together, but no real thought had been given (yet) to how they would be arranged in the quilt.


And then I started arranging them. I prefer asymmetry, but my first, quick effort was only slightly asymmetric.


Because it was nearly symmetric, I rearranged the blocks to create a more traditional feeling, symmetric arrangement. I knew it would not be "me," but I wanted to see how I felt about it anyway.


I will spare you all the future revisions that happen on my design wall before these blocks are finally assembled, but for me, it always seems to be a good thing to leave them on the wall, within sight, but work on something else while I consider the color and value placement, the orientation of the individual blocks (with these, the possibilities seem endless), and how the quilt looks as the light changes over the course of the day.  I really like walking into my studio just after dawn when I can see whatever's there in low light and "see" value more than color.

I'll also be (re) thinking about my initial plan to mix in some pieced rectangles and what this quilt needs in terms of border (or whether it needs one at all).  I'll definitely be sleeping on it, too, and giving my subconscious a shot at solving the problem that is this quilt's design.

Are you a speed arranger like Cynthia or is it a slow and considered task for you, like me?

I'm joining the Linkys for Esther's WOW and WIP Wednesday on Freshly Pieced.

FYI, I have posted the first installment of the Mod-Mod Quilt-Along.   If a low key, year-long QAL appeals, be sure to check it out.

Tuesday, January 14, 2014

You Asked–Here Are My Answers

People here (and on Flickr) were curious to see the block(s) made from the drawing I posted on Sunday.  Here's my first finished block.


After making the templates and cutting fabrics for two blocks, I saw how two of the smallest pieces could be combined into one. 

On Monday I made the new template, cut more fabrics, as well as fabrics for a third block and Slow Stitch Sunday grew into Slow Stitch Monday night.

These blocks are 7-1/2 inches (finished size).  I have made 3 each of 12 patterns.  I drafted the last one because somehow I never received it and my attempts to reach out to the quilter who organized this quilt-along in 2010 failed.

The process of drafting the block by hand was fun.  Maybe later this year, if anyone is interested, I'll put together a tutorial for anyone who would like to give it a try.

I have left the decision of the color of the outside of the last two blocks until I have pulled out all the completed blocks and put them on the design wall to see what color/fabric will work best in the context of the whole quilt. (I couldn't make myself wait on the first one–it really just had to be red).

If you are looking for method in my brightly color madness, the rule I created for myself when choosing fabrics for these blocks was that they all contained the Laurel Burch fabric and a black and white print.  Every block also contains at least one warm and one cool color.   I challenged myself to work with a lot of bright colors in this project.

Another mystery solved:


It is a sentiment that I thought women of a certain age (like me) or fans of Nora Ephrom–whose book, Sometimes I feel Bad About My Neck and Other Thoughts on Being a Woman, inspired this idea–would recognize.

Someone asked why I was making all the e's the same size when I clearly had different sized letters.  Now that they've been arranged and sewn into words and phrases, you can see that the two different sizes are used in different words.

Sunday, January 12, 2014

Preparing for TV stitching

This afternoon, I drafted a block for the one I was missing and made templates so I could choose and cut fabrics and be ready to stitch tonight.


Whether it's Downton Abbey or the Golden Globes, I'll be ready to enjoy TV and Slow Stitch Sunday

Thursday, January 02, 2014

January Goal for a Lovely Finish

I'm very happy that Melissa and Shanna have decided to continue A Lovely Year of Finishes for another year.  I love this challenge because:
A Lovely Year of Finishes
  • I only have to commit to one goal at a time., not a laundry list of projects–it's a personal challenge and not a competition.
  • I choose my own goal.
  • Projects can be new, on-going or a golden oldie UFO–I still have too many of those.
  • Even when I fail to meet the monthly goal, I make progress.

My goal for January is to complete the hand-pieced blocks and figure out what to do with them, design wise, to finish a top from these 2010 Quilt-along blocks.


I made some progress hand-piecing the rest of the blocks last year, but stalled when I realized I was missing one of the block patterns. I tried and failed to contact the organizer, then decided I could draft my own pattern. Sometimes I am such a scaredy cat and that fear can be paralyzing.

This month, I'll "feel the fear and do it anyway." Wish me luck.

I'm adding this post to the Goal Setting party.

Friday, July 12, 2013

Sometimes in Quilting, the Journey IS the Reward

Journal Cover DetailFor today's feather-themed project, I hand-pieced this abstract feathery block, a variation of Practice Petals from Judy Dale's book, Curves in Motion.

I wanted to push myself to try smaller, tighter, more tortuous curves than my previous efforts with this technique using Judy's Bird pattern.

Same Bird Pattern - different processes

It was a challenge and if you take a close look, you can see a lot of imperfection.

After I finished sewing it together, my immediate reaction was that the design would have been much easier for me, and the result would have been better, if I'd used appliqué instead. Then, I thought about Viki Pignatelli's technique for curves and thought it would also be a candidate for a design like this.

One of the things I love about quilting is that there are often many ways to accomplish a design idea. And sometimes, when I realize, after the fact, that I could have chosen another, easier, path, I beat myself up a little.

But, the upside is that I love that there is always something new for me to learn about quilting.   And so while I WAS beating myself up a little for painstakingly making templates, marking fabrics, aligning seams and registration marks and hand-stitching it together instead using a technique within my comfort zone, I also was reminded that sometimes the journey is the reward, and the result of my effort is that I am learning a new way of dealing with curves and that with practice, I will improve and have a new tool in my quilter's box of tricks ... and that realizing my idea for those bird blocks may actually be within my technical grasp.

In the meantime, my sad feathery abstract effort has become a journal cover and a reminder that sometimes the Journey is the Reward.


028 - Feathery Abstract Journal Cover

You can read more about it on today's blog post on The Daily Feather.

The theme for the Linky party on the Block Lotto this weekend is love/hate, best/worst or good news/bad news.  I suppose I am an incurable optimist because I always seem to find the silver lining.  In quilting, often the silver lining of a "bad" quilt project is the lesson learned .... even if the lesson is that you hate a particular technique and, in the future, will find another way :-)

But for me and this particular effort, I feel like the journey was worth it and that I'm making progress on this particular learning curve.   Bonus: I have a little finish to show from one of my Daily Feathers.  Can I get a whoop whoop?

I'm also going to join the parties at Richard and Tanya's Link-a-Finish Friday and Finish it Up Friday on Crazy Mom Quilts.

Sunday, July 07, 2013

Order from the Chaos on my Design Wall

Lately, lots of ideas have been bouncing around in my head and around the studio.  They are reflected by the chaos currently on my design wall.

Design Wall - July 6

Much of this mish-mash of projects comes from my Daily Father project ... the rest are blocks made so far for the Block Lotto.   Starting from top left and working my way down, I have: 

  • the first 12 inch feathered star in a series of blocks from Carolyn Cullinan McCormick's book, A Flock of Feathered Stars: Paper Pieced for Perfection.
  • three blocks (one embroidered drummer, two foundation pieced feathers) for a Yankee Doodle quilt idea.
  • my pieced bird from Judy Dales' book on Curves.  I mentioned a while ago that I wanted to try hand-piecing this block and that is my plan for Slow Stitch Sunday tonight. 
  • three I-spy House lotto blocks.  I don't like the proportions of a couple of these blocks ... I'll definitely be making more of these–I'll post more about them and share the block pattern later this week
On the right side of my smallish design wall is the birdie crib quilt in progress.  I haven't yet cut into the newly dyed fabric to see how well it's going to work and I have some open design questions about borders, but I feel on track for a Lovely Finish in July.

Sunday, May 05, 2013

Thinking about Slow Stitch Sunday

Auditioning Thread for Quilt #3I finished the quilting on the Cotton Robin quilt at my house yesterday.  I can't share a photo until it's finished and received by the owner.  This photo shows some of the thread I auditioned and the back of quilt #3.  I ended up using 4 of the 6 thread colors.

Today I plan to add a piped binding and hanging sleeve and stitch it down later, so that it will be ready to be sent home tomorrow.  So, it's a secret project for me for slow stitch Sunday.

 Earlier this week, on BillieBee's Blog, I won a Star Flower pattern.  I don't know why I haven't yet jumped on the hexie bandwagon ... but this variation appeals to me A LOT.  These are Billie's star flowers in progress.   I see a similarly scrappy version as my future slow sunday project.  Thanks, Billie!

But first, I'll be on the hunt for a protractor so I can draw the pattern and make templates for the last of the hand pieced quilt-along blocks.  Hmmm ...  Sunday evening may turn out to be more about pencil and paper and drawing than stitching today, but I hope to wrap up both tasks tonight.

How do you spend your Sunday evenings?

Wednesday, April 17, 2013

Little Progress, Much Sadness

The bombing at the Boston marathon has left me speechless and sad.  Everyone relates in their own way–I once lived 1-2 blocks away from where it happened and have watched the marathoners from the sidewalk many years and so it is easy for me to imagine Boylston street and the crowds of people cheering on the runners. My heart goes out to Boston.

On a more personal and trivial note, after a near-perfect interview for a job a couple weeks ago, I heard yesterday that the funding for the position was pulled and so still no job for me. 

I have made some small progress on quilting projects.  I added a sawtooth border to the scrappy checkerboard picnic quilt.  It's ready to be layered, basted and quilted. 

Checkerboard with Sawtooth Border

I have also been working on the second round for the Cotton Robin quilt at my house. (I won't share any of that work until the robin has ended this summer).

It seemed like a good idea ...When it arrived at my house, I immediately thought of a paper-pieced border I had made long ago, probably during my first year as a quilter.  When I couldn't find the foundation pattern anywhere, I remembered that I had an old–still not quilted–wall hanging I had made way back when, and thought I could copy the block from the pieced top. Here's what happened when I put it on the light box.

While this wasn't exactly as helpful in reverse engineering the pattern as I thought it would be, it does make for a particularly obscure clue to provide to the Cotton Robin group about the round I've added to the quilt :-)

December #2I have only managed one more of the hand-pieced blocks.

I need to make one more of these (the December block), then draft the pattern for the missing block.

I also need to draft the appliqué idea I have for the top of the scrappy flying geese quilt so I can make some progress there ... since it's my designated Lovely Finish for April.

Events, near and far, have me feeling scattered.  I know I'll be able to focus soon enough on these quilt projects and other tasks, but for now, I am just feeling all kinds of sad.

I'm joining WIP Wednesday on Freshly Pieced and Esther's WOW lists.  Check them out for quilters who are likely making much more progress than me this week.

Sunday, April 14, 2013

The Color Story for my Hand-pieced blocks

November #3When I looked at the block pattern for this block–it was November in the original set for Bonnie's Quilt-Along–I thought the challenge would be getting those long points right.  It turns out, hand-piecing those point was easy and the real challenge was choosing the fabrics.

There has been some discussion of "my colors" for this block, so I thought I'd blog a bit about it.  Before this project, I'd never used a printed fabric to guide my color-selection process.  I decided to try it, using the Laurel Burch fabric.  I collected tone-on-tone fabrics that were the colors I saw in the print, including prints, hand-dyes and batiks. I added black-and-white prints.

I choose the fabrics, block by block, with no advance planning ... which I know could make putting them all together in the end more challenging, but it's just more fun for me this way. In each block, I include the Laurel Burch print, a black and white print and fabrics in colors from both sides of the color wheel.  It's easy to see that in the November blocks, since there are only four fabrics, that means, one cool color, one warm color, one black & white and the focal fabric.

November #1 November #2

You might notice that some of my blocks have a lot less contrast than others.  I don't mind included a few muddled blocks in the mix, like the one with the pink points.  I think the repetition helps you see those points and the fuzziness may make someone looking at the quilt take a closer look. You often see muddled blocks in antique scrap quilts. Including them somehow makes me feel that my quilts are continuing that scrappy tradition. 

December #1Most of the blocks are made from more than four fabrics and I noticed that I tend to put together blocks from fabrics that are predominately warm, like this one that I finished last night, or predominately cool.  I always follow my rule of including at least one warm and one cool colored fabric in each block, along with at least one black & white print and the Laurel Burch fabric.

This is the first December block. My plan for Slow Stitch Sunday is to select and cut fabrics for another of these to work on tonight.

Also finished this week were the two October blocks below I really could have cropped those better so they matched like they do in real life, huh?

October #2 October #3

For anyone who wants to take a closer look at the individual blocks, check out m Flickr photo set for the Quilt-Along 2010.

I've now finished 31 of the 36 blocks planned for this project. I hope to be finished piecing this set of blocks and working on some new hand worked project the next time Slow Stitch Sunday comes around.

Monday, April 08, 2013

25 Blocks and Counting

October #1Last night I pieced this block. It's 25th of 36 blocks I plan to complete before thinking about settings and playing with the arrangement of all the blocks. This one is the first block made using the October block pattern from the 2010 Quilt-along.

Even though I know I have a ways to go before putting them together, I couldn't resist pulling out the 25 blocks now completed and playing on the design wall and sharing the photo of my progress as part of Judy's Design Wall Monday.


25 Blocks on the Design Wall

Sunday, April 07, 2013

I'm working on the Slow Stitch Sunday habit

August blocksThese are the latest three of the hand-pieced blocks. These blocks are the August blocks from the 2010 Quilt-Along.

It's been a distracting week and not much quilting  happened at Sophie Junction.

Early last week I had a job interview that went really well–I'm hopeful, but could definitely use prayers and crossed fingers for luck.

The rest of the week was spent dealing with a leak from the upstairs bath into the dining area downstairs ... I'm sure there's a Murphy's Law about how leaks happen over beautiful antiques.  Fortunately I discovered it and moved the furniture out of the way before any real damage was done ... I wish I could say the same about the ceiling.  It's dry enough here that mold shouldn't be an issue and things should dry out quickly so that repairs (to the tile upstairs and the ceiling downstairs) can be made.

I'm determined that whatever else happens, I will make time on Sunday for some handwork until it becomes automatic and I've always got something to pick up and work on.  Kathy's Slow Stitch Sunday has been a great motivator.

For me, it's probably taking the time to prepare and make sure I have something to stitch that is the biggest challenge. This afternoon, I'm preparing templates and choosing/cutting fabrics for the next blocks.  I confess that I am not preparing much in advance, because I find that I often change my mind and am recutting pieces in a different fabric.  After making the first block, I decided to modify the pattern slightly.  Here's the original block (left) and the re-designed version (with the black & white section split and combined with yellow).

August #1 August #1 (version 2)

For me, ripping out stitches made by hand is just as tedious, but I really do prefer the modified block.

I'm also linking up with the Block Lotto Weekend Update.

Tuesday, April 02, 2013

Making Swiss Cheese ... and More Hand-pieced Sunflower Blocks

Unless you've used templates for making pieced blocks or carefully cut pieces for appliqué, you've never experienced the fun of turning perfectly good fabric into something that looks  a lot like Swiss cheese.

Swiss Cheese Fabric

As soon as you find yourself cutting things piece by piece, the temptation to choose what part of the fabric you use is too great.  When you're done fussy-cutting those pieces, you're left with fabric that is only good for  . . .  more fussy cutting :-)

July #3Here's what became of my fussy cut leaf triangles from the black and white print.

Since picking up the hand-pieced quilt-along blocks I put down almost three years ago,  I've made pretty good progress. This block was the July block of the month.  I'm making three blocks from each pattern.  Below are the (untrimmed) blocks I've made since picking up the project a couple weeks ago, from May through August.


First eight blocks made in 2013 

September is the lost month–I never received that pattern, but didn't notice it was missing three years ago–so, after I've made a couple more August blocks, I plan to skip it and jump into the Fall months while I work on designing a pattern and templates.  I did find a photo of the September block on Bonnie's blog ... I like this one a lot, so I'll probably attempt to reproduce it  rather than design my own variation on these sunflowers.

I'm sharing this work in progress on Esther Aliu's WOW list and WIP Wednesday on Freshly Pieced.


Related Posts Plugin for WordPress, Blogger...