Showing posts with label paper foundation piecing. Show all posts

Saturday, April 02, 2016

It's a Start ...

If you made it all the way to the bottom of the list of blocks I posted yesterday, then you have already seen my first scrappy orange blocks for this month. This is the "blocks in the wild" photo I took for the block pattern cover.

Butterfly Block Pattern Cover
The morning after I took this photo,  the backyard looked like this ... and the snow was still coming down.

April Snow

"You thought it was Spring?  April Fools!" says Mother Nature.

These are paper-pieced blocks and in the pattern, I included notes about how I approach cutting/trimming the fabrics for foundation pieced blocks to end up with a block that is on-grain and doesn't have any stretchy bias edges.

Next week, I plan to make more scrappy butterfly blocks for the April Block Lotto and get started on the blocks for my two samplers.

In the meantime, for those that are making one of the sampler quilts I designed of this year's Lotto block patterns, I put together a post with some information to keep in mind when choosing background colors for your Butterfly blocks and some alternative block ideas for those that are making one of the samplers but don't like paper-piecing and won't make this block for their sampler.  That's the great thing about quilting–there are always alternatives.   You can find it on Blocklotto.com here:

Sampler Saturday - Blocks and Options for Butterfly Blocks

Details for this month's Block Lotto–including the coupon code for the pattern–are here:

Orange You Ready to Try Paper Piecing in April?

It's just a start ... but I am joining the party for the first orange Scraphappy Saturday ... and looking forward to seeing what everyone else is making from their orange scraps.

Wednesday, October 21, 2015

QOV Works in Progress

I feel stalled on my quilts for Quilts of Valor ... so maybe blogging about these works in progress will help me kick my butt into gear.

It starts with a PanelMy guild's QOV mini-group has started a challenge.  We each start with one of two panel designs ... and make a quilt (top) by January. This is mine.

I have an idea about where I want to go with this, but ... haven't yet actually done ANYTHING beyond thinking about it.

Since I haven't EVER made a quilt using a panel, this may turn out to be more of a challenge than I envisioned ... but, you know, I have a very hard time saying know to a challenge ...

The colors are actually more dull and muddy-together than they appear on my screen. One of my goals is to do something to help pull apart the image of the eagle from the top half of the U.S. by repeating all the colors in my quilt.

In the meantime, I have started using the bag of 1 1/2-inch QOV strings that were gifted to me.

Foundation pieced string blocksI simplified a block that caught my eye when reading blogs–I can't exactly remember where, does anyone recognize it? Anyway I drew a foundation pattern with pencil and paper and have been paper-piecing these blocks.

After making a couple test blocks from my hand-drawn pattern, using a leave-in stabilizer for the foundation, I decided I liked it well enough to create something more precise in EQ.

Then, I woke up a few weeks ago, on the morning when the QOV mini-group meets, thinking about using the method where the foundation is printed on (the non-shiny side) of freezer paper and you don't sew through the paper. I thought it would be an easy thing to print some foundations onto freezer paper and try it at the mini-group ... turns out the hardest part of the process is getting the freezer paper–cut off the roll–to become flat enough to go through the printer. This is easier said than done ... but I did it, though I was late for the mini-group.

These eight blocks represent the original 3 (with foundations) and 5 made using the freezer paper method. I will need 80 of these 7 1/2-inch blocks to make a quilt that is 60 by 75 inches.

And then, there's this ... still waiting for me to quilt and finish it.


New Photographic Challenge

The backing and batting are ready ... I think I just needed to think through the how and where.  There isn't enough space in my sewing room to open the work-table I would ordinarily use to baste a quilt and I am still thinking about the best way to do it in the space I have.  I may take it with me and see if I can use the tables at the quilt shop after the meeting today. I am looking forward to quilting it ... as usual, it's the basting that slows me down.

Joining all the pretty appliqué project links at Esther's WOW (WIPS on Wednesday) and WIP Wednesday on Freshly Pieced.


Monday, June 29, 2015

Global Themes

I enjoy quilts inspired by events or global themes.  This is Climate Change by Gail Garber, the first place winner in the large art quilt category at Fiber Arts Fiesta, which took place last month in Albuquerque.

Climate Change by Gail Garber

Climate Change by Gail Garber - Detail
Gail's description of her quilt, from the program, is "Textile expression of sudden changes in our warming world." It was quilted by Kris Vierra.

It's a great example of what's possible with paper foundation piecing.

Kris' quilting is the perfect complement to the quilt design.

Wednesday, July 16, 2014

Red Projects in Process

The practice silly strings blocks have become a quilt top, with the addition of tomato red squares from my red cotton scraps and a bit of linen.

Silly String Blocks + RED

I thought it might grow larger, but as I extended the red background, when it grew to this size, I decided it was "done." 

I had some leftovers squares and rectangles that will likely become a messenger-style bag.


Leftover Red Squares

I haven't been quilting much, as I pep are to jump into some new contract work. I haven't yet made any of the blocks for my Mod-Mod quilts–the July update was published yesterday on the Block Lotto.  I plan to make the spokes blocks I need for these quilts during this month's Friday Night Sew-In.  Some of them will be red– this month's Rainbow Scraps Challenge color.

There's been a bit more red progress going on around here.  I've made a couple more red Briar Patch blocks for the scrappy version of that quilt.  I'm joining Lee's party for WIP Wednesday.

Red Briar Patch Blocks

Sunday, April 06, 2014

Making Blocks for Scrappy Quilts

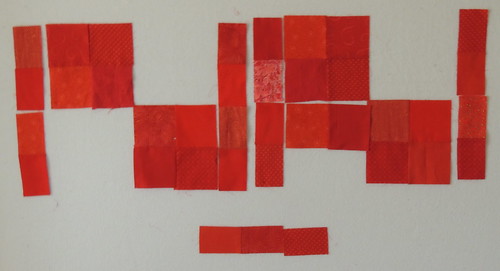
Sunday was gray and cold and windy here, feeling more like winter than anything else.  It made it easy to stay inside and continue to play with purple scraps.  The result was a purple haze on my design wall.

Design Wall - April 6 - a Purple Haze

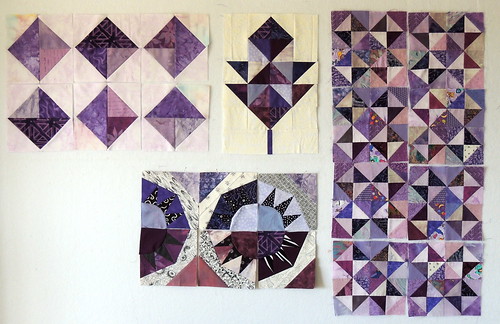
These are the blocks for the four ongoing projects I'm working on as part of the Rainbow Scrap Challenge.  Two are new this year, two are old (and older) projects that I hope to finish by year's end  as I work my way, month by month, color by color.

As I moved from block-to-block and project-to-project, I realized that my approach to these scrappy blocks isn't always the same.

Scrappy Purple Broken Dishes Block
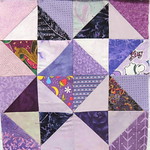
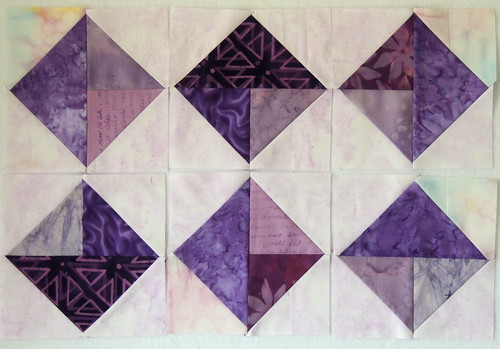
Each of the Broken Dishes blocks is made from 32 triangles.  When cutting fabrics for these, I don't really think about the individual fabrics and how they will play together, only their VALUE. The placement of the light, medium and dark fabrics creates the stars in these monochromatic blocks and they do seem to be proof of the idea that if you use 50 different fabrics, they will work.

FYI, the 8 broken Dishes blocks on my design wall are from a previous iteration of the Rainbow Scraps Challenge.  My goal this month is to make 13 more.

Purple Briar Patch Block
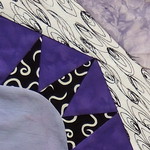
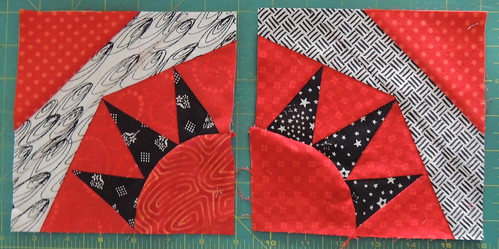
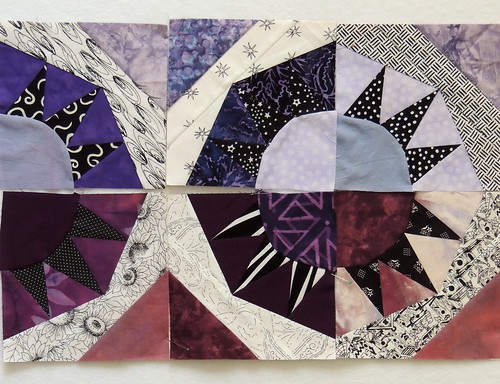
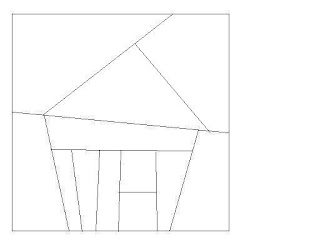
The paper pieced Briar Patch blocks contain 3 purple fabrics plus 2 black and white prints (one light and one dark). In each of these blocks, I do think about choosing three fabrics that play well together.

But because I doubt that the blocks will be lumped together by color in the quilt, I don't worry if the blocks made from a single color, like these six scrappy purple ones aren't great together.

Six Scrappy Purple Briarpatch Blocks

A side effect of my gray, overcast day is that some of the purple fabrics in these blocks look a little dead.  They are actually more lively and purpley in person ... but they still don't all play well with one another. 

Purple Triangles-in-a-Square blockFor the Triangles-in-a-Square blocks for my Mod-Mod Throw, because I know they WILL be grouped together in the quilt, I paid more attention to the group of 14 fabrics and how they ALL worked together.

I still used a mix of purples that were closer to red on the color wheel and those leaning toward blue, but all six blocks are happy to be adjacent to one another (and definitely happier together than those Briar Patch blocks) ... or at least I think so.

6 Scrappy Purple Triangles-in-a-Square blocks

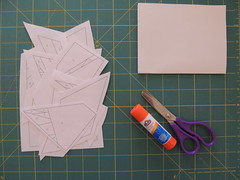
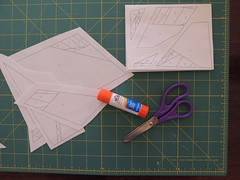
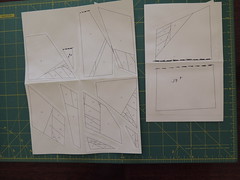
I made these using the 4-at once method (#1 in the instructions) and the paper foundations (method #3) to make 2 more.   I'll have more to say about these and the Mod-Mod quilt-along next week.

Scrappy Purple Oak Leaf Block
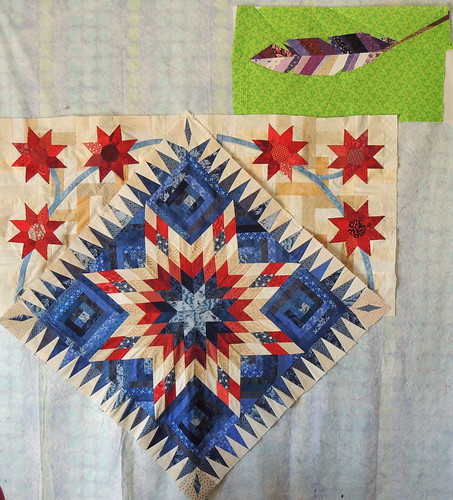
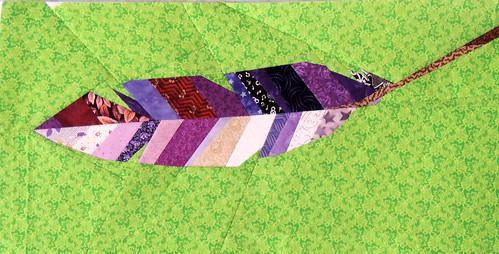
I confess I am not entirely happy with my purple Oak Leaf block.

While I do want to have enough contrast between the 10 purples in this block–because I want the individual triangles to be obvious–this one seems to have almost too much value contrast and would, I think, benefit from more mediums and fewer dark fabrics.

If I get all those Broken Dishes blocks made before the end of the month, maybe I'll try remaking this one and see what happens.

When you make scrappy blocks, do you choose fabrics that coordinate, choose them based on value or color,  or just randomly choose and use them ... or do you have your own technique for choosing fabrics? 

Sunday, January 05, 2014

It was a dark and scrappy (Saturday) night

When I pulled out my scrap bins to make Double Dare, I thought about using blue, since it's the designated color for January in the Rainbow Scrap Challenge, but it just didn't want to be blue ...

So last night, I pulled out my blue scraps and one of my golden oldie projects and got started.   Along with making more of my scrappy broken dishes star blocks, I plan to make some of these this year. 


The pattern is a paper foundation piecing pattern from Judy Niemeyer called Briar Patch.

Eight or nine years ago, I  belonged to the Greater Ann Arbor (Michigan) Quilt Guild and did a half-day workshop with Judy as part of what they used to call Quilt University–their long weekend of workshops held on alternating years with their quilt show.  The pattern is designed for beginner foundation piecers.  I wasn't a beginner, but since I was mostly self-taught, I thought I could benefit from all the tips she promised to provide.  She delivered and I learned.

I thought it would be a good scrap/stash-busting project at the time and showed up with some red uglies and black and white prints from my stash. Everyone else in the workshop came with beautiful batiks like those Judy uses in her quilts.  I was definitely the one not like the others that day.   We worked our way through her process and made a couple blocks that day.  Here are the (very) old blocks alongside last night's effort.


I promptly tucked pattern, templates and some fabrics away and forgot it.  As part of reorganizing at the end of the year, I pulled it out and thought it would be a good match for the Rainbow scraps challenge.  The individual blocks are 6 inches.  The pattern contains enough printed foundations for 80 of them for a 66 by 78-inch quilt.

I'm joining Angela's link party for the First Scrap-Happy Saturday of 2014

Sunday, July 07, 2013

Order from the Chaos on my Design Wall

Lately, lots of ideas have been bouncing around in my head and around the studio.  They are reflected by the chaos currently on my design wall.

Design Wall - July 6

Much of this mish-mash of projects comes from my Daily Father project ... the rest are blocks made so far for the Block Lotto.   Starting from top left and working my way down, I have: 

  • the first 12 inch feathered star in a series of blocks from Carolyn Cullinan McCormick's book, A Flock of Feathered Stars: Paper Pieced for Perfection.
  • three blocks (one embroidered drummer, two foundation pieced feathers) for a Yankee Doodle quilt idea.
  • my pieced bird from Judy Dales' book on Curves.  I mentioned a while ago that I wanted to try hand-piecing this block and that is my plan for Slow Stitch Sunday tonight. 
  • three I-spy House lotto blocks.  I don't like the proportions of a couple of these blocks ... I'll definitely be making more of these–I'll post more about them and share the block pattern later this week
On the right side of my smallish design wall is the birdie crib quilt in progress.  I haven't yet cut into the newly dyed fabric to see how well it's going to work and I have some open design questions about borders, but I feel on track for a Lovely Finish in July.

Friday, June 14, 2013

A Silly Idea

Quilting Feathers in the FeatherIt was, perhaps a silly idea to quilt feathers inside the sections of the super-sized foundation pieced feather.

But I couldn't resist that silly idea.

I also pushed myself to try some variegated thread that I had been gifted with long ago–something light on the light side and something colorful on the darker side.

Last night was all about trying new things and silly ideas.

Monday, June 10, 2013

Something Old, Something New and Coming Soon, Something Blue

Here's what's on my design wall today.

Design Wall - June 10

The familiar lone star waits on the wall for me to finish the appliqué on the setting triangles and begin to put it together.  After some assembly and the border is completed,  there will be more appliqué–and blue leaves will added to the stems.

The feather at the top of my wall is half of the Feathers block from the Forest QAL.

Feather

If you are comfortable with paper foundation piecing (PFP), there have been some amazing blocks in this QAL–mostly I have just followed and admired, but last week, I had the idea of making one of the feathers much larger. The block pattern (which has two feathers) is 12 inches square.  My feather is approximately 12 by 24 inches.

I may have made more work for myself when I decide to enlarge the pattern and keep it printable on 8 1/2 by 11 sheets of leave-in sheets. After printing the block pattern, I cut out the sections needed for this feather and then puzzled them together inside a 4 1/4 by 5 1/2 inch rectangle (which, when enlarged 200% would fit on my foundation sheets). A couple sections were longer than 5 1/2 inches and had to be split and then put back together again.  If you're curious, it looked like this (click to enlarge photos).

playing with paper, scissors and glue laying out the pieces paper foundations laid out to enlarge onto 8.5 x 11 sheets

It's been a while since I played with paper, scissors, glue and puzzles–while, at times, I wondered if I was just making it harder for myself (because I didn't want to have to remove the paper foundations), it still felt like play.

Wednesday, September 15, 2010

How to Draw a Liberated House

We're making liberated houses this month for the Block Lotto.  I know that even if you like the look of liberated or wonky houses, you might not be in love with the technique.  An alternative is to draw your house and use the drawing as a foundation for paper piecing.  Here's how.

Sophie's DON'T FORGETS:
  • When drawing a PFP pattern, remember that ALL lines must be STRAIGHT and that all lines must begin and end with a "T-intersection" with a previously drawn line.
  • Remember that a paper piecing template looks like the MIRROR IMAGE of the finished block.  If, for example, you draw a house with a door on the left and window on the right, your house block will have a door on the right and a window on the left.
Begin with a sheet of paper (or other foundation material) that is at least 1/2 inch larger than the finished size of the block you want to make.
  1. Draw a square that represents the FINISHED size of your block–for the September Block Lotto, that would be an 8 inch square. Remember when you are making the block, you will add 1/4 inch on each side of this square for the seam allowance, making a 8 1/2 " square.


  2. Draw the horizontal-ish line that will represent the top of the main body of the house and the bottom edge of the triangle which forms the roof.

  3. On the bottom half of your drawing, add two vertical-ish lines that will define the left and right sides of your house.

  4. Draw a line between the two lines in step three which will define the top edge of your door and window.

  5. On one side of your house, create the door by drawing two lines that begin at the line in Step 4 and end at the bottom of the square.

  6. On the other side of your house, create a window by drawing two more lines that begin at the line in Step 4 and end at the bottom of the square.  Then add the horizontal line between them to define the bottom of your window.

  7. Define the roof by drawing two, intersecting slanted lines.


    NOTE: IF YOUR ROOF DOES NOT EXTEND TO THE SIDE EDGES OF YOUR SQUARE, YOU WILL HAVE TO CREATE TWO SECTIONS FOR YOUR PATTERN.  CUT THE DRAWING APART ALONG LINE DRAWN IN STEP 2. BEFORE YOU BEGIN TO PIECE THE BLOCK.
  8. Now, number your template with the paper piecing order:

    1 - window
    2 - space beneath window
    3 - house section beside window
    4 - house section on the other side of window
    5 - door
    6 - house section beside door
    7 - house section above door and window
    8 - sky on one side of house
    9 - sky on the other side of house
    10 - roof
    11 - sky on the side of roof which does NOT extend to the top of block (MISNUMBERED as 12 in the drawing below)
    12 - sky on the other side (MISNUMBERED 11 in the drawing below).


Remember that the block you piece will actually EXTEND beyond the square 1/4 inch for the seam allowance. I usually cut out the paper pattern adding the 1/4 inch on each side of the square to make sure I DON'T FORGET.
Related Posts Plugin for WordPress, Blogger...