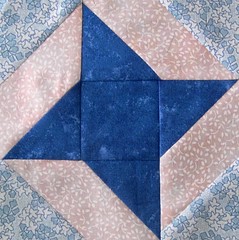
 Here's another block I had planned for the block lotto that didn't make the list. I still love it, for the friendship star in the center and the ribbon effect when the blocks are put together in a straight set. I think it has all kinds of scrappy possibilities.
According to Barbara Brackman's Encyclopedia of Pieced Quilt Blocks, this block was first publishedwith the name Quartered Star, in 1978 in Michael James' The Quiltmakers Handbook, but I've also seen it referred to as the Ribbon Star.
Whatever you call it, I think it offers great possibilities for playing with color and value. For the block lotto, I had originally thought of a constant of dark blue for the star in the center, medium blue in the corners and quilter's choice of lights–I used pink in this sample–for the "ribbon." But don't let my ideas of color hold you back from making this block your own.
The construction of this block is accomplished by using partial seams, a useful technique for any quilter's repertoire.
To make the 6 inch (finished size) block as shown:
- Cut four 2.5 x 4.5 inch rectangles of light (ribbon) fabric, four (corner) 2.5 inch squares of medium blue and five 2.5 inch squares of dark blue (star) fabric.
- Begin by aligning a dark blue square (star fabric) with the right end of a rectangle (ribbon fabric), right sides together.


- Draw a line from the upper left corner of the square to the lower right. Sew on the line.
- Trim 1/4-inch on the outside of the seam


- Press the seam (toward the blue/star fabric) rotate the rectangle 180 degrees and repeat, adding a medium blue (corner fabric) triangle. Be sure to always draw the line in the same direction (upper left to lower right, when the rectangle is horizontal like this.)
- Once again, trim 1/4 inch on the outside of the seam, press open (toward the medium blue/corner fabric.)


- Your rectangle should look like the unit below on the left after adding triangles to each end.
- Make 4 identical rectangles. Then, you're ready to assemble the quartered star block.


- Lay out the rectangles around the last dark blue *star fabric) square as shown below on the left.
- Sew the center square to the rectangle above it. Start the seam where the two ends are aligned and sew ONLY 1/2-to-2/3 across the small square. Press the partially sewn seam.


- Add the rectangle on the left to the end of the two blocks partially sewn together. Press.
- Add the rectangle on the lower left.


- Add the last rectangle, to the lower right. Then go back to the original (partially sewn) seam and complete it. See how easy partial seams can be?

Your block is done!


1 comment:
What a neat way to make the friendship block. I will have to try that next time. My blog is http://gramsquilting.blogspot.com
Post a Comment