Monday, January 07, 2013

Proof of Concept - My 2012 Block Lotto Sampler

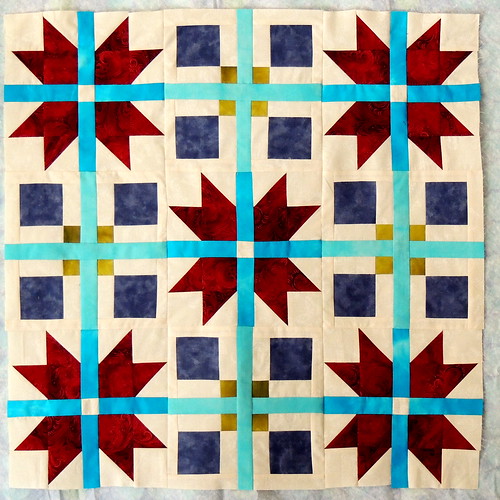
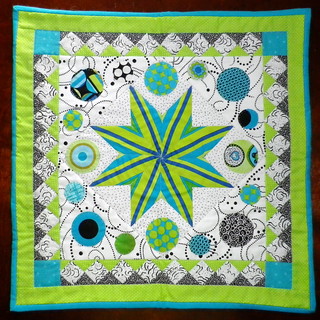
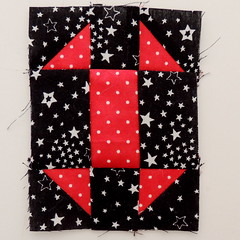
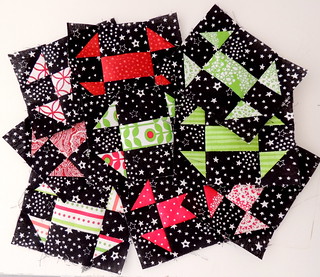
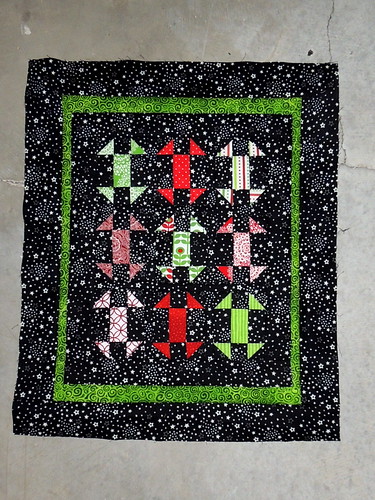
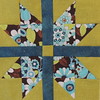
A year ago, I planned to make a sampler from the 9-inch lotto blocks we would make in 2012. A few days ago, I actually started making the blocks. Here's my set of 12.

  2012 Lotto Blocks for my sampler

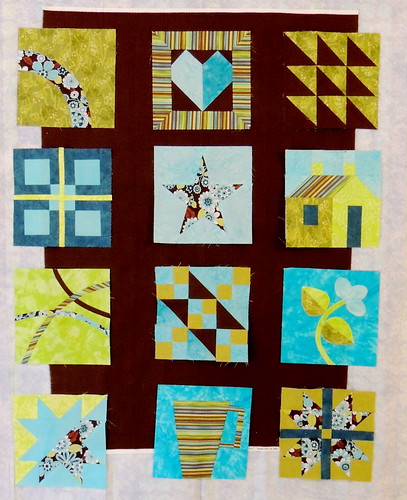
This quilt will be a proof of concept of my ideas about putting together a set of blocks for the lotto each year that not only represent a variety of techniques and skill-sets (and a learning experience for beginners), but will play nicely in a sampler for those that choose to make a set of blocks for themselves. For 2012, I wanted to choose blocks that would play well in a sampler designed with a modern quilt aesthetic. 

I believe that choosing blocks that share characteristics with some of the other blocks, none would end up being the one block that's not like the others and looks like it doesn't belong and they will all play nicely together.  So, last year, we had: 

Blocks with curved elements:

  Eclipse block 3-D Flower block Silly String Block

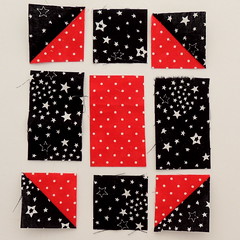
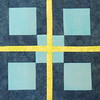
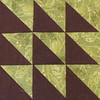
Blocks made from geometric units
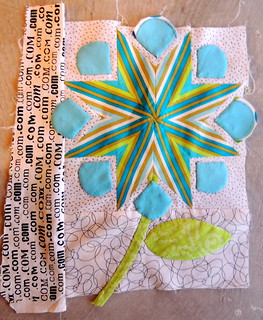
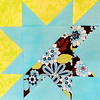
Jacob's Ladder block Hot-crossed 9-patch block Triangle-squares

Star blocks 

Split star block 5-points Star block Star-crossed block

Other figurative block designs

Improv mug block 3-D Flower block Simplified Schoolhouse Block Heart block

Etc., including blocks with skinny inserts, traditional block patterns, liberated blocks ....

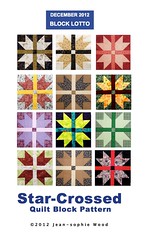
If you are curious about any of the individual blocks, you can find the block patterns (and photos of more examples made for the Block Lotto last year) in the 2012 Block Lotto Index on blocklotto.com

Now I just need to make a quilt and decide if my ideas work. But first I'll be quilting and finishing my quilt for the In Your Words blog hop which begins today.

Did you spend the weekend working on something you planned or, like me, were you distracted by an idea that continued to assert itself?

Saturday, January 05, 2013

Lazy Saturday Afternoons

Roasted tomatoes, eggplants and garlicAfter racing around running errands earlier today, I returned to a lazy saturday afternoon and evening in the studio. I know crockpots can make for easy meals while you're sewing away ... I am also a fan of sticking veggies in the oven to roast. Today, it was these tomatoes, eggplants and whole cloves of garlic, tossed with olive oil, salt, pepper and red pepper flakes.

My dinner was loosely based on Giada de la Laurentis' Rigatoni with Eggplant Puree.  The roasted veggies were so beautiful and fragrant when they came out of the oven, I almost skipped the puree step.

Zucchini "angelhair"I didn't have any pasta in the house, so I sliced up a couple of small zucchini into faux angel hair using the newest tool in my kitchen arsenal, the spiralizer.


I warmed up the zucchini with some of the sauce in a couple minutes.  I realized after the fact that I forgot the parmesan cheese in the recipe and didn't miss it ...

After a bowl of roasted veggie goodness with a glass of chardonnay,  I'm ready to return to the design wall and my Saturday night sew-in.


Tonight I'm working on my January pick for Melissa and Shannon's Lovely Year of Finishes, this table topper made from a couple of last year's lotto blocks from April and December.

April + December

If only we'd made those Hot-Crossed 9-Patch blocks in May, then this combination could have been a May-December Romance ...

Thursday, January 03, 2013

Block Lotto 2013

Block Lotto 2013 is off to a great start–more than 100 January blocks have already been made an posted ... but I realized this afternoon I haven't said anything about it here.  Oops :-)

This year we'll be making rectangular blocks which measure 6-inch by 9-inch (finished size when they're sewn into a quilt). 

Our January block is this Tall Shoo Fly variation,  in colors inspired by my Holiday Lane pillow project: tomato RED, LIME green and BLACK & WHITE.  There's a link to the print-friendly directions from my Freebies page (click the block name there.) The blocks on the right are my contribution for January.

As always, I hope I that I've made choices that will appeal, that many lotto blocks will be made and entered in the drawing each month and that beautiful quilts will be made by the winners.   But it also makes me happy when quilters follow along and use them for their own projects and I love to see photos when they do. 

(I confess that I'm less than happy when quilters steal them and use them for commercial projects, but we'll leave that topic for another day.) 

This year, there will also be a little bit of discussion about the ways we can STRETCH some well-known blocks to create these stretched variations. 

The blocks this year can all be made from two colors (though we may not necessarily make them that way for the block lotto).  My plan is to make a very scrappy two-color sampler from this years blocks ... and if you'd like to play along, I'd love to hear about it.  

If you are thinking of using the Block Lotto 2013 as a BOM, here's a couple more considerations for designing your sampler quilt: 
  • Half the blocks need a Tall orientation to make sense, but the other half will also work as short, wide blocks.  
  • A couple of the blocks would work well as borders. 
A couple of simple layouts I am considering for a 60-inch by 90 inch quilt. The black rectangles represent the lotto blocks.  The black bars at the top and bottom are multiples of those two blocks that I said would work as borders. 


If you counted, you'll see that there's only 9 blocks + 2 blocks in the bars, or 11 blocks.  There will be 12 blocks ... and I will use one as the label on the back of my quilt. 

More information about this month's Lotto block is here: Tomatoes, Limes and Tall Shoo Flies.  Information about how to join the Block Lotto is here: Block Lotto Basics.

Wednesday, January 02, 2013

Working with Words

Here's a sneak peek at my work-in-progress for the In Your Words blog hop that begins on Monday, January 7.

The piecing and appliqué are now complete, but for the sake of the element of surprise, you'll have to come back at the end of next week to see the rest ... which I plan to quilt, bind and embellish in the meantime.

I wasn't sure how well my "twin" quilt would work with the original, from last year's Cotton Robin, especially since I intentionally took the design in a completely different direction. I think they are going to play nicely together.

It's been a while since I made any free style letters--I'd forgotten how much fun they can be.  Want to guess what I'm spelling?


WIP Wednesday at Freshly Pieced


I am linking up to WIP Wednesday over at freshly pieced. Go check out what other people have in progress today. 

Monday, December 24, 2012

Merry Christmas

I don't usually like shopping and generally avoid malls and large retailers at all costs, but there's something about being out and about around the holidays, with all the decorations, music and good will that makes me smile.  

Today, when I returned to my car  in a parking lot, I found it next to a car that seemed to be completely filled with the live pine tree stuffed inside. The smell of pine inside that car must have been intoxicating. The image reminded me of this one–of a larger tree in a smaller car (from Curiosities by Dickens).


The snow has all but melted here, but more is forecast for tonight and I'm hoping for a White Christmas.  As the song says, May your days be merry and bright and may all your Christmases be white. 

Sunday, December 23, 2012

Farolitos, Tamales and Holiday Traditions

A farolito is a small paper lantern–traditionally a candle set in some sand inside a paper bag, but sometimes made of plastic and electric lights.   Outside of Santa Fe and parts of Northern New Mexico, it is also called luminaria. 

They are part of the Christmas tradition around here. Below is my attempt at capturing the effect of the roofs and adobe walls lined with farolitos in Santa Fe.  

Holiday Lights


Here's a photo of farolitos along Canyon Road on the right is from the Chasing Santa Fe blog. The Christmas Eve farolito walk along Canyon Road is another tradition (read more about it here.

One of the pleasant side-effects of living life a bit like a tumbleweed is that wherever you tumble, you are exposed to new traditions and ... you can hang onto the ones you like and make them part of your own tradition. 

I am especially susceptible to the FOOD traditions. 

The Christmas Eve meal along the Mediterranean Sea in the south of France often includes oysters on the half-shell.  My nod to that tradition will be steamed mussels at my house–probably Rachel Ray's Mussels in Mexican Beer

My plan for Christmas day lunch is a local holiday tradition: Tamales.  I'm making these Pork and Red Chile Tamales.

Whether your traditions are new or old, I hope you enjoy a lovely holiday.   

Wednesday, December 19, 2012

Project Mashup–My Twofer Twin Quilt in Progress

It's really just a nice case of synchronicity.

I'd been planning to add words to one of my works-in-project; someone dropped out of the group and there was an opening in the In Your Words Blog Hop.  My design idea and words were a fit for the theme of revealing who you are or more about you and I asked if there was room for one more ...

The commitment (and deadline!) means it's more likely I'll get busy and FINISH it.

The little quilt project was one begun a year ago, when I signed up for Julie's Cotton Robin.  Because the fabric I contributed for my quilt was one of two matching Michael Miller fabric sample headers, I decided to make two centers, send one with one set of the fabrics for the round robin and finish the other myself.

The TWIN idea
The starter fabrics are on the right and  my Twins-Separated-at-Birth star blocks made from that crazy, not quite a stripe fabric at the bottom of the collection of fabrics are below.

The "twins"

And here is the round robin quilt I received, begun with the block on the right and completed by Laurina, Andra and Nan. I blogged about this quilt and the cotton robin last summer here: Revisiting the Cotton Robin.  Julie has a few more spots, if you'd like to play in this medium (small quilts made by 4 quilters, details kept secret until the finished quilts are revealed). You can find details on the Cotton Robin blog.

My Cotton Robin Quilt - Finished

That lovely quilt is a hard act to follow–more than once, I've wished I had finished my own sister quilt before I saw this one, but life, several moves and a couple of job changes got in my way.

Beginning work on the Twin quiltBut I am happy to be finishing it now and am having fun using the twin block and a lot of the same  fabrics to create a very different design.

What I've been up to so far is a bit of hand appliqué.  Sometimes when life hands us lemons, a little handwork is just the sort of meditative activity we need ... to figure out how we're going to make lemonade.

I'm not sure this is working, but it's a start and I am hopeful that I can MAKE it work within the original guidelines of adding two borders.  Come back on Friday, January 11 for my reveal in the In Your Words blog hop to see my finished Separated-at-Birth Twin quilt.

The strip of dot com fabric is an oldie but goodie from my stash, purchased not long after I began quilting.  This is just about all I have left, but it's so perfect for the In Your Words theme that I had to include it.

Remember, if you'd like to participate in the next Cotton Robin, be sure to get in touch with Julie, ASAP.

Let Me Count the Ways ... to make Triangle Squares

The last few times I've put together directions for making a quilt block that has half-square triangles (HST), aka Triangle Squares, as one of it's components, I've left the specifics of how you cut and sew those units up to the quilter.

Today, it occurred to me that it could seem a little bit like a cop out, a bit like quilt as desired.

So  while I was making some new blocks that had triangle squares as a component, I tried making them  a few different ways and thought about the list of ways to make them.  

I can't share the blocks I made for another week or so, but here's my list of ways to make triangle squares. Did I include your go-to method?

One Triangle at a Time


Cut individual triangles by:
  • Cutting a square 7/8-inch larger than finished size and cutting it in half diagonally, or
  • Using a specialty ruler or
  • Using a die-cutting machine. 
Pair triangles together and sew together to form a triangle square.

USE this method when you want unique, scrappy combinations and are comfortable working with bias edges.

One Triangle Square (HST unit) at a Time


  • Cut two squares that are the SAME size as your desired UNIT size


  • Stack the two fabric squares with right sides together

  • Draw a line diagonally from corner to corner on the top square
  • 
Sew ON the drawn line

  • Trim ¼ inch from the seam (on the side you don’t want to keep

  • Sew the small triangles together for a smaller bonus square.


USE this method if you only need one HST unit or if you want to control the direction of stripes and other one-way fabric designs


Two (HST units) at a Time


  • Cut two squares that are 7/8-inch larger than your desired FINISHED size
  • Stack the two fabric squares with right sides together
  • Draw a line diagonally from corner to corner on the top square
  • Sew on each side of the drawn line, ¼-inch away from the line
  • Cut on the line to create two HST units. 

USE this method if you want to avoid techniques that require cutting/sewing bias edges.

VARIATION

Instead of drawing the line first, cut the stacked fabrics diagonally from corner to corner and sew the triangle pairs together.

USE this method if you like to use a ¼-inch foot with an edge guide and are comfortable sewing bias edges


Four Triangle Squares (HST units) from Two Large Squares


  • Calculate the size of large squares by dividing your desired UNIT size by .64 and round up to something measurable.  For example, if you want a 2” finished size triangle square, take 2.5 (the unit size) and divide by .64 for 3.9 inches, which I rounded up to cut two 4-inch squares. 
  • Stack the two fabric squares with right sides together
  • Sew around the outside edges of the square
  • Cut diagonally  from corner to corner in both directions to create 4 units
  • Press and square up to the correct size.
WARNING: This method results in HST units with bias on all sides.  USE this method ONLY if you are VERY comfortable working with bias edges.

Using Printed Foundations to Make Triangle Squares


Printed Foundations for making HST units are available commercially as strips  or sheets from several sources and are also available as free downloads.  This example, for 2-inch (finished size) units, came from here.
  • Cut the sheet to a size appropriate for the number of triangle squares 
  • Cut two pieces of fabric to the same size as your paper foundation
  • Use a smaller stitch length and stich through the stack of foundation and fabric
  • Cut along all solid lines to create HST units.  
USE this method if you need to make MANY matching HST units  beginning with large pieces of fabric or if you are working  with pre-cut strips.  See the Thangles website to see how this technique works with their strip-based product.

Making Many HST Units from Bias Strips


Create a striped fabric square from bias strips cut as wide as your desired UNIT size, alternating your two fabrics, then starting at one corner, cut  HST unit squares. 

USE this method if you need to make MANY HST units from two fabrics, are comfortable working with bias edges and don’t like removing paper foundations. 

I haven’t yet tried this method, but found a good tutorial on Lois Arnold’s blog, here.

Download a print-friendly copy of this info (with more in-progress photos) here:

Sophie's Tips for Making Half-Square Triangles

Sunday, December 16, 2012

Playing with the Left Overs

Leftover Bonus TrianglesI needed a play break on Sunday afternoon and so I put any and all work I felt I should be working on aside and decided to play with the small triangle squares left over from my Holiday Lane pillow.

Although I probably wouldn't have paired the red, green and/or white fabrics with the white on black star print, since I had these squares, I decided to follow this path and see where it led.

Before I show you what I did, I wanted to share the pillow in it's current state ... yes, Grace has claimed it as her own.

Grace Enjoys the Holiday Lane pillow

I trimmed those half-square triangle units to 1 1/2-inch squares and added some 1 1/2-inch squares and 1 1/2 by 2 1/2-inch rectangles to form a 3-inch by 4-inch (finished size) shoo fly block.

First trial block using triangles Tall Churn Dash

Happy with these proportions, I made some more, using up the left-over triangle squares and cutting up fabrics for two more blocks, for a nice round number of nine blocks.


9 Churn Dash Blocks 

I added skinny 1/2-inch sashing and a couple of borders and now have a pieced quilt top of doll-sized-proportions of 18 by 24-inches, ready to be quilted and hung.  I'm calling it Starry Skies and Shoo Flies.   I still think that if I'd purposely chosen fabrics for this quilt, I wouldn't have used the star print for the background–it doesn't feel like me, but it's OK and it was fun to play in the studio and just go with the flow and not think a lot about it. 

  Starry Skies and Churn Dashes Doll Quilt

Although this project is off the design wall and onto the studio floor (for photography purposes, after it proved too windy to take a photo outside), I'm linking up with Judy's Design Wall Monday.

Tuesday, December 11, 2012

I have no one but myself to blame ...

After looking at some photos I took of our first snow around my neighborhood yesterday, I have one of those insidious songs stuck in my heard.

Here's one of the photos.


And here's the song.


Of course, around here,  there's not a pink one, nor a blue one, nor a green one, nor a yellow one, and they're all made out of faux-adobe and they really do all look the same :-) 

Monday, December 03, 2012

Silver Linings and the Last Lotto Blocks of 2012

Star-Crossed BlockI finally caught the bug that's been going around the office, came home Friday feeling horrible, and headed straight to bed.

As pretty much all I wanted to do was sleep, my weekend plans changed dramatically ... and I pushed off holiday decorating for a week.

But my low-energy state was perfect for spending time in the studio. Though I mostly hung out with the cats on the chaise and watched holiday movies,  I also made some Star-Crossed blocks for the December Block Lotto.


Star-Crossed Block Pattern CoverWe're making completely scrappy blocks in three fabrics of the quilter's choice. Mine were made from a combination of fabrics that I'd recently pulled out for other projects and some larger scrap (you need about a 10" square to make the star points or the background.

I also had time to finish up the directions for making the block.  The blocks on the cover were made by Maree, Toni and me.

You can download a copy (PDF format) of the directions here: Star-Crossed Block.

I think this block has lots of possibilities–whether you go scrappy or use a defined 3-color combination.  I also think it will place nicely with other blocks.  I think a 2 block quilt made from this block and the Hot-Crossed 9-patch could be interesting.

I also finished a project ... but wanted to put it through the washer and dryer for some crinkly goodness before I photographed it.  Stay tuned ... and in the meantime, check out what other quilters have going in the links at the bottom of Judy's Design Wall Monday.

Saturday, December 01, 2012

Room with a View

From my bed, I can look through the glass in the door that goes out to the deck and watch the sun rise over the mountains.  Many mornings, I wake up early and linger in bed waiting for it.

Lately I've tried to capture what I see with my camera ... I continue to be awed by the skies, the clouds, the mountains.  I have taken more than a few photos.  Here is one, taken from the deck earlier this week.
Related Posts Plugin for WordPress, Blogger...