Friday, May 17, 2013

Bloggers Quilt Festival :: Spring 2013 :: Wall Hanging

Finished and HungIf you arrived at this post by way of Amy's Bloggers' Quilt Festival, welcome to my blog, Sophie Junction, and for considering my wall hanging, Cocka-Doodle-Tea Towel, for your vote. While you're here, be sure to click over to the Freebies tab and check out the free quilt block patterns, project ideas and tip sheets for quilters.

If you are a follower, you know that I blogged about this project exhaustively in March when I was putting it together for the Tea Towel Challenge. Thanks for putting up with me as I blog about it one more time :-)

I wasn't sure which quilts to share for the festival, but after a discussion about this morning in my kitchen with a fine artist who teaches color theory (also the owner of the company repairing the ceiling just out of view in this photo), and her praise, I knew it was the one.


Cock-a-Doodle-Tea Towel

Quilting on the Singer 301
Here's the basics: 
  • The quilt measures 40 x 56 inches and is an original design.
  • This quilt was begun and finished in March, 2013. 
  • It is made from a tea towel, vintage damask tablecloth and fabrics from my stash, including some made fabrics, pieced from crumbs.
  • The techniques I used include machine piecing--including improvisational pieced words, foundation pieced sun and traditional 4-patch and triangle squares–hand appliqué, and machine quilting. 
I challenged myself to use only fabrics from stash and to quilt it on my vintage singer 301. It's the first quilt I have tried to quilt quilted on this little workhorse.  I have since free motion quilted two more (larger) quilts on this machine.  I think I'm actually getting the hang of it and improving with each quilt ...  here are some detail photos of the quilt and the quilting. Click the links in the key below the photo mosaic to see the original photos on Flickr.

Tea Towel Quilt Details Mosaic


1. Detail - Cone Flowers, 2. Details - Checkerboard border and Sunflower section, 3. Detail - Sun and Checkerboard sky, 4. Detail - words and triangle sections, 5. Detail - Sunflowers, 6. Detail - Thread Painted Butterfly, 7. Detail - Fill patterns, 8. Detail - Quilted Rooster, 9. Ivan Bartlett design (tea towel)

Thursday, May 16, 2013

Moving Furniture and English Paper Piecing

Ceiling RepairI didn't discover the leak in the upstairs bathroom last month until water came spilling through the downstairs ceiling and onto a piece of antique furniture, creating a lot of damage in its path.

This morning, I was up early and moving all the furniture in the dining/living area to the far end of the room before the repair people arrived to scrape and tape and screw and plaster and paint my "pregnant" ceiling back to normal.

When a test of the matching paint didn't match, the decision was made to repaint the entire ceiling.  Tomorrow morning, I'll be up early again and moving as much of the furniture as I can past the construction mess,  through the kitchen and into the studio to make it as quick and easy for the painter to finish.

While they worked today, I sat in the corner, watched and learned, and made some progress stitching blue diamonds on the star flower tea cozy project.

Almost Ready

Eight more diamonds and I'll be ready to quilt it and turn it into a tea cozy.

I"m sharing my progress on Hexie Friday.

Tuesday, May 14, 2013

If I Had Done the Math ...

If I had thought about into just how many squares I would be quilting essentially the same little flower-fill ... maybe I would have opted for some nice overall design.  The answer  is that in my 25 checkerboard-style 16-patch blocks, half of the squares–200 of them–are cream. Surrounding them are 84 cream triangles in the triangle squares in which I also planned dense free-motion quilting.  What was I thinking :-)

49 squares to go ...

If you find it a little boring to see what looks to be essentially the same in-progress photos ... imagine how I feel. No wonder I am so easily distracted by english paper piecing and my little star flower tea cozy project.

 I have resisted doing an actual count of how many completed/left to quilt until this morning: 151 cream squares quilted, 49 to go.  After all these flower shapes, I'm thinking about something leaf-inspired for the triangle border.

This will be my mid-month check-in for a Lovely Year of Finishes and for Esther's WOW (WIPS on Wednesday) Link list and for WIP Wednesday on Freshly Pieced ...  I promise no more boringly similar photos of this project until I finish the squares and am, at least, quilting the triangle border :-)

Monday, May 13, 2013

Fill In the Blanks ___________

Filling In the BackgroundSunday night is almost always TV night chez Sophie. Last night I started putting my starflowers into a scrappy dark blue background made of hexagon and diamond shapes.

Instead of adding partial star flowers, I decided to use more blue and diamond shapes instead.

I will continue adding scrappy blue diamonds until the pieces cover the paper pattern I created for a cozy for my tea pot.

Here's where I stopped last night–with quite a few blank spots to fill.

Tea Cozy Progress

These small pieces–each is smaller than 14 inches square–make it easy to use any available space as a design wall.  Even so, last night, I found myself thinking it would be nice to have a small pin board in the den next to where I sit and stitch to put these small pieces on the wall while I was thinking about the orientation of the star flowers and which blues to add where.  I think working on a design wall spoils you ... or, at least, it has me.

Speaking of design walls (or the lack there of), I'm joining the linky list on Judy's Design Wall Monday.

I'm also joining the monthly linky for EPP, Sarah's Help for Hexie-aholics.

Saturday, May 11, 2013

Picnic Quilt Update

Still QuiltingLot of quilting done ... still lots of quilting to go.

I'm pushing on and fighting my new found hexie fever. The new rule around here is no hexies before dark :-)

I'm glad I got an early start on this month's lovely project, because at times the number of safety pins in the yet unquilted squares seems infinite ... I'm motivated to finish because I really am looking forward to seeing the alternating minimally quilted and very quilted squares in this quilt after it's been washed and dried.

Do you choose quilting designs based on how they look in 2-dimensions or in their inevitable 3-D crinkled and cozy state?

My Plan for the Star Flowers

Here's my plan for a small project for the English paper pieced Star Flowers - a tea cozy for my everyday tea pot. 

The Plan

If you're paying attention, you might notice that I put together three more little star flowers last night for the other side.  I wonder how long this Hexie Fever will last?  While I was stitching, I wondered how long it would take to make 500 flowers–my wild guess at how many I'd need for a large bed quilt. 

LittleDaisyBlockI also noticed how similar these sweet little blocks are to the little Daisy blocks I pieced on the machine in January, the only different being one was six points and the other eight.  Isn't it interesting how we are attracted to variations of the same shapes and motifs over and over again?

For the curious, the pattern for my tea cozy started with measuring the height and width of the pot, adding some allowance for batting, quilting, shrinking and cutting two squares of newsprint.

Making the PatternI added some curves at the top to follow the shape of the bamboo handle, then pinned the two sheets together for a quick fit check.

Next up: adding hexagons to fill and extend the background ... but first, I need to ignore the siren's call to sit and stitch hexies and make some progress on the free motion quilting in those checkerboard spaces.

Onward!

Friday, May 10, 2013

And Then There Were Three ...

They're Multiplying!OK.  I admit it.  I am beginning to understand the addictive quality of English Paper Piecing and all those hexie projects I see in blogland.

By the time I had finished stitching the third star flower, I was already thinking about how I was going to go through my scrap bins and cut up all the smaller pieces of fabric into petals and hexie shapes to make a much larger project ... I have wanted to find a project to use up the too-small-for-most-project scraps in there. Maybe this is it.

When I uploaded the photo of the first flower to Flickr yesterday, within minutes, Amy was asking for a peek at the back.  

I'm sure there are neater ways to do it, but here's a look at the insides of my blocks.   Please remember this is my FIRST adventure in English Paper Piecing and don't judge my sloppy first efforts too harshly ... I'm sure I'll get better/neater with practice ;-)  

Templates and FabricI printed Regina's template sheets on card stock and used a rotary cutter and ruler to cut them out. I punched a pair of holes near the center. Using one of the paper templates as a guide and an add-a-quarter ruler, I stacked the fabrics and rotary cut them with a 1/4 inch allowance around the template.

As you might guess, I cut and prepared everything for only one star flower at a time–it's just the way my design mind works, focusing on the elements of one flower/block/section at a time. But, I think this isn't the way I've seen most hexie/EPP projects progress and I need to figure out if I can shift to a way of cutting everything (or at least hundreds) of units, preparing them and having them ready to assemble. It's that kind of preparatory step that often slows/stops progress for me.  I'm focusing on that personal challenge this month and I think the blogiverse sent me this prize of an EPP project as a way to overcome it ... or at least make some strides in that direction.

Pinned Hexie with Fabric AttachedHere is what my hexie center looked like after I attached the fabric. I deviated from Regina's directions a bit, but using the heavier card stock and not stitching through the paper.

I simply tacked the fabric at the corners and skipped to the next corner.

You can see how I pinned the fabric in place by going through my two punched holes.  It distorts the shape less and the pin is just going through fabric, not paper/card stock.

And here is the finished star flower, from the  back.

Star Flower - Front and Back

In theory it seems that once the surrounding pieces are sewn in place, I should be able to clip the basting/tacking stitches, remove the paper templates, and reuse them. 

This weekend on the Block Lotto's Weekend Update, I asked quilters to share their process.  I have found when I share mine here, I learn so much from the comments and discussions that follow.  Since I am just beginning my adventure in EPP, I know I have a lot to learn and would love to read your comments, suggestions and tips.   And if you'd like to share a blog post about YOUR process, please jump over to the Block Lotto and join me at the Linky party.

I'm also joining Billie Bee's Hexie Friday.

Thursday, May 09, 2013

Something New - English Paper Piecing

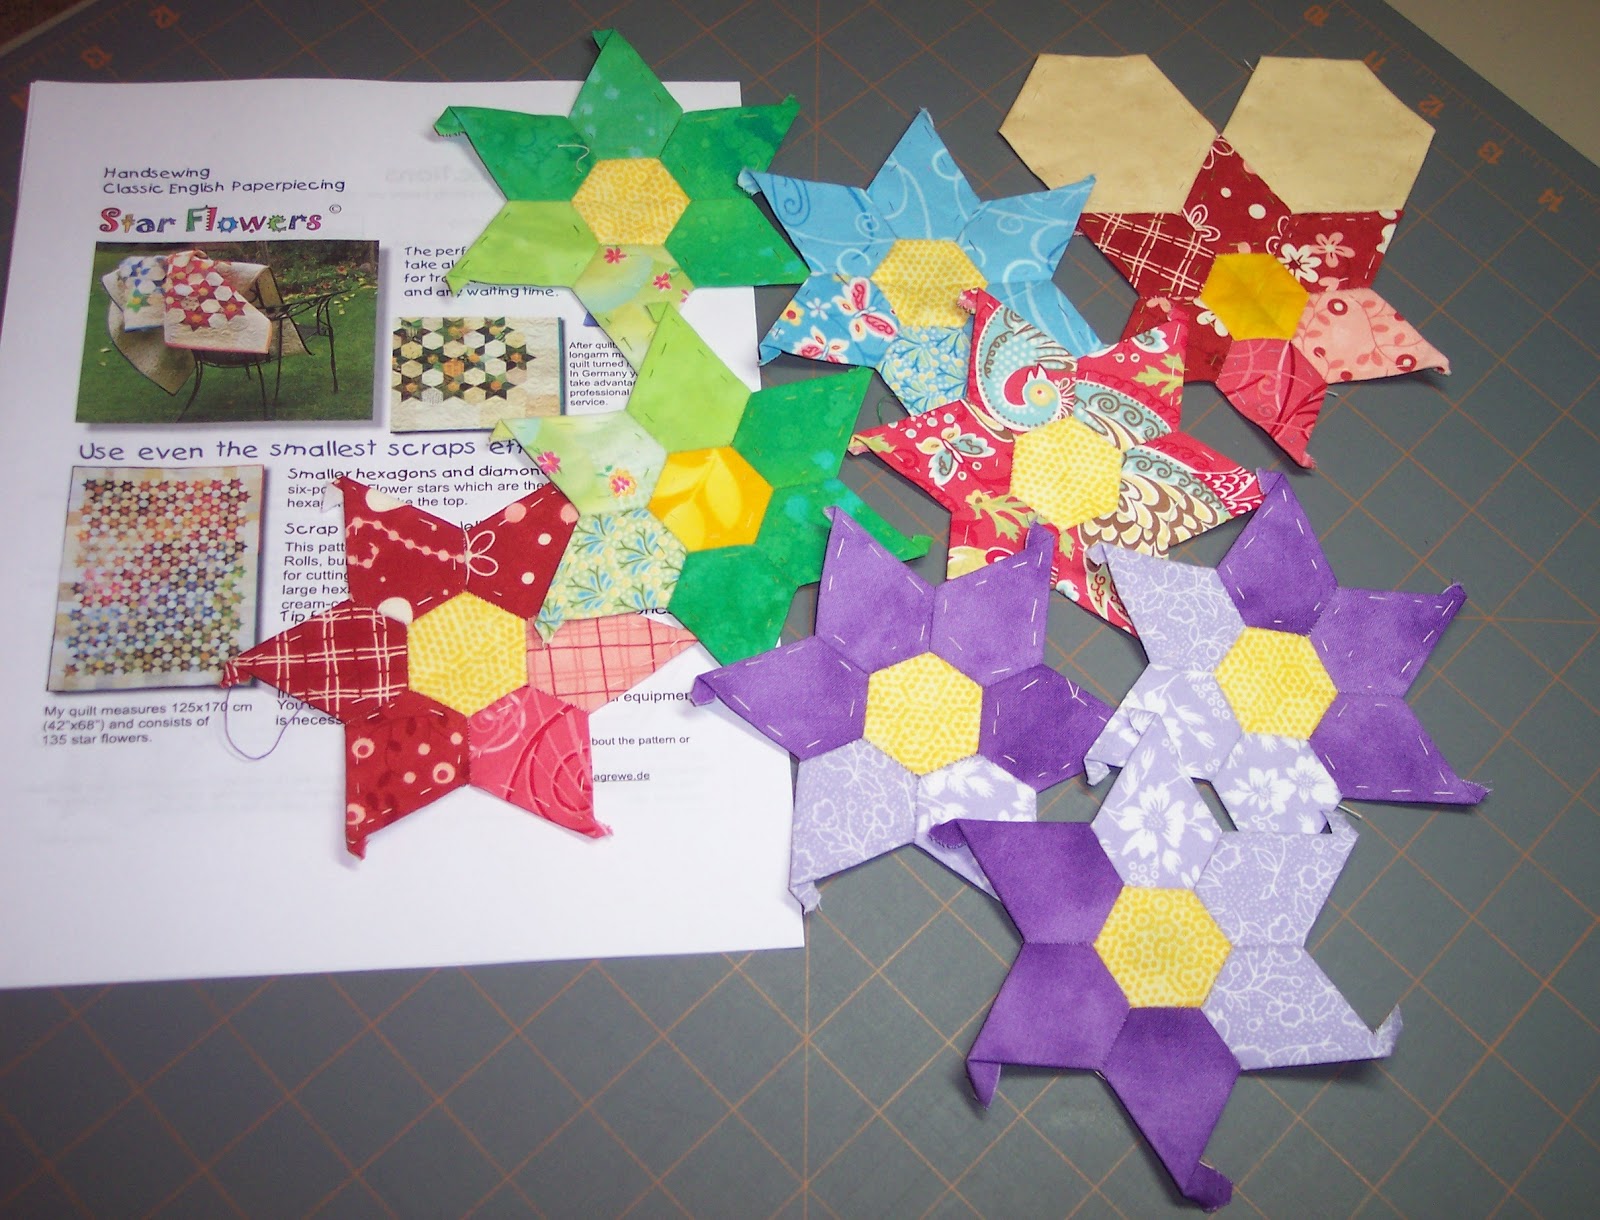
First Star FlowerLast night, I decided to give my prize from BillieBee's Blog a spin.

I printed out the English Paper Piecing templates for Regina Grewe's Star Flower quilt pattern and decided to make just one ... to see how it would go.

My technique varied a bit from the directions–I printed the templates on card stock and didn't sew through the paper when I basted the fabrics onto the shapes. I punched a pair of holes near the center to make it easy to pin them to the fabric

Here's a direct link to the English page where Regina sells the Star Flower pattern and an acrylic template to use to rotary cut fabrics for the petals: Regina's Star Flower

I have a small project in mind which I'll share after I prove to myself that I can actually make enough of the Star Flowers.  It's an interesting bit of serendipity that after I declare my intention to learn to love the necessary preparations for the quilting journey that the blogiverse hands me an opportunity to practice, with a technique that seems to be all about the preparation.

Thanks again, to Bille in Texas and Regina in Germany.


Wednesday, May 08, 2013

Bringing Flowers to the Picnic (Quilt)

The free-motion fun has begun on the picnic #quilt for #aLYoF for MayLast night I finished quilting the X's in the colored squares and started the fun part–free motion quilting doodle-y flowers in the cream squares of the checkerboard picnic quilt.

Although the quilted straight lines stabilized the quilt sandwich and I could have removed the pins, I am leaving them in until I quilt the square to give me a visual indication of how much of the FMQ is done/left to go ... it might also keep me from missing a square as I work my way around the quilt.

My flowers have spiral centers, 5-to-7 petals and echo quilting to fill the square.


Quilting Detail

If you missed my question yesterday asking for color suggestions for the piping I plan to insert in the binding, I'd still love your input.  I've had a couple ideas: a light blue to match the thread I used for the straight quilting and/or a tan, like the tan squares that are sprinkled across the quilt (I included one tan square in each of the 16-patch blocks). 

I'm joining Lee's WIP Wednesday list on Freshly Pieced ... or in my case, today, freshly quilted ;-)

Tuesday, May 07, 2013

Quilting Begins on the Picnic Quilt

Beginning to quiltYesterday I finished the last quilt for the Cotton Robin.  It feels good that I've done all the work and now I just have to wait for my own quilt to come home to me.

I have a couple small projects that I want to work on this month, but first, I want to finish the checkerboard picnic quilt which is my choice for a lovely finish in May.

I decided today to use the Instagram account I set up over a year ago to capture my progress.  If you'd like to follow along, you can find me here or by searching for the hashtag #aLYoF for all the images tagged for a Lovely Year of Finishes.

I thought it would be a fun way for me to get into the Instagram habit.

You might have noticed in my photos of basting this quilt, that I placed the pins in the light squares ... to make it easy to quilt simple X's in the colored ones. I used the walking foot for this part. I didn't mark the diagonal line and it's not perfect ... but it is mostly close enough.  It was interesting as I stitched to observe how the light blue thread seems to change color against the different colored squares–to my eye, the closer the fabric is to blue's complement orange, the grayer the thread color seems to me.

My plan is to lightly quilt the colored squares and to add a more dense free motion fill pattern in the cream-colored squares.

The piped binding I added to the cotton robin quilt is still in my head.  I may add piping to the picnic quilt.  If I add a dark binding (like the outside triangles), what color do you think the piping should be?

Here's the photo of the whole quilt for reference:

Checkerboard with Sawtooth Border

As soon as I typed the question, MY answer popped into my head ... can't wait to see if anyone suggests the same color.

Since it's already Wednesday in Australia, I'm linking to Esther's WOW link list. (WOW = WIPS on Wednesday)

Monday, May 06, 2013

Learning to Love ... Basting a Quilt

Tools of the TradeA few days ago, I posted that I was going to focus on learning to love the preparation phases of quilting that tend to slow me down or, when I resist them completely, stop working on one project and picking up something easier/more fun.  One of those potentially project-stopping preparation processes is layering and basting a quilt.

I think, for me, there are two aspects to consider: attitude and technique.

Attitude

In terms of attitude, this weekend I was reminded of one of my favorite little books, Peace is Every Step, by Thich Nhat Hanh. It is about cultivating a mindfulness in everything we do ... and thinking about it made me consider being more mindful in my quilt making and remember that the care we take in each step makes the following one go more smoothly.   Or, at least, that's what I was telling myself as I carefully pressed the checkerboard picnic quilt top and backing before layering and basting the quilt :-)

Technique

When it comes to technique, of course, practice makes perfect ... but technique can also be improved, made more efficient and/or faster, by learning from others.

Basting a quilt is something where I know that I have miles to go to perfect my technique ... and learn to love the process.  I'd love your comments on how I could do it better/faster.

Bad knees and a lack of space make layering and basting on the floor impractical for me, so I use a table like this one, which is approximately 35 by 60 inches. Mine is covered with cutting mat. (Both acquired long ago either on sale or with coupons at JoAnn.)

Preparing to baste Quilt #3 My tools of the trade (above) for securing the quilt sandwich are painters tape for smaller quilts and clamps,  used at the edge of the table, for larger quilts that hang over the edge.

For quilts that are larger than the table top, I center the backing, batting and top on the center of the table.
Clamped to table


Small "bent" safety pins Once the layers are perfectly smooth and clamped to the table to keep it that way, I dump the pins (from their extra large Rx container and start pinning. once the quilt on the surface of the table is basted, I release the clamps, slide the quilt so that another section is on the table, check to make sure everything is flat and smooth and rinse and repeat ... until the entire quilt is basted and ready to be quilted.

Pinned
Sometimes I have help. Johnny–who I wasn't fast enough to capture with the camera–tries to remove the pins, but Grace just wants to roll around on the quilt and play (she also loves to help make the bed, pretty much in the same way.)

Helpful GraceHow do you baste quilts?

Do you have any suggestions for me?

This isn't a design wall post–the Cotton Robin quilt that I'm finishing is on the wall, but cannot be shared for another month or so–but I'm joining Judy's link list for Design Wall Monday because ... with your help, I hope to design a better, more enjoyable process.

Sunday, May 05, 2013

Thinking about Slow Stitch Sunday

Auditioning Thread for Quilt #3I finished the quilting on the Cotton Robin quilt at my house yesterday.  I can't share a photo until it's finished and received by the owner.  This photo shows some of the thread I auditioned and the back of quilt #3.  I ended up using 4 of the 6 thread colors.

Today I plan to add a piped binding and hanging sleeve and stitch it down later, so that it will be ready to be sent home tomorrow.  So, it's a secret project for me for slow stitch Sunday.

 Earlier this week, on BillieBee's Blog, I won a Star Flower pattern.  I don't know why I haven't yet jumped on the hexie bandwagon ... but this variation appeals to me A LOT.  These are Billie's star flowers in progress.   I see a similarly scrappy version as my future slow sunday project.  Thanks, Billie!

But first, I'll be on the hunt for a protractor so I can draw the pattern and make templates for the last of the hand pieced quilt-along blocks.  Hmmm ...  Sunday evening may turn out to be more about pencil and paper and drawing than stitching today, but I hope to wrap up both tasks tonight.

How do you spend your Sunday evenings?

Friday, May 03, 2013

Finding My Way - More about the Scrappy Geese Quilt

The second round of quilting in the borders and another trip through the washer/dryer last night did the trick. My quilt, Finding My Way, no longer has friendly, waving borders.

  Finding My Way - Finished

About the Quilt

Finding My Way - BackIt measured 60 by 80 inches before it was washed and dried; now it is closer to 56 by 75 inches.

90 flying geese units were arranged into trios of geese with light, medium and dark values (relative to one another), ordered light to dark. The individual units were from a block exchange–a great way to collect geese made from 90 different fabrics and almost as many cream sky backgrounds. The thirty trio of geese had 2 inch strips added to each side to create 9 inch (finished size) blocks. The six star blocks added at the top are 8 inches. The the borders was created by sewing 40 two inch width of fabric (WOF) strips together for 60 inches of wide scrappy striped made fabric. After cutting the made fabric for borders and trimming the edge even, I had a 3 inch strip left, which I used in the pieced backing.

Detail from Finding My Way
The free motion quilting (on my old-as-me Singer 301), was designed to create a soft, crinkly texture.  There's a bendy, loopy feather in each of the goose triangles, a soft meander in the sky and loopy squares in alternating directions in the tan sashing strips, continuing around the stars  The border was quilting in the ditch between the strips, with more curving lines with loops added within each strip to better balance with the rest of quilt.

Although this quilt is VERY scrappy, made from more than 200 fabrics,  the design could easily be made from a precut layer cakes, charm squares and jelly rolls ... the idea has caught with me and I'll be looking for the right fabrics to make a bed-size version (maybe with bird blocks instead of the stars).  For more information about how to make the blocks, check out my Tip Sheet for making Flying Geese and my directions for making the Square and Points Star block.

If you love the look of the scrappy geese blocks, we're making them for the block lotto this month–come check it out and join us ... you could win a set of your own.

Here's the quilt in action on the chaise in the studio.  Notice how Johnny Be Good first photo bombs my efforts to take a photo, then claims the quilt and glares in my direction, daring me to just try to budge him from his new quilt.

Ready to Cuddle

Johnny Photo Bombing

Claiming the New Quilt

Johnny Sleeps

Ultimately, he settled in and had a nice long snooze, giving this quilt his kitty seal of approval.

Don't finishes feel great ... even if they aren't exactly on time?  Can I have (another) Whoop for this one?

I'm also linking with Pat Sloan's Show & Tell,  Fresh Sewing Day, FMQ Friday (when Leah's post is up) and Link a Finish Friday.

Thursday, May 02, 2013

April's (Late but Lovely) Finish and May's Goal

More quilting, scrappy bindingI've added more quilting to the border and added the scrappy green binding.

 It wasn't finished in time to "count" as my Lovely Finish for April ... but it essentially done. After I've stitched down the hanging sleeve and added the label, I'll be back with photos of the finished quilt.

For May, my #aLYoF plan for a Lovely Finish is to complete this picnic quilt–made from the scrappy checkerboard blocks that I made and rejected as a border for the scrappy geese.

Checkerboard with Sawtooth Border

The larger goal for May is to learn to embrace the preparation phase of quilt projects.  I notice that I often resist the care and time required for preparation and projects are stalled as a result.  In May I will consciously try to embrace and enjoy those tasks.

Wednesday, May 01, 2013

Ooops

Almost ...As everyone in the Block Lotto community knows, I woke up thinking today was April 31 and then I heard a morning news guy mention the possibility of snow on May 1.    Oops.

My plan for what I thought was the last day of April included dealing with the logistics of the Block Lotto drawing for those popular bird blocks, putting the binding on my scrappy geese quilt for my Lovely Finish for April, and then spend the evening getting everything ready for the May 1 post on the block lotto.

What a different sort of day I had as I scrambled to play catch-up.

Had I realized YESTERDAY what day it was, I would have spent the evening binding this quilt.  Instead, because I didn't think that the stitch-in-the-ditch quilting in the border was enough, I opted to wash and dry it to see what happened and make a decision about adding more quilting.

Quilting DetailI was going for a soft, cozy-crinkly texture and I think I mostly accomplished that ... but I really DO need to add more quilting to the borders before I finish it up and bind it tonight.

I'll be using the green fabrics sitting on the edge of the quilt above for a scrappy dark  green binding.

Since I'm too late to join the Lovely Finishes link list and this quilt is still a work-in-progress for at least one more day, I'll be linking to WIP Wednesday posts on Freshly Pieced and Esther's Blog.  Check them out to see all kinds of progress on projects.

Saturday, April 27, 2013

Look what Pat Made

Bloom where you are plantedRemember my separated-at-birth quilt, Bloom?  

I completed it in January and, as part of a blog hop, created a giveaway of small Lemoyne star-style Little Daisy blocks and some coordinating fabrics for two?

Packages

Pat was one of the winners and yesterday, as part of a pom-pom-themed blog hop, posted photos of what she did with her winnings.  Her scarf-style chatelaine is so fabulous, I just had to share.  I especially love the hand stitching around the little star block. 


Visit Pat's blog, Life in the Scrapatch, to see more photos and details about how she made it and sign up for her giveaway which includes some of my fabric squares, left over from her project, plus more coordinating fabrics from her stash. I wonder if her winner will continue the tradition?


If you like scrappy goodness like Pat and I apparently do, check it out and sign up for the giveaway.  She also has a tutorial for an ice cream cone-shaped pincushion (on the following post) that's pretty adorable. 

And if you want to make your own little Lemoyne star variation for a sewers scarf of your own, you can find the templates for the Little Daisy block on my Freebies page

I am sharing this post as my weekend update on the Block Lotto because I think it's far more interesting  than my plan to layer and baste my scrappy geese quilt after I return from the farmers' market or finish up directions for the May Block Lotto which I can't share until May 1.

Friday, April 26, 2013

The Borders are ON

I probably should have pressed this before grabbing this snap:

Borders on!

The border fabric I made yesterday has been sliced and added to the scrappy geese quilt (with a small strip left-over for the pieced backing.  April's UFO is now two finished tops–this one and the checkerboard picnic quilt–and I'm almost ready for some more free motion quilting.  Although I have made changes in the design along the way, I've always known how I wanted to quilt these geese.  I can't wait to get the back pieced and the quilt layered and basted so I can begin.  Can I get a whoop, whoop?

Thursday, April 25, 2013

Light, Bright, Dull, Dark

Whenever I am putting together scrappy blocks or scrap quilts, I always try to include "light, bright, dull, dark." It isn't catchy, it doesn't rhyme, but it works when putting lots of disparate fabrics together.

More memorable is the phrase, "when life give you scraps, make quilts." Life is beating me up and I needed something easy and meditative to sew this afternoon.  I decided to make the border "fabric" for the scrappy geese quilt.  If sewing was my meditation, my mantra was, "light, bright, dull, dark."

Made Border Fabric

I made 60 inches of made fabric by sewing forty 2-inch width-of-fabric (WOF) strips together. I expected some differences in the WOF measurement, but maybe not quite as much as I found.

Now that I've sewn it all together, it's time to cut it up into borders.  How many times and how ways as quilters do we cut up fabrics only to sew them back together again?

I'm joining Pat Sloan's Show & Tell Linky party today.

Wednesday, April 24, 2013

And now for something a little different ... Plan C

My original idea was to add a scrappy fanciful appliqué tree with a pair of flying birds to the top of the scrappy geese quilt ... and I got as far as enlarging and modifying the inspiration (from a pattern by Patrick Lose) until I decided I didn't like it.

Like many who have commented, since I liked the look of this month's bird blocks for the block lotto walking across the top of the scrappy geese–you can see them on my design wall here–I considered making more for this quilt, but ultimately I decided they looked too contemporary for the old-fashioned scrap quilt feel of the geese. 

Here is Plan C: a row of my go-to blocks, Sawtooth Stars. 

Scrappy Geese with Stars


Strips for bordersI have no idea how geese and other birds navigate, and even though I know it's probably not by using the stars, when I decided to add the stars to this piece, a name for this quilt has popped in my head: Finding My Way Home.

As the original set of squares and rectangles that were cut and put aside for the border have become a quilt of their own–the checkerboard picnic quilt–I've been cutting more.

Will I have a lovely finish in time for the end of the month ... I have no idea. But, even two new quilt tops finished feels like progress.

I'm joining the WIP Wednesday lists on Freshly Pieced and Esther's blog.  Check them out to see what other quilters are up to this week.

Related Posts Plugin for WordPress, Blogger...